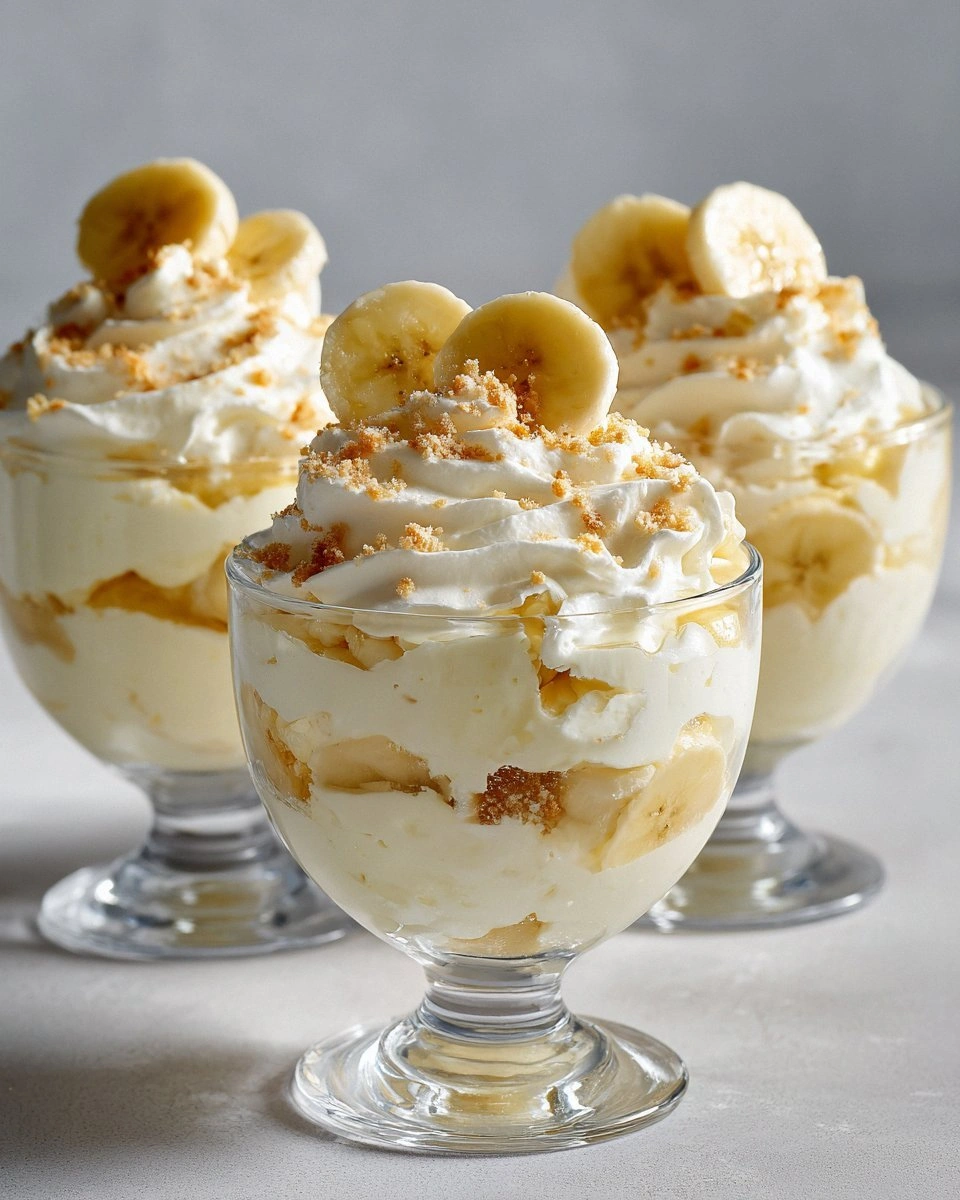
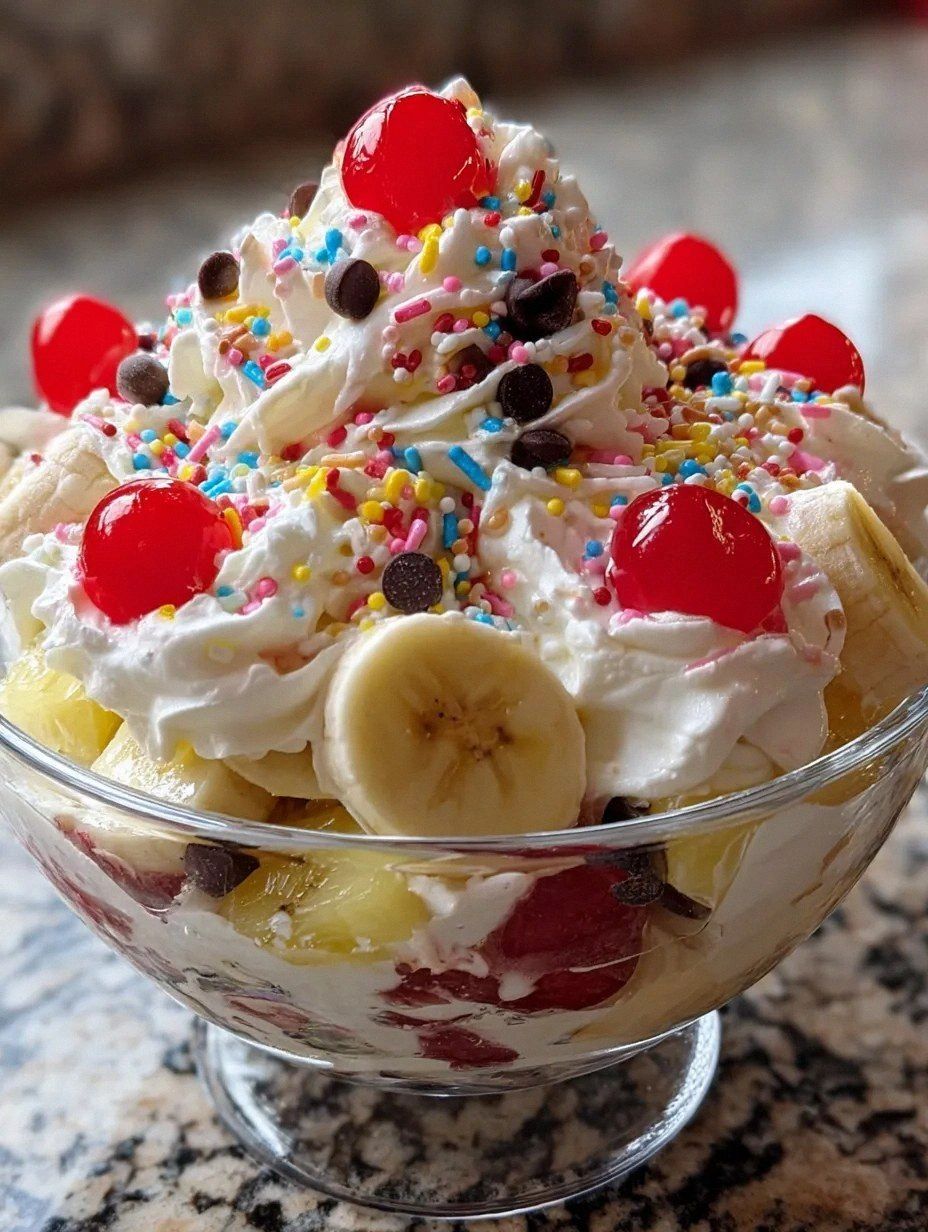
Picture this: a cloud‑light cake base that’s as airy as a summer breeze, layered with ribbons of chocolate and strawberry sauce that swirl together like a sunrise over a tropical beach. The texture is a daring duet of creamy, melt‑in‑your‑mouth ice‑cream pockets and a gentle crunch from toasted walnuts that crackle under your fork like tiny fireworks. When you dig in, the vanilla‑kissed fluff embraces the fruit, the sauce, the whipped topping, and the whole thing sings a chorus of flavors that is simultaneously nostalgic and brand‑new. I dare you to taste this and not go back for seconds – it’s that good.
Most banana split recipes get this completely wrong. They either drown the banana in syrup or serve the ice cream on a soggy wafer. I’ve cracked the code by treating the base as a light, airy “fluff” that soaks up just enough sauce to stay moist without turning mushy. The secret ingredient? A splash of espresso‑infused vanilla that lifts the entire bowl into a realm of sophistication, while still feeling like a playful childhood treat. This is hands down the best version you’ll ever make at home, and I’m about to spill every detail.
Let me walk you through every single step — by the end, you’ll wonder how you ever made it any other way. Okay, ready for the game‑changer? This next part? Pure magic. Stay with me here — this is worth it.
What Makes This Version Stand Out
- Texture: The fluffy cake base feels like a cloud, while the crunchy walnuts add a surprise snap that shatters like thin ice under a spoon.
- Flavor Depth: Espresso‑infused vanilla gives the dish a subtle bitterness that balances the sweet syrups, creating a sophisticated palate.
- Simplicity: Only twelve ingredients, all pantry‑friendly, and you won’t need any fancy gadgets beyond a whisk and a baking sheet.
- Visual Wow: The vibrant ribbons of chocolate and strawberry swirl across the top like an abstract painting, guaranteeing Instagram likes.
- Crowd Reaction: I’ll be honest — I ate half the batch before anyone else got to try it, and the look on my friends’ faces was pure bliss.
- Make‑Ahead Potential: The cake base stores beautifully in the fridge for up to two days, letting you assemble the sundae bowl in minutes when guests arrive.
- Ingredient Quality: Using ripe, caramel‑brown bananas and high‑quality chocolate syrup transforms an ordinary dessert into a celebration.
- Versatility: Swap the sauces, change the nuts, or add a splash of liqueur – this bowl adapts to any flavor mood you’re in.
Inside the Ingredient List
The Flavor Base
All‑purpose flour is the backbone of any good cake, providing structure while still allowing the batter to rise into that coveted cloud‑like fluff. I use a fine sifted flour; it ensures no lumps, which means an even rise and a silky mouthfeel. If you skip the sifting, you’ll end up with a denser texture that feels more like a muffin than a sundae bowl. For a gluten‑free twist, swap the flour for a 1‑to‑1 gluten‑free blend, but add a tablespoon of xanthan gum to retain elasticity.
Granulated sugar not only sweetens but also contributes to the tender crumb by breaking down gluten strands during mixing. Using raw cane sugar adds a subtle caramel note that deepens the overall flavor profile. If you’re watching sugar, you can replace half with coconut sugar; the flavor will shift slightly toward a buttery caramel, which actually pairs beautifully with the banana.
The Texture Crew
Baking powder and baking soda are the leavening duo that makes the cake rise like a balloon at a fair. The soda reacts with the acidity in the mashed bananas, creating tiny air pockets that give the fluff its signature lightness. If you forget the soda, the cake will still rise, but it will lack that signature “pop‑pop” sensation when you bite into it.
Unsalted butter, melted and cooled, coats the flour particles, preventing excessive gluten formation and ensuring a tender crumb. The butter also adds a rich, buttery aroma that makes the kitchen smell like a bakery on a Sunday morning. For a dairy‑free version, substitute with a high‑quality coconut oil; the coconut flavor will complement the banana nicely.
The Unexpected Star
A splash of espresso‑infused vanilla extract is the secret weapon that elevates this dessert from “sweet” to “sophisticated.” The espresso’s bitterness cuts through the sugar, while the vanilla adds warmth, creating a balanced flavor orchestra. If you’re not a coffee fan, swap the espresso for a teaspoon of dark rum; the alcohol will evaporate during baking, leaving a fragrant depth.
Ripe bananas are the heart of the dish. Their natural sweetness reduces the need for extra sugar, and their moisture keeps the cake tender. Choose bananas that are heavily speckled and almost brown – they’re sweeter and more aromatic. If bananas are out of season, try mashed mango for a tropical twist, but expect a slightly different texture.
The Final Flourish
Chocolate syrup and strawberry sauce are the colorful ribbons that give the bowl its iconic look. Use a high‑quality, low‑sugar chocolate syrup to avoid a cloying aftertaste; the darker the cocoa, the richer the flavor. The strawberry sauce should be made from fresh strawberries, a splash of lemon juice, and a whisper of honey – this brightens the bowl and cuts through the richness.
Toasted walnuts add a buttery crunch that contrasts the silky fluff, while a generous dollop of freshly whipped cream crowns the creation like a cloud. Finally, maraschino cherries provide that classic banana split finishing touch, adding a pop of tartness that balances the sweetness. Everything's prepped? Good. Let’s get into the real action...
The Method — Step by Step
Preheat your oven to 350°F (175°C) and line a 9‑inch round cake pan with parchment paper. The heat should be steady, not a hot blast, so the cake bakes evenly. While the oven warms, whisk together the flour, sugar, baking powder, baking soda, and salt in a large bowl. This dry mix is the canvas for our fluffy masterpiece.
In a separate bowl, combine the melted butter, eggs, vanilla‑espresso extract, and mashed bananas. The bananas should be mashed just until smooth; a few small lumps add texture. When you whisk these wet ingredients together, you’ll notice a faint, buttery aroma that signals you’re on the right track. Tip: Use a silicone spatula to scrape every last bit of butter from the bowl – those golden flecks are flavor gold.
Pour the wet mixture into the dry ingredients and fold gently with a rubber spatula. The goal is to incorporate everything without over‑mixing – you’ll see streaks of flour that disappear in seconds. Over‑mixing creates gluten, which will make the cake dense and ruin the fluff. The batter should look glossy and slightly thick, like a luxurious mousse.
Transfer the batter into the prepared pan, smoothing the top with an offset spatula. Now, here’s the trickiest part: before you slide the pan into the oven, drizzle half of the chocolate syrup in a zig‑zag pattern across the surface, then swirl it with a toothpick. This creates marbled pockets that will melt into the cake as it bakes.
Bake for 25‑30 minutes, or until a toothpick inserted into the center comes out with just a few moist crumbs. The edges will start pulling away from the pan, and the top will have a faint golden hue that smells like a bakery on a Sunday morning. When you pull the cake out, let it cool in the pan for 10 minutes before transferring to a wire rack – this prevents it from breaking apart.
Once the cake is completely cool, slice it into generous wedges that will serve as the “bowl” base. Place a wedge on a wide plate, then scoop a generous dollop of softened vanilla ice cream into the center, letting it melt slightly into the cake’s crevices. Drizzle the strawberry sauce over the ice cream, letting it cascade down the sides like a sunrise.
Top with a cloud of freshly whipped cream, scatter toasted walnuts, and finish with maraschino cherries arranged like tiny jewels. The final look should be a riot of colors and textures that invites you to dig in immediately. And now the fun part: grab a spoon, take a bite, and let the flavors explode – that sizzle when the warm cake meets cold ice cream? Absolute perfection.
That's it — you did it. But hold on, I've got a few more tricks that'll take this to another level. Ready to become the undisputed sundae bowl champion?
Insider Tricks for Flawless Results
The Temperature Rule Nobody Follows
Never bake a cake from a cold batter. Let your batter sit at room temperature for five minutes before sliding it into the oven. The slight warmth ensures the leavening agents activate uniformly, giving you that even rise. I once tried a chilled batter and ended up with a sunken center – lesson learned.
Why Your Nose Knows Best
Your sense of smell is the ultimate timer. When the cake is about 20 minutes in, the kitchen will fill with a buttery, caramel‑nutty aroma that signals it’s almost done. If you can smell that faint hint of toasted walnut, you’re on the right track. Trust your nose more than a clock.
The 5‑Minute Rest That Changes Everything
After baking, let the cake rest for exactly five minutes before moving it. This short pause lets the steam redistribute, preventing the crumb from becoming gummy. A friend tried to rush this step and ended up with a soggy base that fell apart under the ice cream.
The Secret Whisk Technique
When whisking the wet ingredients, use a “figure‑eight” motion rather than circular. This creates tiny air bubbles that later expand during baking, adding to the fluffiness. It feels a bit theatrical, but the results are undeniable.
The Final Glaze Finish
Before serving, warm the chocolate glaze just enough so it becomes pourable but not runny. Drizzle it in a slow, steady stream over the whipped cream; this creates a glossy finish that looks restaurant‑grade. Pro tip: A tiny pinch of sea salt on the glaze adds a sophisticated contrast.
Creative Twists and Variations
This recipe is a playground. Here are some of my favorite ways to switch things up:
Tropical Breeze
Swap the chocolate syrup for a mango coulis, add toasted coconut flakes, and replace walnuts with macadamia nuts. The result is a sun‑kissed bowl that transports you to a beachside cabana.
Mocha Madness
Add a tablespoon of instant coffee granules to the batter and drizzle a mocha ganache instead of chocolate syrup. Coffee lovers will adore the deep, bitter‑sweet harmony.
Berry Explosion
Incorporate fresh mixed berries (blueberries, raspberries, blackberries) into the strawberry sauce, and garnish with a handful of berry‑filled chocolate chips. The burst of tartness cuts through the sweet base beautifully.
Nut‑Free Delight
Leave out the walnuts and use toasted pumpkin seeds for crunch. This version is perfect for those with nut allergies while still delivering that satisfying snap.
Adult Only
Add a splash of dark rum to the banana mash and a drizzle of bourbon‑infused chocolate glaze. Serve with a side of espresso‑soaked ladyfingers for an indulgent after‑dinner treat.
Storing and Bringing It Back to Life
Fridge Storage
Place any leftover cake slices in an airtight container with a damp paper towel on top to maintain moisture. The cake will stay fresh for up to three days, and you can re‑assemble a quick sundae bowl by adding fresh ice cream and sauces.
Freezer Friendly
Wrap individual cake wedges tightly in plastic wrap, then place them in a freezer bag. They freeze solid for up to two months. When you’re ready to enjoy, thaw overnight in the fridge, then add your toppings.
Best Reheating Method
To revive a frozen wedge, preheat a skillet over low heat, add a splash of water, and cover with a lid. The steam will bring the cake back to a soft, fluffy texture in just a few minutes, ready for a fresh scoop of ice cream.