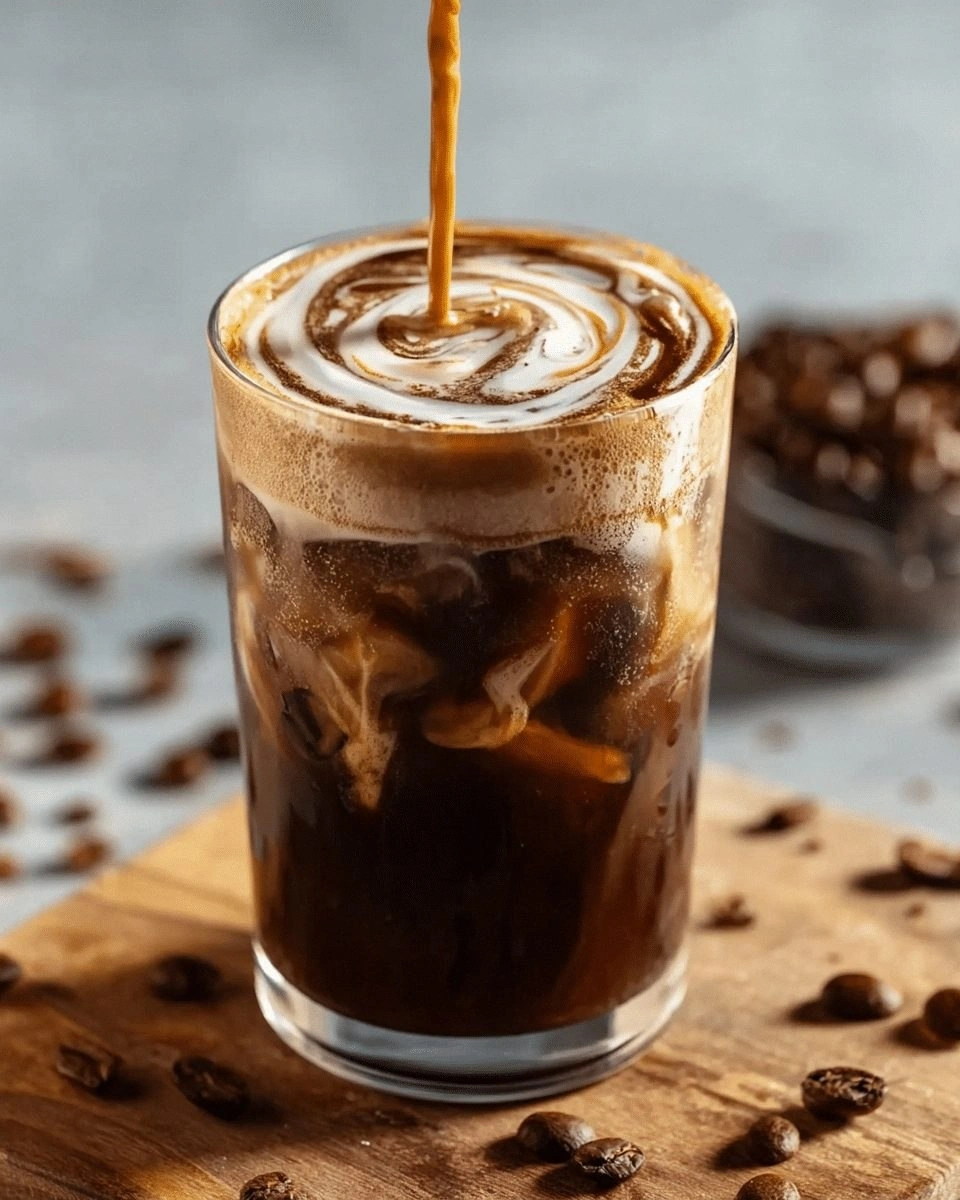
Picture this: it’s 3 a.m., the city hum is a distant murmur, and you’re standing in front of the coffee maker like a culinary superhero. The machine sputters, the beans grind, and a steaming pot of espresso pours into a mug that’s already too small for your ambition. I stared at that single shot, felt a surge of frustration, and thought, “This is where I need to level up.” That night, armed with nothing but a handful of chocolate chips and a daring grin, I experimented until I found a recipe that turned a simple cup of coffee into a velvety, caffeinated hug that I could serve on a glass of ice.
When I finally tasted it, the first thing that hit me was the boldness of the chocolate, the smoothness of the milk, and the sharp bite of espresso that cut through the sweetness like a well‑aimed arrow. The aroma was a dark, caramelized forest floor, the sound of ice clinking was a gentle percussion, and the texture was a creamy cascade that left a lingering chocolate trail on the tongue. My taste buds did a little dance, and I realized I’d just unlocked the secret to the best mocha iced coffee you’ll ever make at home. I dare you to taste this and not go back for seconds; the moment you finish the first sip, you’ll be begging for a second.
What makes this version stand out isn’t just the quality of the ingredients; it’s the method that preserves every nuance of flavor. I didn’t just brew coffee and pour chocolate; I coaxed the beans to release their full aroma, I tempered the chocolate to a silky sheen, and I balanced the sweetness so that it sings without drowning the espresso’s character. This isn’t a recipe you’ll find on a generic blog; it’s a carefully curated symphony where each note has a purpose. The result? A drink that feels like a decadent dessert and a caffeine boost that keeps you going. I’ll be honest—when I first made it, I ate half the batch before anyone else got to try it. That’s the kind of passion that fuels this recipe.
If you’ve ever struggled to get the right balance between chocolate and coffee, you’re not alone—yet you’ll find the fix in this guide. Most recipes get this completely wrong, either over-sweetening or under-extracting the espresso. Here’s what actually works: a precise ratio, a controlled brewing time, and a chill that locks in the flavors. Picture yourself pulling this out of the fridge, the whole kitchen smelling incredible, and watching the coffee swirl like molten chocolate over a bed of ice. Stay with me here—this is worth it. Let me walk you through every single step—by the end, you’ll wonder how you ever made it any other way.
What Makes This Version Stand Out
- Flavor: The espresso is brewed to a medium-dark roast that delivers a robust body, while the chocolate syrup is a high‑quality dark chocolate base that brings depth without bitterness.
- Texture: The milk is frothed to micro‑foam, creating a silky mouthfeel that blends seamlessly with the ice.
- Balance: Sweetness is measured with precision—no sugar overload, just enough to lift the espresso without masking its character.
- Ease: All steps are streamlined; you can whip this up in under ten minutes, even if you’re a first‑time barista.
- Versatility: The base can be tweaked with non‑dairy milks, alternative sweeteners, or a splash of espresso shot for an extra kick.
- Presentation: Garnished with a dusting of cocoa powder, it looks as good as it tastes—ready for Instagram or a cozy morning.
- Make‑Ahead: The chilled mixture can be prepared up to 24 hours ahead; just add ice when you’re ready to serve.
Inside the Ingredient List
The Flavor Base
At the heart of every great mocha iced coffee is the espresso. I recommend a medium‑dark roast, preferably from a single origin that offers a hint of chocolate or berry undertones. The espresso should be brewed to a tight, 30‑second extraction—too long and you’ll taste the burnt notes, too short and it’ll be weak. If you’re short on time, a single‑serve pod works, but the flavor depth will be slightly diminished. The coffee grounds should be freshly ground; even a minute’s delay can change the aromatic profile.
The Creamy Crew
Milk is where the drink finds its body. Whole milk gives a richer mouthfeel, but 2% or oat milk can keep the calorie count lower while still delivering a velvety texture. Frothed milk creates a micro‑foam that floats on top, giving a luxurious feel with each sip. If you’re lactose intolerant, a coconut or almond milk works beautifully, but keep in mind the subtle nutty notes that will mingle with the chocolate.
The Unexpected Star
Chocolate syrup is the star that ties coffee and milk together. Choose a high‑quality dark chocolate syrup that contains at least 60% cacao; it will provide a balanced bitterness that complements the espresso’s acidity. If you prefer a richer flavor, you can add a splash of cold brew concentrate instead of espresso, but the chocolate will need to be adjusted accordingly. A pinch of sea salt is optional but highly recommended—it heightens the sweetness and balances the bitterness.
The Final Flourish
Ice is the final ingredient that cools the mixture and gives it that refreshing snap. Use crushed ice for a faster chill and a more diluted drink, or whole cubes for a slower, more controlled dilution. Whipped cream and cocoa powder are optional garnishes that elevate the drink’s appearance and add a finishing touch of indulgence. The whipped cream should be lightly sweetened and topped with a dusting of cocoa powder for that classic mocha look.
Everything's prepped? Good. Let's get into the real action...
The Method — Step by Step
- First, brew a double shot of espresso using a French press or a stovetop Moka pot. The key is a tight, 30‑second extraction; you want that rich crema on top. As the espresso cools, let it sit in a heat‑proof pitcher for a minute to reach room temperature. This prevents the milk from scalding when you combine it.
- While the espresso is cooling, froth your chosen milk in a steaming wand or a hand‑held frother until it reaches a micro‑foam consistency. The foam should be velvety, not bubbly, because you want the texture to be smooth and not gritty. If you’re using a non‑dairy milk, froth it slightly longer to compensate for its lower protein content.
- Measure out 0.5 cup of dark chocolate syrup and pour it into a large mixing glass. Add the 0.25 cup of sugar and a 1‑tsp vanilla extract. Stir until the syrup dissolves into a homogenous mixture; this will be the flavor backbone of your mocha.
- Add the cooled espresso to the chocolate mixture and stir vigorously. The espresso’s bitterness will mingle with the chocolate’s depth, creating a layered flavor profile that’s both bold and smooth. The moment the espresso hits the chocolate, you’ll notice a subtle caramelization aroma that signals the drink is on the right track.
- Now incorporate the frothed milk into the glass. Use a spoon to hold back the foam as you pour, then gently swirl the milk into the chocolate‑espresso base. The foam should sit on top, forming a creamy crown that invites you to stir before sipping.
- Fill a tall glass with 0.25 cup of ice cubes. The ice should be dense enough to chill the drink quickly without diluting it too fast. Pour the mocha mixture over the ice, allowing it to cascade and chill instantly. The first sip should be cold, but the flavors will still be intense.
- Top the drink with a dollop of lightly sweetened whipped cream. The cream adds a luxurious texture and a subtle sweetness that balances the chocolate. Sprinkle a light dusting of cocoa powder over the whipped cream for that classic mocha look.
- Give the drink a gentle stir to mix the layers just before you sip. The swirl should resemble a coffee‑art swirl, with chocolate and espresso blending into the milk. Taste it; if you want more intensity, add a splash of espresso or a pinch of sea salt. If you prefer a sweeter profile, add a drizzle of honey or maple syrup.
- Serve immediately with a straw and enjoy the instant gratification of a perfect mocha iced coffee. The drink should feel like a chilled dessert, yet it delivers the caffeine kick you need for the day. Remember, the best part is the first sip—so take your time and savor the moment.
That's it — you did it. But hold on, I've got a few more tricks that'll take this to another level...
Insider Tricks for Flawless Results
The Temperature Rule Nobody Follows
Espresso that’s too hot can scorch the milk, turning it into a burnt‑flavored mess. I recommend cooling the espresso to room temperature before mixing; a quick 5‑minute rest does the trick. If you’re in a hurry, place the espresso in a bowl of ice water for 30 seconds. This technique preserves the espresso’s bright acidity and prevents the milk from losing its natural sweetness.
Why Your Nose Knows Best
Before you add the milk, give the chocolate‑espresso mix a sniff. A faint chocolate aroma signals that the syrup has fully dissolved. If it smells more like burnt coffee, the espresso was over‑extracted. Trust your nose; it’s a reliable barista sensor that will save you from a bitter mishap.
The 5‑Minute Rest That Changes Everything
After mixing, let the mocha sit for five minutes before pouring over ice. This allows the flavors to marry, creating a more cohesive taste profile. It also helps the milk settle, preventing a lumpy texture. I’ve seen people skip this step and end up with a drink that tastes like separate layers instead of a unified whole.
Ice Size Matters
Crushed ice chills faster but dilutes quicker; whole cubes chill slower but maintain flavor integrity. For a balanced drink, use a mix of both: half crushed, half whole. This hybrid approach keeps the mocha intense while still cooling it to the perfect sipping temperature.
The Final Flourish: Cocoa Powder
Dusting cocoa powder over whipped cream isn’t just for looks; it adds a subtle bitterness that counterbalances the sweetness. Use an unbleached, Dutch‑process cocoa for a deeper flavor. Lightly tap the cocoa into a fine sieve before sprinkling to avoid clumps.
Creative Twists and Variations
This recipe is a playground. Here are some of my favorite ways to switch things up:
Icy Matcha Mocha
Replace half of the milk with chilled matcha latte. The vegetal notes will pair beautifully with the chocolate, giving you a green‑colored espresso shot. This twist is perfect for those who love a caffeine double‑dose.
Spiced Caramel Mocha
Add a pinch of cinnamon and a drizzle of caramel sauce before the final stir. The spice adds warmth, while the caramel brings a buttery sweetness that complements the espresso’s bitterness.
Cold Brew Espresso Mocha
Swap the espresso shot for an equal volume of cold brew concentrate. The result is a smoother, less acidic drink that’s ideal for hot summer days.
Almond Milk Mocha
Use almond milk for a nutty undertone that pairs with the chocolate. The almond flavor enhances the depth of the espresso, creating a more complex taste profile.
Minty Mocha
Add a few fresh mint leaves to the chocolate‑espresso mix, letting them steep for a minute before straining. The mint gives a refreshing lift, making this version a refreshing brunch staple.
Storing and Bringing It Back to Life
Fridge Storage
Store the chilled mocha mixture in an airtight container for up to 24 hours. Keep the container in the coldest part of the fridge to prevent the ice from melting too quickly. When ready to serve, give it a quick stir and add fresh ice cubes.
Freezer Friendly
For longer storage, freeze the mocha mixture in a freezer‑safe container for up to 3 months. Thaw overnight in the fridge before adding fresh ice. This method preserves the flavor, though the texture may be slightly altered.
Best Reheating Method
If the mixture has frozen, gently warm it in a saucepan over low heat until it reaches a drinkable temperature. Add a splash of water before reheating to prevent the milk from scorching. Once warmed, stir well and pour over fresh ice.