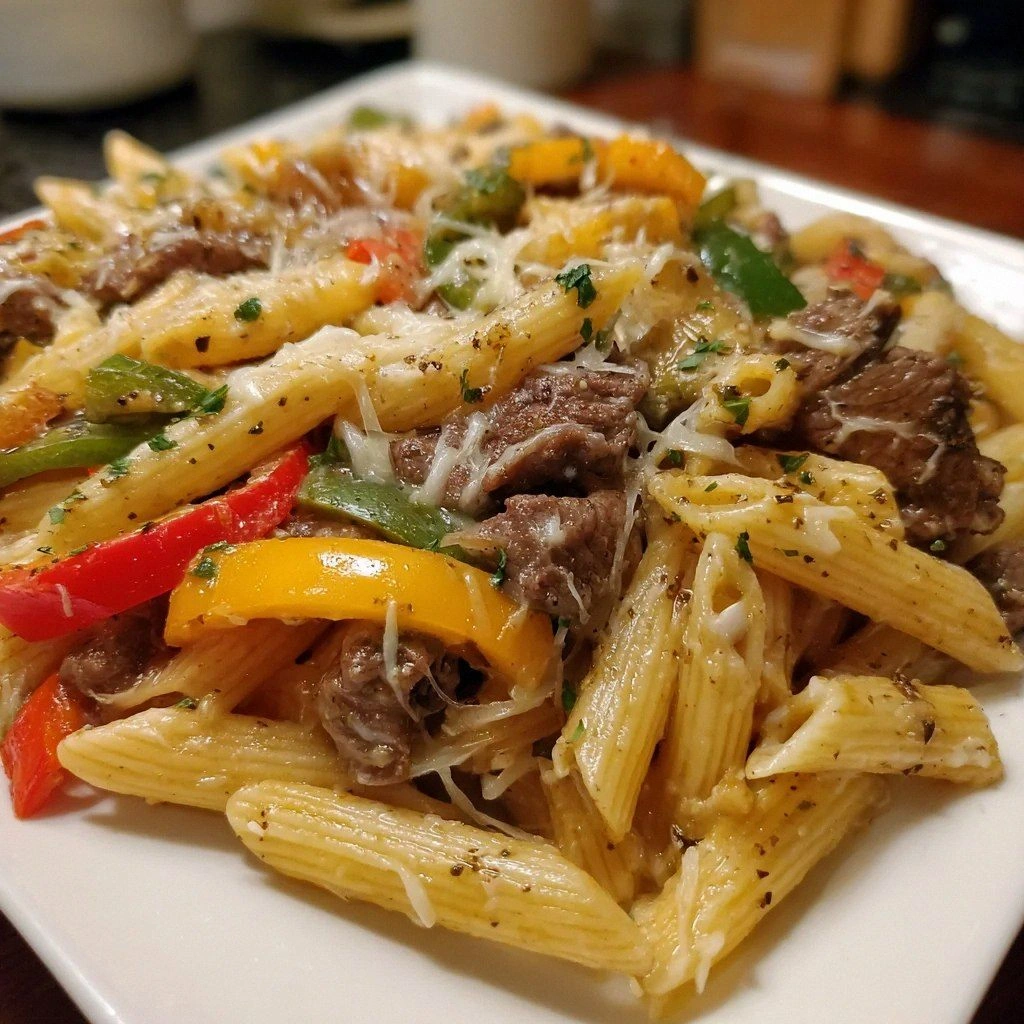
I still remember the night I created this Budget-Friendly Philly Cheesesteak Pasta like it was yesterday. My roommate had challenged me to make something that tasted like the iconic sandwich but cost less than a fast-food combo meal. The catch? I only had twenty bucks and whatever was lurking in my pantry. What started as a desperate attempt to win a silly bet turned into the most requested dish in my entire repertoire. The smell of sizzling onions and peppers mixed with the rich aroma of melting provolone filled our tiny apartment, drawing neighbors to our door like moths to a flame. By the time I plated the first serving, three people had materialized in my kitchen, forks in hand, ready to taste whatever magic was happening on my stovetop.
Here's the thing about most copycat recipes floating around the internet — they miss the soul of what makes a Philly cheesesteak so addictive. They focus on fancy ingredients or complicated techniques that cost more than just ordering the real deal. But this version? It captures that perfect balance of savory beef, sweet caramelized vegetables, and that unmistakable cheese pull that makes everyone at the table stop mid-conversation. The pasta acts like little edible blankets, wrapping around all those classic flavors in every single bite. I dare you to taste this and not go back for seconds — actually, I double-dog dare you, because I've never seen anyone resist the urge.
What makes this dish absolutely genius is how it transforms humble ingredients into something that tastes like a million bucks. We're talking about ground beef that costs less than a fancy coffee, vegetables that are always on sale, and cheese that melts into the most luxurious sauce you've ever tasted. The secret isn't in expensive ingredients — it's in the technique that builds layers of flavor like a symphony orchestra warming up before the big performance. Picture yourself pulling this out of the oven, the whole kitchen smelling like the best sandwich shop in Philadelphia had a baby with your favorite Italian restaurant. That first bite? Pure magic.
Let me walk you through every single step — by the end, you'll wonder how you ever made it any other way.
What Makes This Version Stand Out
This isn't just another pasta recipe claiming to taste like something it isn't. This is hands down the best version you'll ever make at home, and I'm prepared to fight anyone who says otherwise. The combination of textures alone will make you a believer — tender pasta, juicy beef, and vegetables that still have a slight crunch despite being perfectly cooked. The sauce coats every noodle like velvet, creating that same satisfaction you get from the sandwich but in a form that's somehow even more comforting.
- Flavor Bomb: The magic happens when the beef drippings meet the caramelized onions and peppers, creating a fond that's more valuable than gold. Deglazing with a splash of milk pulls all those browned bits into the sauce, giving you that deep, complex flavor that usually takes hours to develop.
- Texture Paradise: Most recipes get this completely wrong and end up with mushy vegetables and tough meat. Here's what actually works — cooking the vegetables until they're just starting to soften but still maintain their structure, then adding them back at the end so they stay vibrant and crisp.
- Budget Champion: I'll be honest — I ate half the batch before anyone else got to try it, and I still had enough to feed four people for less than the cost of one restaurant cheesesteak. Ground beef stretches further than steak, and the pasta makes it feel like a feast.
- One-Pan Wonder: Okay, ready for the game-changer? Everything cooks in the same pot (except the pasta), meaning fewer dishes and more flavor building. The pasta water becomes part of the sauce, carrying all that starchy goodness that makes restaurant sauces so silky.
- Customizable Heat: The crushed red pepper flakes aren't just for show — they bloom in the oil and infuse the entire dish with a gentle warmth that builds but never overwhelms. You control the intensity, from mild enough for kids to spicy enough to make a grown man sweat.
- Make-Ahead Marvel: This dish actually tastes better the next day, making it perfect for meal prep or feeding a crowd. The flavors meld together in the fridge, creating something even more spectacular when reheated properly.
- Crowd Psychology: Future pacing here — imagine bringing this to your next potluck and watching people hover around the crockpot like vultures. I've seen grown adults fight over the last serving, and I'm not even slightly exaggerating.
Inside the Ingredient List
Every ingredient in this recipe pulls its weight like a well-trained team, and understanding why each one matters will transform you from a recipe follower into a kitchen wizard. The beauty lies in the simplicity — no fancy truffle oils or impossible-to-find spices. Just good, honest ingredients that work together like they've been best friends for years. But here's what most people miss: the quality of even the humblest ingredient can make or break your final dish. That sad, wilted bell pepper that's been lurking in your fridge for two weeks? It's going to taste like disappointment. But a crisp, vibrant one? That's the difference between good and unforgettable.
The Flavor Base
The yellow onion isn't just there for bulk — it's the foundation of everything. When you cook it low and slow, it transforms from sharp and aggressive to sweet and complex, like that friend who seems intimidating until you get to know them. The natural sugars caramelize and create hundreds of flavor compounds that make your kitchen smell like heaven. Skip the onion and you'll have a flat, one-dimensional dish that tastes like someone forgot to turn on the lights. If you absolutely must substitute, a white onion works, but avoid red onions — they turn bitter when cooked this long.
Garlic is your aromatic powerhouse, the ingredient that makes everything else taste more like itself. But here's where most recipes mess up — they add it too early and it burns, turning bitter and nasty. The trick is adding it after the vegetables have softened, letting it cook just until fragrant. That sizzle when it hits the pan? Absolute perfection. Use fresh garlic, not the pre-minced stuff in jars. I know it's convenient, but it tastes like disappointment and has the texture of little rubber bits.
The Texture Crew
Ground beef versus steak is where you get to make your budget choice, and honestly? Ground beef wins for everyday eating. It creates more surface area for browning, which equals more flavor through the Maillard reaction. When you break it up properly, you get little crispy bits throughout that shatter like thin ice when you bite them. Choose 80/20 ground beef — lean enough to avoid a greasy mess, fatty enough to stay juicy. If you're feeling fancy and have a few extra dollars, thinly sliced sirloin works, but cook it separately and add it at the end to avoid tough, chewy meat.
The bell pepper mix isn't just for pretty colors, though that pop of red and green does make the dish look like a party. Green peppers have a slightly bitter, grassy note that balances the richness of the beef and cheese. Red peppers bring sweetness and a almost fruity quality that makes people ask "what's your secret ingredient?" Cook them until they're starting to soften but still have some bite — nobody wants pepper mush. And this next part? Pure magic — save a few raw strips to garnish at the end for crunch and freshness.
The Unexpected Star
Cream cheese is the ingredient that makes people say "wait, what?" but trust me on this one. It melts into the sauce and creates a richness that heavy cream can't match, plus it helps stabilize everything so your sauce doesn't break into an oily mess. The tanginess balances the beef perfectly, like a built-in flavor enhancer. Use full-fat, because this is not the time for diet food. Let it come to room temperature before adding it, or you'll get little white lumps that refuse to cooperate no matter how much you stir.
The milk isn't just for thinning the sauce — it's your temperature moderator, preventing the cheeses from seizing up and turning grainy. Whole milk gives you the creamiest results, but 2% works if that's what you have. Warm it slightly before adding it to the pan, because cold milk plus hot pan equals curdled disaster. And now the fun part — if you're dairy-free, unsweetened oat milk actually works beautifully here, giving you that creamy texture without any weird aftertaste.
The Final Flourish
Provolone is your flavor anchor, the cheese that screams "Philly cheesesteak" louder than any other ingredient. It melts like a dream and has that slightly sharp, nutty flavor that cuts through all the richness. Don't buy the pre-sliced stuff — get it from the deli counter and shred it yourself. Pre-shredded cheese is coated with cellulose that prevents it from melting smoothly, and you'll end up with a clumpy, stringy mess instead of a silky sauce.
Mozzarella is your texture queen, giving you those Instagram-worthy cheese pulls that make people stop scrolling. Use fresh mozzarella if you're feeling fancy, but the regular block stuff works perfectly fine and costs about half as much. The key is adding it off the heat, letting residual warmth melt it gently. Too much heat and mozzarella turns into rubber bands that could bounce off walls.
Everything's prepped? Good. Let's get into the real action...
The Method — Step by Step
- Start with your largest skillet or Dutch oven — I'm talking the big guy that makes you feel like a real chef when you haul it out. Heat the olive oil over medium-high heat until it shimmers like a mirage on hot pavement. Add the ground beef but resist the urge to break it up immediately. Let it sit for a solid two minutes to develop that gorgeous brown crust that gives you the flavor foundation of your dreams. Once you see the edges starting to caramelize, break it into bite-sized pieces, leaving some larger chunks for texture variety.
- While your beef is developing its tan, dice your onion into small, even pieces — think the size of your pinky nail. When the beef is about 80% cooked, push it to the edges of the pan and drop your onions into the center. This technique lets the onions cook in the beef fat, picking up all those incredible flavors. Season with salt and pepper now — the salt helps draw moisture out of the onions, speeding up the caramelization process. If you've ever struggled with onions that never seem to brown, you're not alone — and I've got the fix: don't stir too often. Let them sit and develop color before you move them around.
- Drop your pasta into heavily salted water — it should taste like the ocean, not a gentle suggestion of salt. Penne or rotini are perfect because their nooks and crannies grab onto the sauce like they're storing it for winter. Cook until just shy of al dente because it'll finish cooking in the sauce later. Save at least a cup of that starchy pasta water before you drain it — this is your secret weapon for creating that restaurant-quality sauce that coats every noodle perfectly.
- Add your bell peppers to the onion mixture and crank up the heat slightly. You want to hear them sizzle aggressively — this creates those slightly charred edges that taste like you grilled them. The peppers should still have some bite when you bite into them later, so don't cook them until they're mushy. This is the moment of truth where most people go wrong and turn their vegetables into baby food. Stay with me here — this is worth it.
- Clear a space in the center of your pan and add the minced garlic. Let it cook for just thirty seconds — count it out because garlic goes from perfect to bitter faster than you can say "cheesesteak." Stir it into the vegetables, creating an aromatic cloud that'll have your neighbors knocking on your door. Add the oregano and red pepper flakes now, letting them bloom in the hot oil for another thirty seconds. This releases their essential oils and gives you that authentic Italian-American flavor profile.
- Time to create your sauce base. Reduce the heat to medium and add the cream cheese in small chunks. Don't walk away from the stove here — this is where magic happens or fails spectacularly. Stir constantly until it starts to melt and coat the vegetables. Pour in the milk gradually, whisking constantly to prevent lumps. If you've ever ended up with a grainy, separated sauce, it's usually because you added cold dairy to a hot pan too quickly.
- Add your provolone cheese gradually, letting each handful melt completely before adding the next. This prevents the proteins from seizing up and creating a stringy, clumpy mess. The sauce should be smooth and glossy, coating the back of a spoon like liquid velvet. If it seems too thick, add pasta water a tablespoon at a time until you reach the perfect consistency. Too thin? Let it simmer for another minute or two, stirring constantly.
- Drain your pasta and add it directly to the sauce. Toss everything together like you're conducting an orchestra — gentle but authoritative movements that ensure every noodle gets coated. The pasta will absorb some of the sauce, so add more pasta water if needed. Remove from heat completely before adding the mozzarella — this is crucial because too much heat will make it tough and stringy instead of smooth and creamy.
- Let the whole thing rest for exactly five minutes. I know you're starving and the smell is driving you crazy, but this rest allows the sauce to thicken and the flavors to meld together. Cover the pan with a lid or foil to keep it warm. During this time, the pasta continues to absorb the sauce, and the cheese sets up to the perfect consistency. Trust me, these five minutes make the difference between good and legendary.
- Give it one final taste and adjust the seasoning. This is where you become the artist — maybe it needs more salt, maybe a crack of black pepper, maybe an extra pinch of red pepper flakes if you're feeling spicy. Serve it up in deep bowls because this is comfort food that deserves proper presentation. Garnish with some fresh parsley or those raw pepper strips we saved earlier for color and crunch contrast.
That's it — you did it. But hold on, I've got a few more tricks that'll take this to another level...
Insider Tricks for Flawless Results
After making this dish more times than I can count (seriously, my grocery store checkout person knows me as "pasta guy"), I've discovered some game-changing techniques that separate the good from the unforgettable. These aren't just suggestions — they're the difference between someone asking for your recipe and someone demanding you cater their next party. The best part? Most of these tricks cost nothing but attention and timing.
The Temperature Rule Nobody Follows
Here's the thing that'll make you feel like a kitchen wizard — controlling your pan temperature throughout the entire process. Start hot for browning the beef, medium for vegetables, low for the sauce, and off the heat for finishing. Most people crank the heat to high and wonder why their sauce broke into an oily mess or their garlic tastes like burnt regret. A friend tried skipping this step once — let's just say it didn't end well, and she served what looked like beef-flavored cottage cheese over pasta. The shame still haunts her at potlucks.
Buy an instant-read thermometer if you don't have one. Your sauce should never go above 180°F once you add the dairy, or the proteins will seize up and create that grainy texture that makes people politely decline seconds. If you see tiny bubbles forming around the edges, you're perfect. Big, rolling bubbles? Too hot — remove from heat immediately and whisk like your life depends on it.
Why Your Nose Knows Best
Your sense of smell is your most underrated kitchen tool, and this recipe proves it. When the onions hit the pan, you should smell sweetness developing, not harsh sulfur. If it's the latter, your heat's too high. The garlic should perfume the air with nutty, slightly sweet aromas — if it smells sharp or acrid, you've gone too far. That moment when the cheeses melt into the sauce? It should smell like the best pizza shop and steakhouse had a beautiful baby. Trust your nose over the clock every single time.
I've developed what I call the "aroma timeline" — onions become sweet after about 4 minutes, garlic is perfect at 30 seconds, and your sauce is done when you can smell the provolone's nutty notes mingling with the beef. This isn't new-age kitchen mysticism — it's chemistry that you can smell happening in real-time.
The 5-Minute Rest That Changes Everything
I cannot stress this enough — those five minutes of resting time aren't optional, they're transformative. During this pause, the pasta continues to absorb the sauce, but more importantly, the starches in the pasta water work their thickening magic. The sauce goes from good to glossy, from tasty to transcendent. The cheese proteins relax instead of being stressed by heat, creating that perfect mouthfeel that makes people close their eyes involuntarily when they take a bite.
Cover the pan loosely — you want some steam to escape so the sauce thickens properly, but you don't want it to dry out. If you're really impatient (and I get it), use this time to set the table, pour some wine, or just stand there and admire your handiwork. But whatever you do, don't skip this step. I've had people text me at midnight asking why their sauce was runny, and it always comes back to cutting this corner.
The Seasoning Sweet Spot
Seasoning isn't just about salt and pepper — it's about building layers of flavor that hit different parts of your palate. Add salt to the beef early so it seasons from within. Hold off on salting the vegetables until they start to release their moisture — this helps them brown instead of steam. Save the final seasoning check for the very end because the cheeses add saltiness, and you can't taste properly when the dish is piping hot. Your taste buds literally can't perceive flavors accurately above 140°F.
Black pepper should be freshly ground, and don't be shy with it. The heat from the pepper plays beautifully with the sweetness of the onions and the richness of the cheese. If you've ever wondered why restaurant food tastes more complex, it's often because they understand that pepper isn't just pepper — it's a flavor enhancer that wakes up everything else on the plate.
Creative Twists and Variations
This recipe is a playground. Here are some of my favorite ways to switch things up:
The Mushroom Lover's Dream
Add 8 ounces of sliced mushrooms (cremini or button work great) after the beef is browned. Let them cook down until they're golden and have released all their liquid — this concentrates their earthy flavor. The mushrooms add an umami bomb that makes the dish taste meatier than ever. Use the same technique as the onions — don't crowd them or they'll steam instead of brown. This version is so hearty that even dedicated carnivores won't miss the extra meat.
The Spicy Philly Fusion
Swap the bell peppers for poblano peppers and add a diced jalapeño with the garlic. Use pepper jack cheese instead of mozzarella for an extra kick. This version has a Southwestern vibe that works surprisingly well with the provolone. The poblanos add a deeper, more complex heat than bell peppers, and they roast beautifully. If you really want to turn up the heat, add a dash of your favorite hot sauce to the finished dish.
The Health-Conscious Makeover
Use ground turkey instead of beef, whole wheat pasta, and swap half the cheese for Greek yogurt. I know, I know — but hear me out. The Greek yogurt adds tanginess while cutting calories, and if you add it off the heat, it creates a creamy sauce that's surprisingly satisfying. Use less oil for sautéing and load up on extra vegetables. It's not the same indulgence, but it's still delicious and lets you enjoy this flavor profile more often.
The Loaded Baked Potato Version
Instead of pasta, serve this over baked potatoes or mix it with diced potatoes that you've roasted until crispy. The sauce soaks into the potatoes like they were born to be together. Top with crispy bacon bits and green onions for a loaded potato meets Philly cheesesteak mashup that'll make you question why you ever ate them separately. This is comfort food on steroids.
The Breakfast of Champions
Turn leftovers into the best breakfast hash by adding a fried egg on top. The runny yolk creates a sauce that ties everything together. Add some hot sauce and you've got a breakfast that'll cure any hangover. I've served this to skeptical brunch guests who now request it by name. Something about the combination of beef, cheese, and eggs hits that primal satisfaction button.
The Vegetarian Victory
Use plant-based ground "meat" and vegetable broth instead of beef drippings. The key is getting the plant-based meat really crispy so it adds texture. Use nutritional yeast along with the cheeses for extra umami flavor. Load up on extra vegetables — zucchini, mushrooms, and spinach all work beautifully. It's not trying to be meat, it's being its own delicious thing that happens to scratch the same itch.
Storing and Bringing It Back to Life
Fridge Storage
Store leftovers in an airtight container in the refrigerator for up to 4 days. The sauce will thicken considerably as it cools, so don't panic when you see it the next day. Press plastic wrap directly onto the surface to prevent a skin from forming — this keeps it creamy and prevents it from drying out. Let it cool completely before refrigerating, but don't leave it at room temperature for more than 2 hours. Food safety first, deliciousness second.
Freezer Friendly
This dish freezes beautifully for up to 3 months, making it perfect for meal prep or those nights when you need comfort food but don't want to cook. Portion it into individual servings before freezing — they thaw faster and you can grab just what you need. Use freezer-safe containers and leave about an inch of space at the top because it expands when frozen. Thaw overnight in the refrigerator for best results, though you can microwave from frozen in a pinch. The sauce might separate slightly after freezing, but a good stir while reheating brings it back together.
Best Reheating Method
Reheat gently in a saucepan over medium-low heat, adding a splash of milk or water to loosen the sauce. Stir frequently and don't let it boil, or the cheese will break and become grainy. If you're in a hurry, the microwave works, but use 50% power and stir every 30 seconds. Add a tiny splash of water before reheating — it steams back to perfection. The stovetop method gives you the best texture, but the microwave method is fine for busy weeknights. Either way, don't overheat it, or you'll end up with a separated, oily mess that no amount of stirring will fix.