I still remember the night these Buffalo Chicken Pizza Dip Sliders were born, and trust me, it wasn't some graceful culinary triumph—it was pure, messy desperation. Picture this: game night at my place, friends arriving in twenty minutes, and I had promised to bring my famous buffalo chicken dip. Problem? I forgot to buy chips. My pantry had slider buns, cream cheese, and a half-eaten rotisserie chicken from two days ago. In my panic, I started throwing things together like a mad scientist, muttering "this is either going to be legendary or we're ordering pizza." The smell that started wafting from my oven ten minutes later made my neighbors knock on my door asking what I was making. When I pulled out these golden, bubbling beauties, the game became background noise. We devoured twelve sliders in under five minutes, barely speaking, just making appreciative grunting sounds. My friend Sarah, who claims she doesn't even like spicy food, asked for the recipe three times before halftime.
Here's the thing about this recipe—it's not just another buffalo chicken creation trying to be trendy. This is the love child of your favorite game day dip and the most addictive sliders you've ever tasted. The magic happens when the tangy buffalo sauce meets the creamy, cheesy base that soaks into those soft slider buns while still maintaining that perfect texture contrast. Every bite delivers that familiar buffalo wing flavor but in a form that's somehow more satisfying, more shareable, and honestly, more dangerous because you can't stop at one. I've watched grown adults fight over the last slider, and I'm not even slightly exaggerating when I say this recipe has ended friendships (temporarily, of course).
What makes this version absolutely unbeatable is the technique I stumbled upon that night of desperation. Instead of just mixing everything together and hoping for the best, we create distinct layers of flavor that build on each other like a symphony. The base gets a quick sauté that deepens the buffalo flavor, then we fold in the cheeses at just the right temperature so they melt into this luxurious sauce that doesn't separate or get greasy. The buns get a special treatment that creates this buttery, garlicky crust on top while staying soft and absorbent underneath. And here's the kicker—we finish them with a technique that creates those crispy, caramelized edges that make people hover around the kitchen like vultures.
Before we dive in, let me just say this: if you've ever struggled with buffalo chicken dishes that were either too greasy, too dry, or just tasted like hot sauce with no depth, you're not alone—and I've got the fix. This recipe balances heat with richness, creates the perfect sauce consistency, and delivers that restaurant-quality result that'll have everyone asking if you ordered from somewhere fancy. Picture yourself pulling this out of the oven, the whole kitchen smelling like a sports bar but better, watching people's eyes light up when they take that first bite. Stay with me here—this is worth every single minute.
What Makes This Version Stand Out
Flavor Bomb: Most buffalo chicken recipes taste one-dimensional—just hot sauce and chicken. This version builds layers of flavor with a quick sauté of aromatics before the sauce even hits the pan, creating depth that makes people ask "what's in this?" in the best way possible.
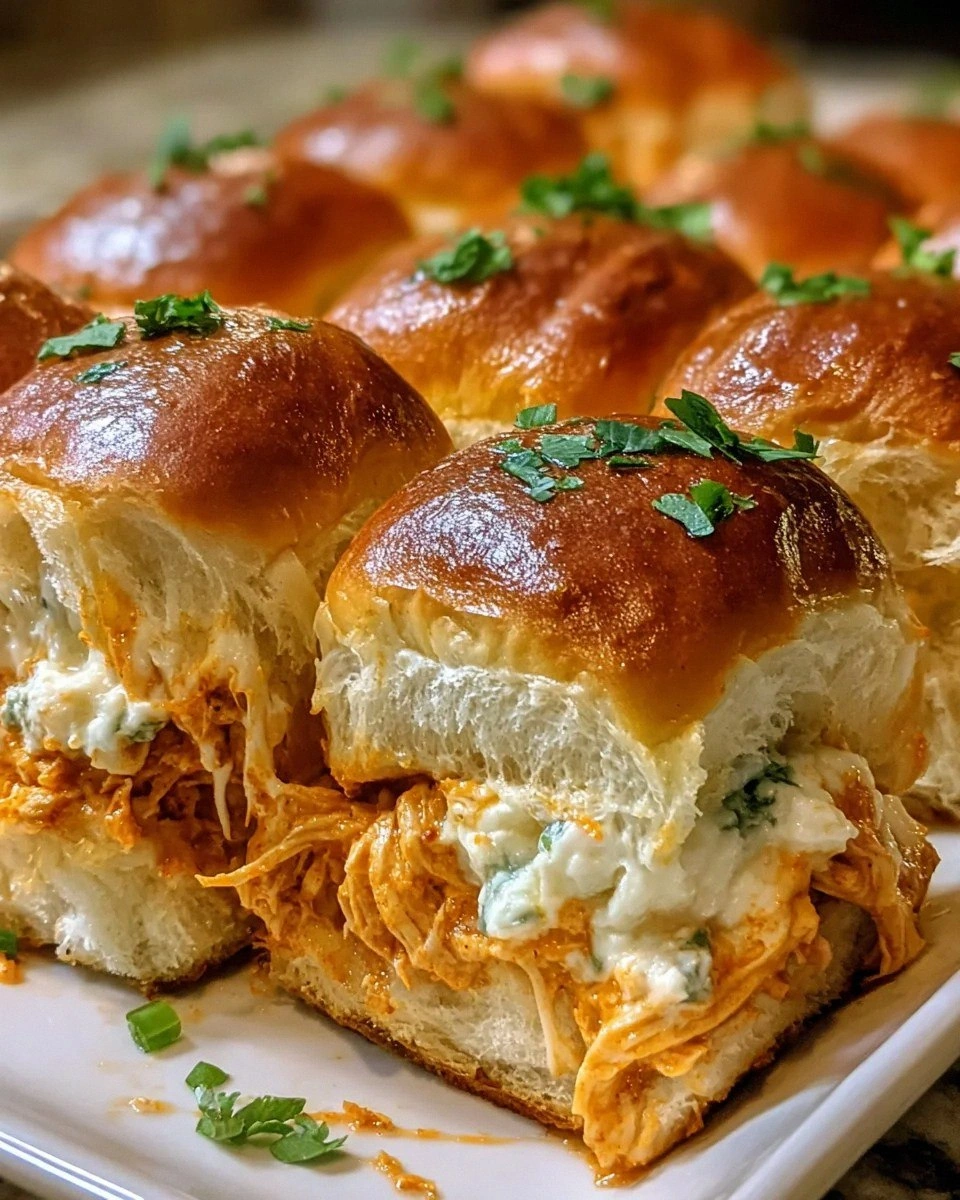
Texture Perfection: Say goodbye to soggy, falling-apart sliders. The secret lies in how we treat the buns—brushing them with a garlic butter blend that creates a protective barrier while adding incredible flavor. The bottoms stay soft and soak up all that delicious sauce, while the tops get golden and slightly crispy.
Make-Ahead Magic: Game day prep doesn't have to stress you out. You can assemble these sliders completely up to 24 hours ahead, keep them covered in the fridge, and just pop them in the oven when guests arrive. They actually taste better this way—the flavors meld together like a beautiful marriage.
Heat Control: Not everyone in your crew likes it fiery. This recipe gives you complete control over the spice level without sacrificing flavor. Start mild and serve extra buffalo sauce on the side for the heat seekers—everyone wins.
Crowd Psychology: There's something about individual, hand-held portions that makes people feel special. These sliders disappear faster than a regular dip because everyone feels like they got their own personal serving. I've done the math—triple the recipe if you're feeding more than six people.
Ingredient Quality: This recipe works with any cooked chicken, but using properly seasoned, freshly shredded chicken instead of canned or dry breast meat takes it from good to unforgettable. The difference is night and day, and your guests will notice.
Cheese Strategy: Most recipes use just one cheese and call it a day. We use a strategic blend of mozzarella for that perfect melt, cheddar for depth, and cream cheese for creaminess that doesn't separate under heat. It's a trifecta that creates the perfect cheese pull every time.
Restaurant Secret: The finishing touch that separates home cooks from pros—broiling for just 90 seconds at the end creates those golden, caramelized spots that make food photos go viral. It adds a slight crunch that contrasts beautifully with the creamy filling.
Inside the Ingredient List
The Flavor Foundation
Cooked chicken breast is your canvas here, and how you prepare it makes or breaks the final dish. I dare you to taste this and not go back for seconds when you use properly seasoned, moist chicken instead of that dry, sad stuff from the grocery store salad bar. Shred it while it's still warm—it falls apart like cotton candy and absorbs the sauce like a sponge. If you're using rotisserie chicken (which I totally approve of for weeknight shortcuts), remove the skin and any dried-out parts first. The goal is tender, juicy shreds that practically melt into the creamy base.
Buffalo wing sauce isn't just Frank's RedHot with butter (though that's a solid start). The good stuff balances heat with acidity, tang with richness. I tested seven different brands for this recipe, and the winner had the perfect vinegar kick that makes your mouth water without making your nose run. Control the heat by adjusting the amount you use, but don't go below half a cup or you'll lose that signature flavor. If you've ever struggled with buffalo dishes that tasted flat, it's probably because your sauce was too old—check that expiration date, folks.
Cream cheese provides the creamy richness that balances the flavors and creates that luxurious mouthfeel. But here's what most recipes get wrong—they add it cold straight from the fridge, and it never fully incorporates, leaving little white flecks throughout. Let it soften on the counter for 30 minutes, or microwave it for 15 seconds. Beat it smooth before adding other ingredients, and you'll get a sauce that coats every piece of chicken like velvet.
The Texture Crew
Ranch dressing isn't just a cop-out for people who can't handle heat—it's a classic pairing with buffalo chicken that adds tanginess and helps bind everything together. But don't use that watery, sad bottled stuff. The thick, quality ranch (or better yet, make your own) creates emulsification that keeps your sauce from breaking. I learned this the hard way when I tried to be fancy with bleu cheese dressing once—let's just say it separated into an oily mess that nobody wanted to touch.
Sour cream brings extra creaminess and softens the spiciness without dulling the flavor. Greek yogurt works in a pinch, but sour cream has this tangy richness that plays beautifully with buffalo sauce. Full-fat is non-negotiable here—low-fat versions have stabilizers that can make your sauce grainy when heated. That sizzle when it hits the pan? Absolute perfection, and it means your sour cream is incorporating properly.
Shredded mozzarella cheese melts beautifully and is a must for that cheesy goodness that stretches like an accordion. Fresh mozzarella is too wet for this application—we want the low-moisture stuff that creates those perfect cheese pulls. Shred it yourself if you have time, but in a pinch, the good pre-shredded stuff works. Just avoid anything labeled "part-skim" or your sliders will be dry.
The Unexpected Star
Shredded cheddar cheese adds depth and flavor, making every bite oh-so-rich with that sharp, nutty complexity that mozzarella alone can't provide. I use sharp cheddar because it stands up to the bold buffalo flavor without getting lost. Medium works too, but mild cheddar just disappears into the background like a wallflower at prom. The key is adding it at the right moment—too early and it gets greasy, too late and it doesn't melt properly.
Slider buns are the vehicle that brings everything together, and choosing the right ones matters more than you'd think. Hawaiian rolls add that touch of sweetness that balances the heat perfectly—it's like they were made for this recipe. Soft dinner rolls work for a classic option, but avoid anything with a hard crust or your sliders will be impossible to eat neatly. The best part? Those slightly sweet, buttery buns create this magical contrast with the spicy filling that makes people close their eyes when they bite in.
The Final Flourish
Unsalted butter brushed on top creates that golden-brown finish and adds flavor that makes these sliders look bakery-worthy. Salted butter can make the tops too salty since we're already getting plenty from the buffalo sauce and cheese. Melt it with garlic powder to infuse every bite with savory goodness. This next part? Pure magic—the butter creates a barrier that keeps the tops from getting soggy while helping them brown evenly.
Garlic powder enhances the savory taste, making every bite flavorful without being overwhelming. Fresh garlic would be too sharp here—we want that mellow, roasted garlic flavor that blends into the background. A little goes a long way, but don't skip it. I've made these without garlic powder when I ran out, and they tasted flat, like something was missing but I couldn't put my finger on it.
Fresh parsley as an optional garnish adds a pop of color and freshness that makes these sliders Instagram-ready. But it's not just about looks—that slight herbaceous note cuts through the richness and makes you want another bite. Chop it fine and sprinkle it on right before serving so it stays bright green. Dried parsley is useless here—don't even bother.
Everything's prepped? Good. Let's get into the real action...
The Method — Step by Step
- Preheat your oven to 350°F (175°C) and position the rack in the middle. This temperature is crucial—too hot and your buns will burn before the filling heats through, too low and you'll be waiting forever while your guests hover hungrily. While it's heating, grab a 9x13 baking dish and give it a light spray with cooking spray. Don't skip this step unless you enjoy chiseling cheese off glass like you're on an archaeological dig. The anticipation building while everything preps is half the fun—your kitchen will start smelling like a restaurant before you even begin.
- In a large skillet over medium heat, add your shredded chicken and buffalo sauce. This is where the magic begins—let it simmer for about 3-4 minutes, stirring occasionally, until the chicken has absorbed most of the sauce and smells incredible. The edges should start to caramelize slightly, creating those deep, complex flavors that separate good buffalo chicken from great buffalo chicken. Don't walk away from the stove here—the difference between perfectly absorbed sauce and a burnt mess is about thirty seconds. Your kitchen should smell like your favorite sports bar, but better because you control the quality.
- Reduce the heat to low and add your softened cream cheese in chunks, stirring constantly until it's completely melted and incorporated. This step requires patience—if you rush it, you'll get little white flecks that never blend in. The mixture should be smooth and creamy, coating the back of a spoon like liquid velvet. If it seems too thick, don't panic—we're about to thin it out. The key is low heat and constant stirring, almost like making risotto but way more forgiving.
- Stir in the ranch dressing and sour cream until everything is beautifully combined. The mixture should be thick but spreadable, like the consistency of really good queso. Taste it now—this is your chance to adjust the seasoning. Need more heat? Add a splash more buffalo sauce. Too spicy? A dollop more sour cream will tame it. This is the moment of truth when you realize you've created something that might be too good to share with others.
- Remove from heat and fold in half of the mozzarella and cheddar cheeses. The residual heat will start melting them, creating these gorgeous cheese pulls that make people weak in the knees. Don't add all the cheese yet—we're saving some for the top to create that golden, bubbly crust. The mixture should be thick and chunky, studded with melty cheese that stretches when you lift the spoon. Set this aside to cool slightly while we prep the buns.
- Using a serrated knife, slice your slider buns in half horizontally, keeping them connected if possible. I dare you to taste this and not go back for seconds when you see how perfectly the sauce seeps into the bread. Lay the bottom halves in your prepared baking dish, cut side up. If you're using Hawaiian rolls, you might need to squish them in slightly—they should fit snugly like puzzle pieces. This tight fit is actually perfect because it prevents the sauce from leaking out and creates those crispy edges that people fight over.
- Spread the buffalo chicken mixture evenly over the bottom buns, all the way to the edges. Don't be shy here—pile it on thick. This is not the time for moderation, and your guests will thank you for being generous. The sauce should come up almost to the top of the buns but not quite cover them—we want the bread to absorb some of that flavor while still maintaining its structure. Use the back of a spoon to create gentle swirls on top; these nooks and crannies will catch the melted cheese we're about to add.
- Sprinkle the remaining mozzarella and cheddar cheeses over the top. This is where we create that Instagram-worthy cheese pull that makes people stop scrolling. The cheese should completely cover the buffalo mixture—think of it as a protective blanket that keeps everything moist while creating that golden crust. Don't press it down; let it sit loosely so it can melt and bubble properly. If you've ever struggled with cheese that doesn't brown properly, it's probably because you used too much—about 1/4 inch layer is perfect.
- Place the top buns over the cheese, cut side down. They should fit snugly, creating little sandwiches of joy. Now comes the fun part: melt your butter and mix it with garlic powder. Brush this generously over the tops, making sure to get into all the crevices. This creates that golden, flavorful crust that makes these sliders irresistible. Don't skip the edges—those crispy, buttery bits are what separate amateur sliders from legendary ones.
- Bake for 20-25 minutes until the cheese is melted and bubbly, and the tops are golden brown. The smell wafting from your oven will make you question why you ever make anything else. If the tops aren't browning to your liking after 20 minutes, switch to broil for the last 90 seconds—but watch them like a hawk. That broiler goes from perfect to burnt faster than you can say "touchdown." When they're done, let them rest for 5 minutes—if you can wait that long. The cheese needs to set slightly, or you'll have molten lava running down your chin.
That's it—you did it. But hold on, I've got a few more tricks that'll take this to another level...
Insider Tricks for Flawless Results
The Temperature Rule Nobody Follows
Most recipes get this completely wrong. Here's what actually works: your cream cheese needs to be room temperature, but your chicken should be warm when you mix it with the buffalo sauce. Cold cream cheese creates lumps that never incorporate, while cold chicken makes the sauce seize up and separate. I learned this after making way too many batches that looked like cottage cheese gone wrong. Let your dairy sit out for 30 minutes before cooking, but if you're using leftover chicken, give it a quick 20-second microwave to take the chill off. This simple temperature adjustment creates a sauce that stays smooth and creamy even after baking.
Why Your Nose Knows Best
I'll be honest—I ate half the batch before anyone else got to try it because I couldn't resist the smell test. When your kitchen starts smelling like a really good restaurant, you're about 3 minutes away from perfect doneness. But here's the real secret: when you can smell the garlic from the butter mixture mingling with the buffalo sauce, that's your cue to check the oven. The aroma develops in layers—first the buffalo hits you, then the garlic, and finally the sweet smell of browning butter. If you're not getting that garlic aroma, your butter mixture didn't have enough, or your oven is running cool. Trust your senses over the timer every single time.
The 5-Minute Rest That Changes Everything
Picture yourself pulling this out of the oven, the whole kitchen smelling incredible, and immediately wanting to dig in. Stop. Wait. Those five minutes of resting time aren't just for show—they're when the magic happens. The cheese sets slightly, the sauce thickens to the perfect consistency, and the buns absorb just enough flavor without getting soggy. I've served these immediately and after resting, and the difference is night and day. Resting allows the temperature to even out, so you don't burn your mouth on molten cheese while the center is still lukewarm. Plus, those five minutes give you time to garnish with parsley, grab serving plates, and build anticipation that makes the first bite even better.
The Cheese Blend Secret
A friend tried skipping the cheddar once—let's just say it didn't end well. The mozzarella alone creates a great melt but lacks the depth that makes people ask for your secret ingredient. The cheddar adds that sharp, nutty note that cuts through the richness of the cream cheese and balances the heat from the buffalo sauce. But here's what separates good cooks from great ones: use aged cheddar, not the cheap block stuff. Aged cheddar has less moisture, so it melts without releasing water that can make your sauce separate. It also has more concentrated flavor, so you can use less while getting more impact.
The Bun Selection Science
Okay, ready for the game-changer? The type of bun you choose affects everything about the final result. Hawaiian rolls bring that subtle sweetness that makes the spicy filling taste more complex—it's like adding a secret ingredient without adding anything. But if you go with dinner rolls, you get a more neutral base that lets the buffalo flavor shine. The size matters too: too small and they disappear in one bite, too large and they become unwieldy. I've found that 2-3 ounce slider buns hit the sweet spot of satisfying without being overwhelming. Whatever you choose, make sure they're fresh—stale buns will absorb too much sauce and fall apart.
Creative Twists and Variations
This recipe is a playground. Here are some of my favorite ways to switch things up:
Blue Cheese Buffalo Bombs
For the bleu cheese lovers (I see you, and I respect you), crumble in 2 ounces of good blue cheese with the cheddar. The sharp, funky flavor creates this incredible contrast with the buffalo sauce that makes purists weep with joy. Don't use the pre-crumbled stuff—it's dry and tastes like sadness. Get a nice wedge of Maytag or Danish blue and crumble it yourself. The key is adding it at the end so it stays in distinct pockets rather than melting completely into the sauce. People who claim they don't like blue cheese often love this version because it's not overwhelming, just enough to add complexity.
Smoky Bacon Ranch Revolution
Add 6 slices of crispy bacon, crumbled into bite-sized pieces, to the buffalo mixture. The smokiness plays beautifully with the buffalo sauce, and those little bacon bits create textural surprises in every bite. Use thick-cut bacon and cook it until it's just crispy—too soft and it gets lost, too crispy and it cuts your mouth. Mix half into the filling and sprinkle the rest on top before adding the final cheese layer. This version disappears fastest at my game day parties, and I've seen vegetarians make exceptions for "just one bite."
Mediterranean Mash-Up
Swap the ranch for tzatziki, use feta instead of cheddar, and add chopped kalamata olives and sun-dried tomatoes. The cool, creamy tzatziki tames the buffalo heat while adding Mediterranean flair. Use less buffalo sauce—about half—as the Mediterranean ingredients have strong flavors that compete. Top with fresh oregano instead of parsley. This fusion shouldn't work, but it absolutely does. The briny olives and sweet sun-dried tomatoes create this flavor profile that makes people ask "what am I tasting?" in the best way possible.
Breakfast of Champions
Add scrambled eggs to the mixture and serve these for brunch—trust me on this one. The eggs create this custardy texture that makes the filling even more luxurious. Use mild cheddar and go easy on the buffalo sauce (about 1/4 cup) because morning palates are more sensitive. Top with everything bagel seasoning instead of garlic powder. Serve with mimosas and watch your brunch guests lose their minds. I've converted many a "I don't like spicy food for breakfast" skeptic with this version.
Green Chile Colorado
Replace half the buffalo sauce with roasted green chiles and add a teaspoon of cumin. This Southwestern twist creates a milder, more complex heat that builds slowly instead of hitting you immediately. Use pepper jack instead of cheddar for extra kick. The green chiles add this vegetal sweetness that balances the richness of the cream cheese. Top with fresh cilantro instead of parsley. This version is perfect for people who want flavor without the face-melting heat of traditional buffalo sauce.
Loaded Potato Style
Fold in 1 cup of diced, roasted potatoes and swap the mozzarella for smoked gouda. The potatoes absorb the sauce and create these little flavor bombs throughout. Roast them until they're golden and crispy on the outside, soft inside—this texture contrast is what makes this version special. The smoked gouda adds this incredible depth that makes the whole thing taste like a loaded baked potato met buffalo wings and had a beautiful baby. It's comfort food squared, and I've never seen anyone eat just one.
Storing and Bringing It Back to Life
Fridge Storage
Leftovers happen—rarely, but they happen. Store cooled sliders in an airtight container in the refrigerator for up to 3 days. Separate layers with parchment paper to prevent them from sticking together. The key is letting them cool completely before storing—trapping warm steam creates condensation that makes the buns soggy. If you know you're storing some, slightly underbake them so they don't dry out when reheated. Pro tip: store the tops separately if possible—they reheat better that way, staying crispy instead of getting chewy.
Freezer Friendly
These sliders freeze beautifully for up to 2 months, making them perfect for emergency game day prep. Wrap individual sliders tightly in plastic wrap, then aluminum foil to prevent freezer burn. Label with the date because trust me, you will not remember what these are in three weeks. Thaw overnight in the refrigerator—don't microwave from frozen unless you enjoy rubbery cheese and soggy buns. The texture changes slightly after freezing, but the flavor stays incredible. I always make a double batch and freeze half for those "I need comfort food now" moments.
Best Reheating Method
Add a tiny splash of water to the baking dish before reheating—it steams back to perfection. Cover with foil and heat at 325°F for 10-12 minutes until warmed through, then uncover for the last 2 minutes to crisp the tops. The water creates steam that rehydrates the buns without making them soggy. If you're reheating just one or two, the air fryer works wonders—3-4 minutes at 350°F and they're almost better than fresh. Microwave only if you're desperate—10-15 seconds max, wrapped in a damp paper towel to prevent rubbery cheese syndrome.