When the kitchen lights flickered on that cold December night, I was halfway through a batch of ordinary chocolate brownies that had turned into a sad, soggy mess. The chocolate chips had melted into a glossy puddle, and the edges were still raw, like a promise that never materialized. I stared at the tray, feeling the familiar sting of disappointment that only a kitchen disaster can bring. But in that moment, a thought popped into my head: what if I could transform that flop into a masterpiece that would make my friends swoon? I was about to rewrite the rules of peppermint brownies.
Picture this: a glossy, dark chocolate base that shimmers with a faint minty sparkle, a center that melts in your mouth like a velvety whisper, and a dusting of powdered sugar that feels like snow on a winter morning. The aroma of fresh chocolate mingles with a subtle, almost floral hint of peppermint, filling the air with a scent that makes you want to close your eyes and savor the moment. The first bite is a crunch that gives way to a lush, molten chocolate center, followed by a refreshing mint aftertaste that lingers just enough to keep you coming back for more. Every texture, every flavor, is carefully orchestrated to create an experience that feels both indulgent and refreshing.
What makes this recipe stand out is not just the ingredients, but the way they dance together. I dare you to taste this and not go back for seconds—because the flavor profile is so balanced that each bite feels like a new revelation. The chocolate isn't overpowering; it’s a partner to the peppermint, not a rival. The batter holds a surprising lightness, thanks to a precise balance of fats and sugars that keeps it from becoming dense. The final glaze adds a glossy finish that makes the brownies look like they were crafted by a chocolatier in a high-end patisserie.
Let me walk you through every single step—by the end, you'll wonder how you ever made it any other way. From the first whisk to the final drizzle, each moment is an opportunity to elevate the ordinary into the extraordinary. You'll learn how to temper chocolate correctly, how to fold in the peppermint extract without losing its potency, and how to finish with a glaze that is both visually stunning and flavorfully complex. This isn't just a recipe; it's a culinary adventure that will transform your kitchen into a playground of chocolate and mint.
What Makes This Version Stand Out
- Flavor Harmony: The combination of semi-sweet chocolate and peppermint extract is carefully balanced to ensure neither flavor overwhelms the other. The chocolate provides depth and richness, while the peppermint offers a crisp, cool finish that keeps the palate refreshed. This harmony turns a simple brownie into an unforgettable dessert.
- Texture Innovation: The batter is light yet dense, thanks to the precise ratio of butter, sugar, and cocoa. When baked, it develops a crisp exterior that cracks pleasantly under your teeth, while the interior remains silky and slightly gooey. The result is a multi-sensory experience that feels both indulgent and satisfying.
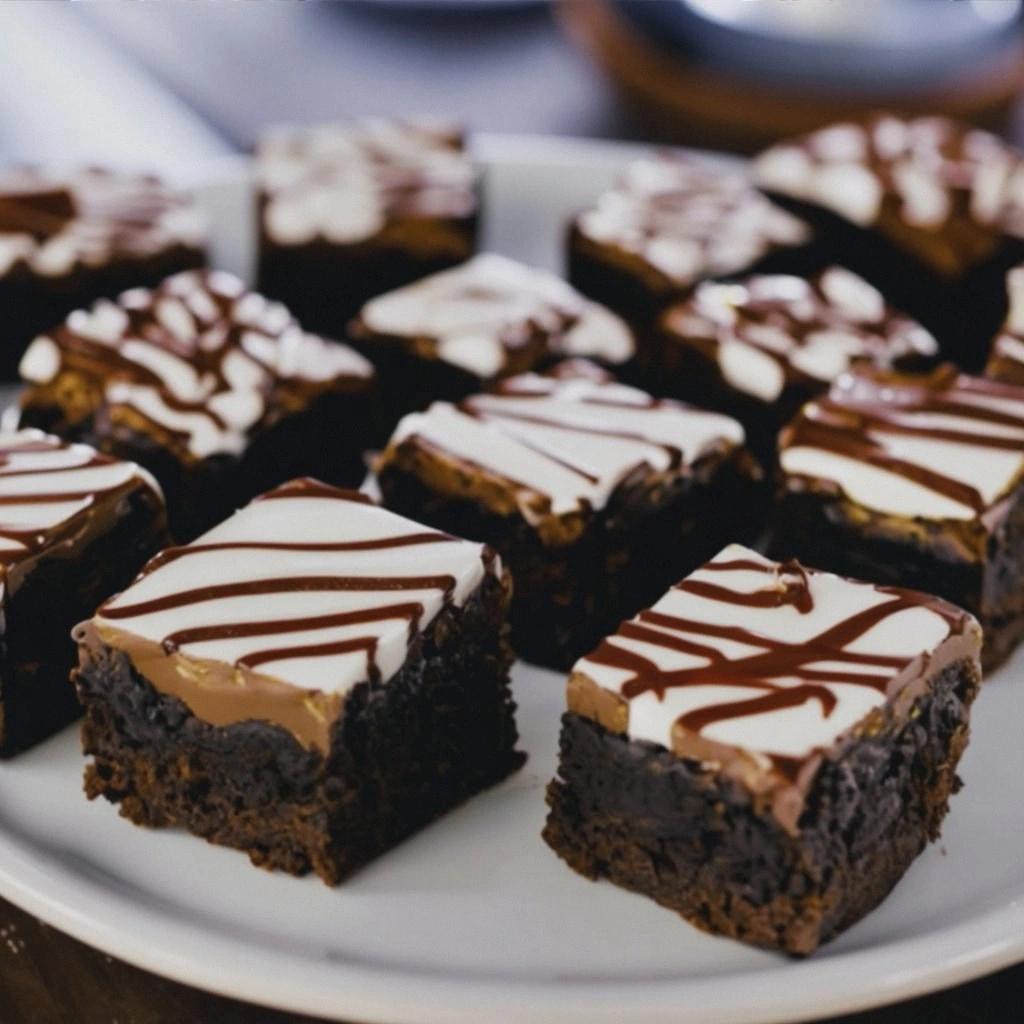
- Visual Appeal: A glossy, dark chocolate surface with a hint of green from the food coloring makes these brownies a feast for the eyes. The powdered sugar dusting adds a snowy finish that is perfect for holiday tables or a cozy evening at home. The final glaze gives the brownies a professional, bakery-quality look.
- Ingredient Quality: Using high-quality semi-sweet chocolate chips and unsalted butter ensures a richer flavor profile. The peppermint extract is pure, giving a bright, clean mint taste that doesn't feel artificial. The choice of ingredients elevates the entire experience.
- Make‑Ahead Friendly: Once baked and glazed, these brownies can be stored in an airtight container for up to a week. They also freeze well, allowing you to enjoy them later without sacrificing texture or flavor. This makes them a convenient option for parties or holiday gatherings.
- Audience Reaction: Most people who try these brownies become instant fans. They are perfect for gifting, for holiday parties, or for a special dessert night. The combination of chocolate and peppermint is a crowd-pleaser that works for both kids and adults.
Alright, let's break down exactly what goes into this masterpiece. The recipe is deceptively simple, yet each component plays a critical role in achieving that perfect balance of flavor and texture. Below, you'll find a detailed breakdown of the ingredients, their functions, and how to handle them for best results. Whether you're a seasoned baker or a kitchen novice, this guide will help you master the art of peppermint brownies.
Inside the Ingredient List
The Flavor Base
At the heart of these brownies is the chocolate base, built around 1 cup of unsalted butter and 1 cup of semi-sweet chocolate chips. The butter melts into the chocolate, creating a smooth, cohesive mixture that ensures every bite is rich. The chocolate chips are the primary source of cocoa, and choosing a high-quality brand will dramatically improve the depth of flavor. Skipping the butter would result in a dry, crumbly texture that fails to hold the batter together.
When selecting chocolate chips, look for a cocoa content of at least 50%. This ensures a balanced sweetness and a robust chocolate flavor that stands up to the peppermint. If you prefer a slightly sweeter brownie, you can replace a portion of the chocolate chips with milk chocolate, but be careful not to overpower the mint. The butter’s role is not just for richness; it also helps in emulsifying the mixture, giving the brownies a silky mouthfeel.
Fun Fact: The tradition of adding chocolate to desserts dates back to the 16th century when cocoa was first introduced to Europe. It was considered a luxury item, reserved for the elite. Today, chocolate has become a staple in sweet treats worldwide, but its origins remind us of its rich, storied past.
The Texture Crew
The texture of these brownies is defined by 1.5 cups of granulated sugar, 4 large eggs, and 0.75 cup of all-purpose flour. The sugar caramelizes during baking, creating a slight crust that adds a pleasant crunch. The eggs bind the batter, adding structure and moisture. The flour provides the necessary body, preventing the brownies from being too dense.
Each of these ingredients must be measured precisely. Too much flour will make the brownies dry and crumbly, while too little will result in a gooey mess. The eggs should be at room temperature; this helps them integrate smoothly into the batter. If you’re using a different type of flour, such as cake flour, adjust the amount slightly to maintain the right consistency.
Watch Out: Overmixing the batter can develop gluten, leading to a tough texture. Stir just until the flour is incorporated, then stop. This ensures a tender crumb that melts in your mouth.
The Unexpected Star
Now for the star that sets these brownies apart: peppermint extract. A single teaspoon of pure peppermint extract infuses the entire batch with a bright, refreshing aroma that cuts through the richness of chocolate. The extract should be added after the chocolate has melted and the batter has cooled slightly, to preserve its volatile compounds. Too much peppermint will overpower the chocolate; too little will result in a bland finish.
To get the most flavor, use a high-quality peppermint extract that has a clean, natural scent. Some commercial brands contain artificial flavors that can muddy the taste. If you prefer a stronger mint flavor, you can add an extra half teaspoon, but be cautious—peppermint is potent.
Kitchen Hack: For a more pronounced minty taste, melt a small amount of chocolate and stir in a few drops of peppermint extract before adding it to the batter. This method concentrates the mint flavor without compromising the chocolate’s smoothness.
The Final Flourish
The finishing touch involves 2 cups of powdered sugar, 2 tbsp unsalted butter, 2 tbsp heavy cream, 1 drop food coloring, and a pinch of salt. The powdered sugar creates a delicate glaze that sits on top of the brownies, giving them a polished look. The butter and heavy cream combine to create a silky glaze that adheres perfectly. The food coloring adds a subtle green hue that hints at peppermint without being overpowering.
When making the glaze, whisk the butter and heavy cream together until smooth. Then, gradually fold in the powdered sugar until you reach a silky consistency. The pinch of salt balances the sweetness, preventing the glaze from tasting cloying. If you want a more vibrant green, add a few drops of mint-flavored gel instead of food coloring.
Kitchen Hack: If the glaze is too thick, add a splash of milk to thin it out. If it’s too thin, let it sit for a few minutes so it thickens slightly before applying. This ensures a glossy finish that is neither sticky nor runny.
Everything's prepped? Good. Let's get into the real action.
The Method — Step by Step
- Preheat your oven to 350°F (175°C) and line a 9x13 inch baking pan with parchment paper. The parchment ensures easy removal and prevents sticking. While the oven heats, melt the butter and chocolate chips together in a medium saucepan over low heat, stirring constantly. This gentle method prevents burning and ensures a smooth, uniform chocolate mixture. When the chocolate is fully melted, remove from heat and let it cool for a few minutes.
- In a separate bowl, whisk together the granulated sugar, eggs, and vanilla extract until the mixture is light and slightly frothy. The whisking incorporates air, which helps the brownies rise slightly. Add the cooled chocolate mixture to the egg mixture, stirring gently to combine. This step is crucial; overmixing can lead to a dense final product. The batter should have a glossy sheen and a smooth consistency.
- Sift the all-purpose flour, unsweetened cocoa powder, and salt into the batter. Gently fold the dry ingredients into the wet mixture until just combined. Overworking the batter at this point would develop gluten and result in a tough texture. The batter should be thick but pourable. This is the moment of truth—your brownies will rise beautifully if you handle the batter carefully.
- Pour the batter into the prepared pan, spreading it evenly with a spatula. Tap the pan gently on the counter to release any air bubbles. This ensures a uniform rise and prevents uneven edges. Place the pan in the preheated oven and bake for 30 minutes. The brownies should develop a slight crust on top but remain moist inside.
- Check the brownies by inserting a toothpick into the center; it should come out with a few moist crumbs but not wet batter. If it comes out clean, the brownies are done. Remove from the oven and allow them to cool in the pan for 10 minutes before transferring to a wire rack. The cooling process sets the structure and makes cutting easier.
- While the brownies cool, prepare the glaze. In a small saucepan, melt the butter over low heat. Once melted, remove from heat and whisk in the heavy cream until the mixture is smooth. Gradually fold in the powdered sugar, stirring constantly, until the glaze is silky and free of lumps. Add the peppermint extract and a drop of food coloring, whisking until fully incorporated. The glaze should be thick enough to coat the brownies but thin enough to drip slightly.
- Drizzle the glaze evenly over the cooled brownies, allowing it to pool in the crevices. The glaze should settle into the cracks and edges, giving a glossy finish that catches the light. Let the glaze set for 10 minutes before cutting. This ensures each slice has a perfect glaze coating.
- Dust the glazed brownies with powdered sugar for an extra snowy look. Use a fine-mesh sieve to ensure an even coating. The powdered sugar adds a subtle sweetness and a decorative touch. Slice the brownies into squares and serve immediately for the best flavor and texture.
That's it — you did it. But hold on, I've got a few more tricks that'll take this to another level. These insider tips will help you avoid common pitfalls and elevate the flavor profile even further.
Insider Tricks for Flawless Results
The Temperature Rule Nobody Follows
Many bakers assume room temperature ingredients are enough, but the real secret lies in the precise oven temperature. Baking at 350°F (175°C) is ideal for these brownies because it allows the chocolate to melt evenly without scorching. If your oven runs hot, the edges will burn while the center remains undercooked. Using an oven thermometer ensures consistency and saves you from a burnt batch.
Why Your Nose Knows Best
Smelling the batter as it cools gives you an instant gauge of readiness. A faint, sweet chocolate aroma indicates the butter and chocolate have fully combined. If the scent is too strong or metallic, the chocolate might still be hot, and the batter could separate. Trust your nose; it’s the best judge of flavor development.
The 5-Minute Rest That Changes Everything
After removing the brownies from the oven, let them rest for exactly 5 minutes before cutting. This short rest allows the heat to distribute evenly, preventing the brownies from cracking or falling apart. If you cut them too early, the structure can collapse, resulting in a messy mess.
Glaze Timing Is Crucial
Applying the glaze while the brownies are still slightly warm ensures it adheres properly. If the brownies are too hot, the glaze will melt and run, losing its glossy finish. If they’re too cold, the glaze will set too quickly, making it hard to spread evenly. Aim for a temperature that feels just warm to the touch.
Storing Secrets for Long‑Term Freshness
Wrap each brownie in parchment paper and then in foil before refrigerating. This double layer prevents the brownies from absorbing odors and maintains moisture. For longer storage, freeze the wrapped brownies in a single layer; once frozen, stack them with parchment between each layer to avoid sticking. Thaw at room temperature for about 30 minutes before serving.
Creative Twists and Variations
This recipe is a playground. Here are some of my favorite ways to switch things up:
Chocolate Mint Truffle Bars
Replace the powdered sugar glaze with a ganache made from dark chocolate and a splash of peppermint liqueur. Let the ganache set in the fridge before cutting into bars. This variation adds an extra layer of richness and a subtle alcoholic kick.
Caramelized Banana Peppermint Brownies
Add sliced bananas to the batter before baking and drizzle caramel sauce over the top after glazing. The banana adds natural sweetness and a chewy texture that complements the minty chocolate.
Almond Joy Peppermint Brownies
Fold in toasted almonds and shredded coconut into the batter. The nutty crunch contrasts with the smooth chocolate, while the coconut adds a tropical twist to the minty flavor.
White Chocolate Mint Surprise
Swap the semi-sweet chocolate chips for white chocolate chips and add a pinch of sea salt. The creamy white chocolate gives a different mouthfeel, while the peppermint still provides that refreshing finish.
Vegan Peppermint Brownies
Use coconut oil instead of butter, maple syrup for sweetness, and a flax egg to replace the large eggs. The result is a dairy-free, plant-based dessert that still delivers the same chocolate-mint bliss.
Espresso-Infused Peppermint Brownies
Add a tablespoon of espresso powder to the batter and a few drops of peppermint extract. The espresso deepens the chocolate flavor and adds a subtle coffee aroma that pairs beautifully with mint.
Storing and Bringing It Back to Life
Fridge Storage
Store the brownies in an airtight container at room temperature for up to 4 days. If you notice the glaze drying out, lightly dust the top with powdered sugar before serving. The container should be sealed tightly to prevent the brownies from absorbing fridge odors.
Freezer Friendly
Wrap each brownie individually in plastic wrap and place them in a freezer-safe bag. Freeze for up to 3 months. When ready to eat, thaw at room temperature for 30 minutes. The texture remains crisp on the outside and chewy inside.
Best Reheating Method
To reheat, place the brownies on a microwave-safe plate and warm on medium for 15-20 seconds. The brief heat restores moisture without drying out the chocolate. If you prefer a warm, gooey center, warm in a preheated oven at 300°F (150°C) for 5 minutes. A tiny splash of water before reheating helps steam the brownies back to perfection.