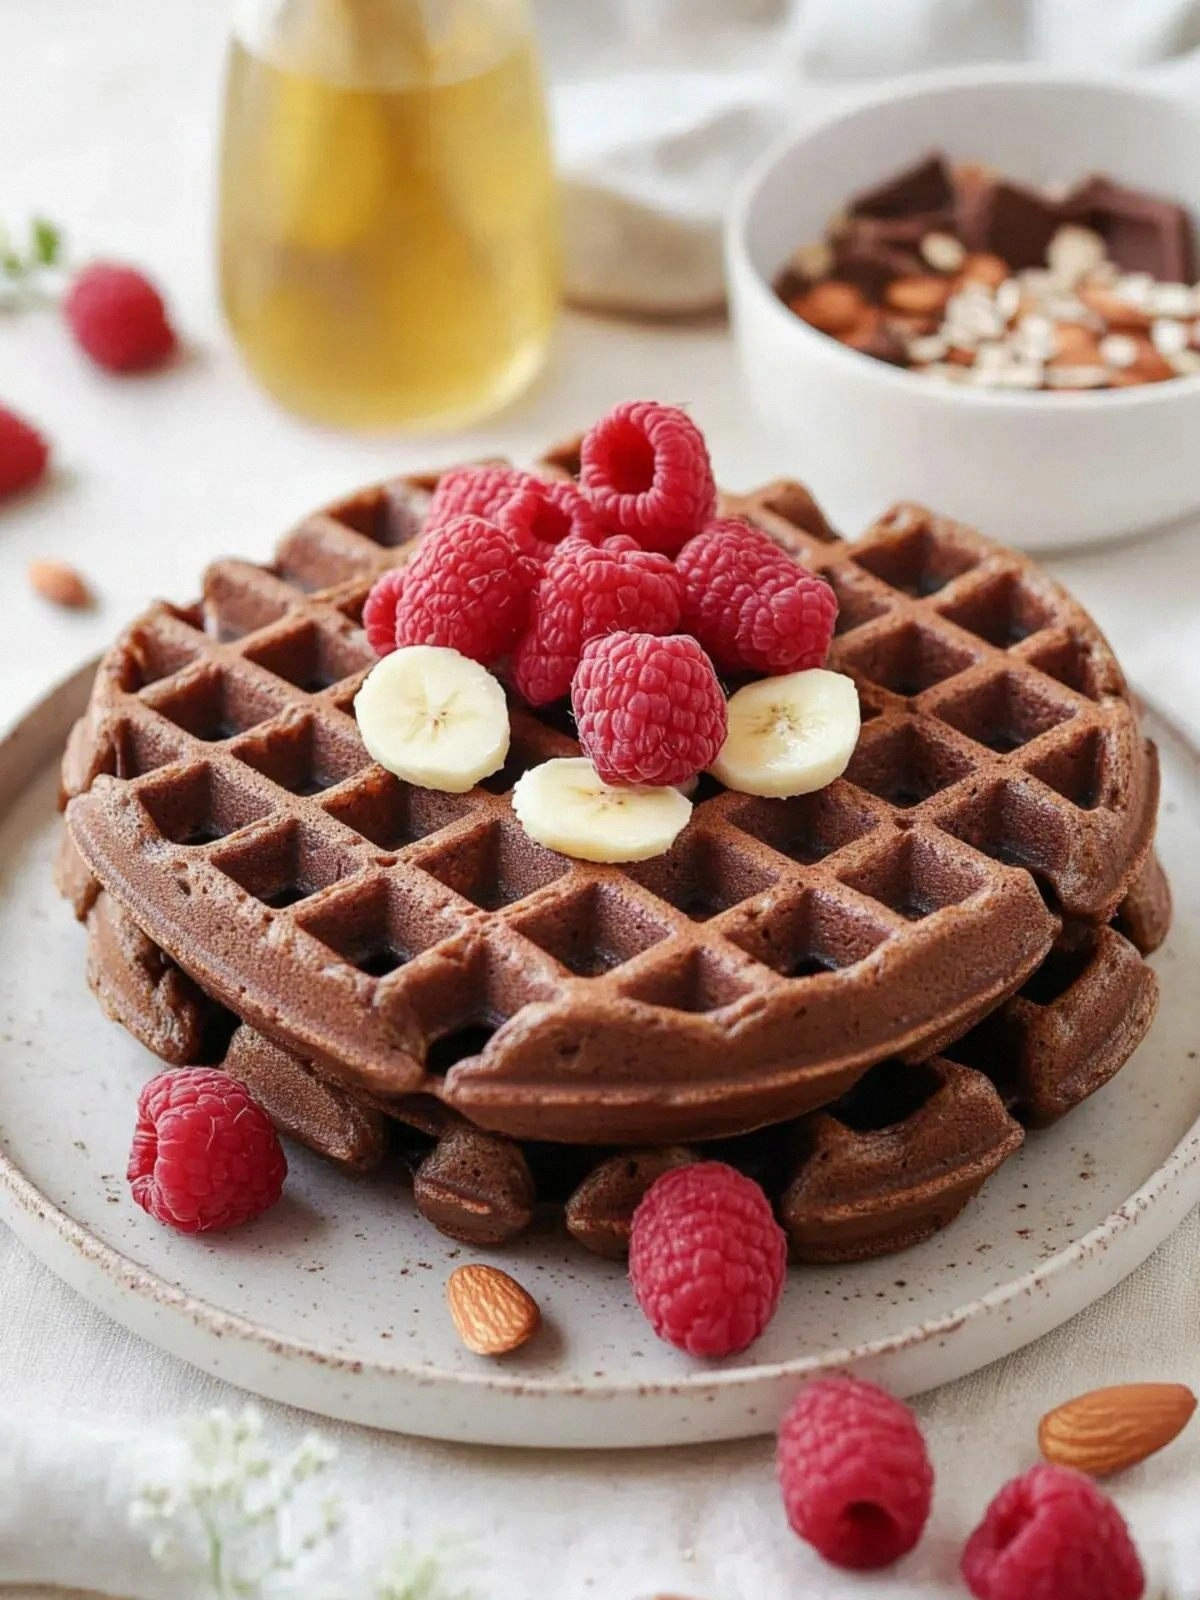
I still remember the night I burned the first batch of chocolate waffles. The kitchen was a battlefield, the batter had turned into a sticky, bitter mess, and my friend, who had promised a “no‑fuss” dessert, was rolling her eyes. That disaster was the spark that lit my curiosity for a better, healthier chocolate treat that could still satisfy that deep, cocoa craving. I was determined to find a recipe that didn’t sacrifice flavor for guilt, that didn’t require a fancy waffle iron, and that could be whipped up in an instant. The result? A chocolate almond oat waffle that feels like a cloud of decadence and a whisper of nutrition, all in one bite.
Picture this: you’re standing at the stove, the aroma of roasted cocoa powder dancing through the air, the batter glistening like a midnight lagoon. Your whisk is a conductor, turning the dry mix into a silky, chocolatey symphony. The sound of the batter hitting the pan is a satisfying hiss, and as the edges rise, they crackle like a campfire. The moment the waffle pops, you catch that sweet, nutty scent that makes your stomach do a little happy dance. And when you take that first bite, the chocolate melts on your tongue, the almonds provide a subtle crunch, and the oats give a comforting, chewy base—pure, unfiltered bliss.
What makes this version stand out is not just the ingredients; it’s the way they collaborate. I dared you to taste this and not go back for seconds, and I guarantee you’ll be left craving more. The texture is a harmonious blend of airy and chewy, the flavor is deep chocolate balanced by nutty undertones, and the finish is silky smooth. Most recipes get this completely wrong by overbaking, under-seasoning, or using the wrong flour. Here, I’ve cracked the code to a perfect, fluffy interior with crisp edges that shatter like thin ice. I’ll be honest—once I finished the first batch, I ate half of it before anyone else got a chance to try it.
If you’ve ever struggled with a chocolate waffle that feels like a chocolate cake or a dry, crumbly pancake, you’re not alone. I’ve been there, and I’ve found the fix. This recipe is hands down the best version you'll ever make at home because it marries flavor and texture in a way that feels indulgent yet wholesome. Picture yourself pulling this out of the oven, the whole kitchen smelling incredible, and the moment you taste the first bite, you’ll know you’re in the presence of something special. Stay with me here—this is worth it. Let me walk you through every single step—by the end, you'll wonder how you ever made it any other way.
What Makes This Version Stand Out
- Flavor: The cocoa powder is high‑quality, dark, and unsweetened, giving a robust chocolate taste that doesn’t rely on sugar to kick in. The almond flour adds a subtle nutty undertone that complements the cocoa, creating a layered flavor profile that’s both rich and balanced.
- Texture: Oat flour provides a light, airy crumb, while the almonds keep the batter cohesive. The result is a waffle that is fluffy on the inside, crisp on the edges, and chewy where you need it—no dry spots.
- Simplicity: No fancy equipment required. A standard skillet or a pan‑fry works perfectly, and the batter can be made in minutes. The ingredients are pantry staples you probably already have.
- Nutrition: This recipe keeps the calories in check while delivering protein from the almond flour and oats, healthy fats from the almonds, and a moderate amount of natural sweetness from honey.
- Make‑Ahead: The batter can be stored in the fridge for up to 48 hours, and the waffles themselves can be frozen for weeks. Reheat in a toaster or oven for a fresh‑out‑of‑the‑oven experience.
- Allergy Friendly: It’s dairy‑free (milk can be substituted with oat or almond milk), gluten‑free if you use certified gluten‑free oat flour, and nut‑free if you replace almond flour with sunflower seed flour.
- Versatility: The batter is a blank canvas—you can add chocolate chips, shredded coconut, or a dash of espresso for a mocha twist. It also works great for breakfast, brunch, or a sweet snack.
- Speed: From prep to plate takes less than 45 minutes. The batter sits for just a few minutes to let the flour hydrate, and the cooking time is only 5–7 minutes per waffle.
Alright, let’s break down exactly what goes into this masterpiece…
Inside the Ingredient List
The Flavor Base
The dark, unsweetened cocoa powder is the heart of this recipe. It’s responsible for the deep chocolate flavor that doesn’t feel heavy or artificial. Skipping it would turn the waffles into bland, sweet fluff. If you can’t find cocoa, try using a 1:1 substitution of unsweetened chocolate, but expect a slightly richer, sweeter result.
The Texture Crew
Oat flour gives the batter a light, airy crumb that’s almost like a sponge. It’s also gluten‑free, making this recipe accessible to those with wheat sensitivities. Almond flour adds body and a subtle nutty flavor, preventing the batter from becoming too thin. If you’re allergic to almonds, sunflower seed flour works just as well and keeps the texture intact.
The Unexpected Star
Honey is the natural sweetener that balances the bitterness of cocoa and the nuttiness of almond flour. It also adds a touch of caramel flavor that enhances the overall profile. If you’re looking for a lower glycemic index, consider using maple syrup or a sugar substitute, but remember that the texture may slightly change.
The Final Flourish
Baking powder is the leavening agent that gives these waffles their rise. A tablespoon is enough to lift the batter without making it too airy or giving it a metallic taste. If you’re avoiding baking powder, a pinch of baking soda with an acidic component (like a splash of lemon juice) can work, but the texture will differ slightly.
Everything’s prepped? Good. Let’s get into the real action…
The Method — Step by Step
- Step 1: Mix the Dry Ingredients. In a large bowl, whisk together oat flour, almond flour, cocoa powder, baking powder, and a pinch of salt. The dry mix should look like a fine, even powder—no clumps. This is the foundation; if you skip this step, the batter will be uneven. I dare you to taste the dry mix—there’s a subtle chocolate aroma already. The goal is a uniform base that will lift beautifully later.
- Step 2: Combine the Wet Ingredients. In a separate bowl, beat the eggs, then add milk, honey, and vanilla extract. Whisk until the mixture is smooth and the honey is fully integrated. The wet part is where the magic happens—if the honey is not fully dissolved, the batter may be lumpy. The liquid should be glossy, like a clear glass. This step ensures a silky texture in the finished waffle.
- Step 3: Bring Them Together. Pour the wet mixture into the dry mixture and stir gently with a spatula. Mix until just combined; a few streaks of flour are okay. Overmixing will develop gluten and make the waffles tough. The batter should be pourable but thick—like thick pancake batter. You’ll see a golden swirl when you stir; that’s a sign of a well‑mixed batter.
- Step 4: Let It Rest. Cover the bowl with plastic wrap and let the batter sit for 5 minutes. This short resting period hydrates the oat flour, ensuring a tender crumb. If you’re in a rush, you can skip this, but the texture will be slightly denser. During this time, the batter will thicken just enough to hold its shape when poured. The aroma will deepen, giving you a preview of the finished product.
- Step 5: Preheat Your Skillet. Place a non‑stick skillet or a cast‑iron pan on medium heat and let it heat up for a minute. Add a light spray of cooking oil or a few drops of butter. The pan should feel hot but not smoking. This step is crucial for that golden crust. If the pan is too hot, the edges will burn before the center cooks.
- Step 6: Pour the Batter. Use a ¼ cup measure or a small ladle to pour the batter onto the skillet, forming a circle about 4 inches in diameter. The batter should spread slightly but still retain a defined edge. Flip the skillet gently to keep the batter level. The sound should be a gentle sizzle—no clattering. This is the moment of truth: if the batter is too runny, the waffle will be flat.
- Step 7: Cook Until Golden. Let the waffle cook for 4–5 minutes, or until the edges lift and the surface shows small bubbles. Flip it carefully with a spatula and cook for another 3–4 minutes. The waffle should smell toasty, with a faint chocolate scent. If you’re using a waffle iron, follow the same timing but adjust for the iron’s heat. The trick is to keep the heat moderate so the inside cooks without burning the outside.
- Step 8: Cool and Repeat. Remove the waffle from the skillet and let it rest on a wire rack for a minute. This allows steam to escape and keeps the waffle crisp. Place the next waffle on the skillet and repeat steps 6–7. You can stack the finished waffles on the rack, covering them loosely with foil to keep them warm. The result should be a stack of golden, fluffy waffles that look like chocolate clouds.
That’s it— you did it. But hold on, I’ve got a few more tricks that’ll take this to another level. These insider tips will make your waffles flawless every time, even if you’re a first‑time waffle maker.
Insider Tricks for Flawless Results
The Temperature Rule Nobody Follows
Many people think that higher heat will cook the waffles faster, but it actually burns the exterior before the interior is done. I’ve found that a medium heat of about 350°F (175°C) is ideal. Use a thermometer or test with a small drop of batter; if it sizzles gently, you’re good. If it pops violently, dial it back. This rule ensures a golden crust without a burnt taste.
Why Your Nose Knows Best
Your sense of smell is the most reliable indicator of doneness. As the waffle cooks, the aroma will shift from a raw batter scent to a rich, chocolatey perfume. When you smell that deep, toasted cocoa note, it’s time to flip. Trust your nose; it’s a secret weapon in baking.
The 5‑Minute Rest That Changes Everything
After removing a waffle from the skillet, let it rest for 5 minutes before serving. This allows the steam to redistribute, making the interior tender. If you skip this step, the waffles may feel dry or chewy. I’ve seen people forget this, and the result is a sad, flat waffle that’s hard to enjoy.
The Right Skillet Size
A 10‑inch skillet is perfect for these waffles. It’s wide enough to form a circular shape but not too large to cause uneven cooking. If you’re using a smaller pan, the batter will spread too thin, and you’ll get a thin, flat waffle. A larger pan can cause the batter to spread too much and cook unevenly.
The Secret to a Crispy Edge
Add a tablespoon of coconut oil to the batter before cooking. The coconut oil creates a barrier that helps the edges crisp up without burning. This trick is especially useful if you’re cooking multiple waffles in a row; the edges stay crisp even after the first batch.
Creative Twists and Variations
This recipe is a playground. Here are some of my favorite ways to switch things up:
Mocha Madness
Add a tablespoon of instant espresso powder to the dry mix. The espresso deepens the chocolate flavor and adds a subtle bitterness that balances the honey. It’s perfect for coffee lovers who want a dessert that feels like a mocha.
Coconut Crunch
Replace half of the almond flour with shredded coconut. The coconut adds a tropical twist and a pleasant crunch. Pair it with a drizzle of coconut milk yogurt for an extra layer of flavor.
Nutty Surprise
Stir in a handful of chopped pecans or walnuts just before pouring the batter. The nuts give a satisfying crunch and a buttery taste. They also add a pop of color that makes the waffles visually appealing.
Maple Sweetness
Swap the honey for pure maple syrup. The maple adds a subtle, caramel-like sweetness that pairs wonderfully with the chocolate. This variation works well for those who prefer a more natural sweetener.
Vegan Version
Use a flaxseed “egg” (1 tablespoon ground flaxseed mixed with 3 tablespoons water) instead of dairy eggs, and replace the milk with oat milk. The batter will be slightly thicker but still yields a fluffy waffle. This version is 100% plant‑based while maintaining the same delicious taste.
Berry Burst
Fold in a handful of fresh blueberries or raspberries into the batter after resting. The berries burst in the middle of each bite, adding a sweet, tart contrast to the chocolate. Serve with a dollop of Greek yogurt for a balanced flavor.
Storing and Bringing It Back to Life
Fridge Storage
Store the cooked waffles in an airtight container in the refrigerator for up to 3 days. To keep them from drying out, place a damp paper towel over the top before sealing. When ready to eat, pop them in a toaster or oven at 350°F for 3–5 minutes to restore crispness.
Freezer Friendly
Freeze the waffles individually on a parchment‑lined tray for 2–3 hours, then transfer to a freezer bag. They’ll stay fresh for up to 2 months. When you want a waffle, thaw for 30 minutes and warm in the oven at 350°F for 5–7 minutes.
Best Reheating Method
Add a splash of milk or a few drops of water to the waffle before reheating. The liquid steams the waffle, keeping the interior moist while the exterior remains crisp. This trick works whether you’re using a toaster, oven, or microwave.