I still remember the night I was trying to salvage a disastrous brunch that had turned into a sticky mess. A loaf of pound cake I’d bought from the local bakery was half‑baked, a box of strawberries was bruised, and the whipped cream had turned into a sad, lumpy cloud. I stared at the chaos, then whispered to myself, “This is going to be the best shortcake I’ve ever made.” And I was right. The next few minutes turned that kitchen disaster into a fragrant, buttery masterpiece that had everyone begging for seconds.
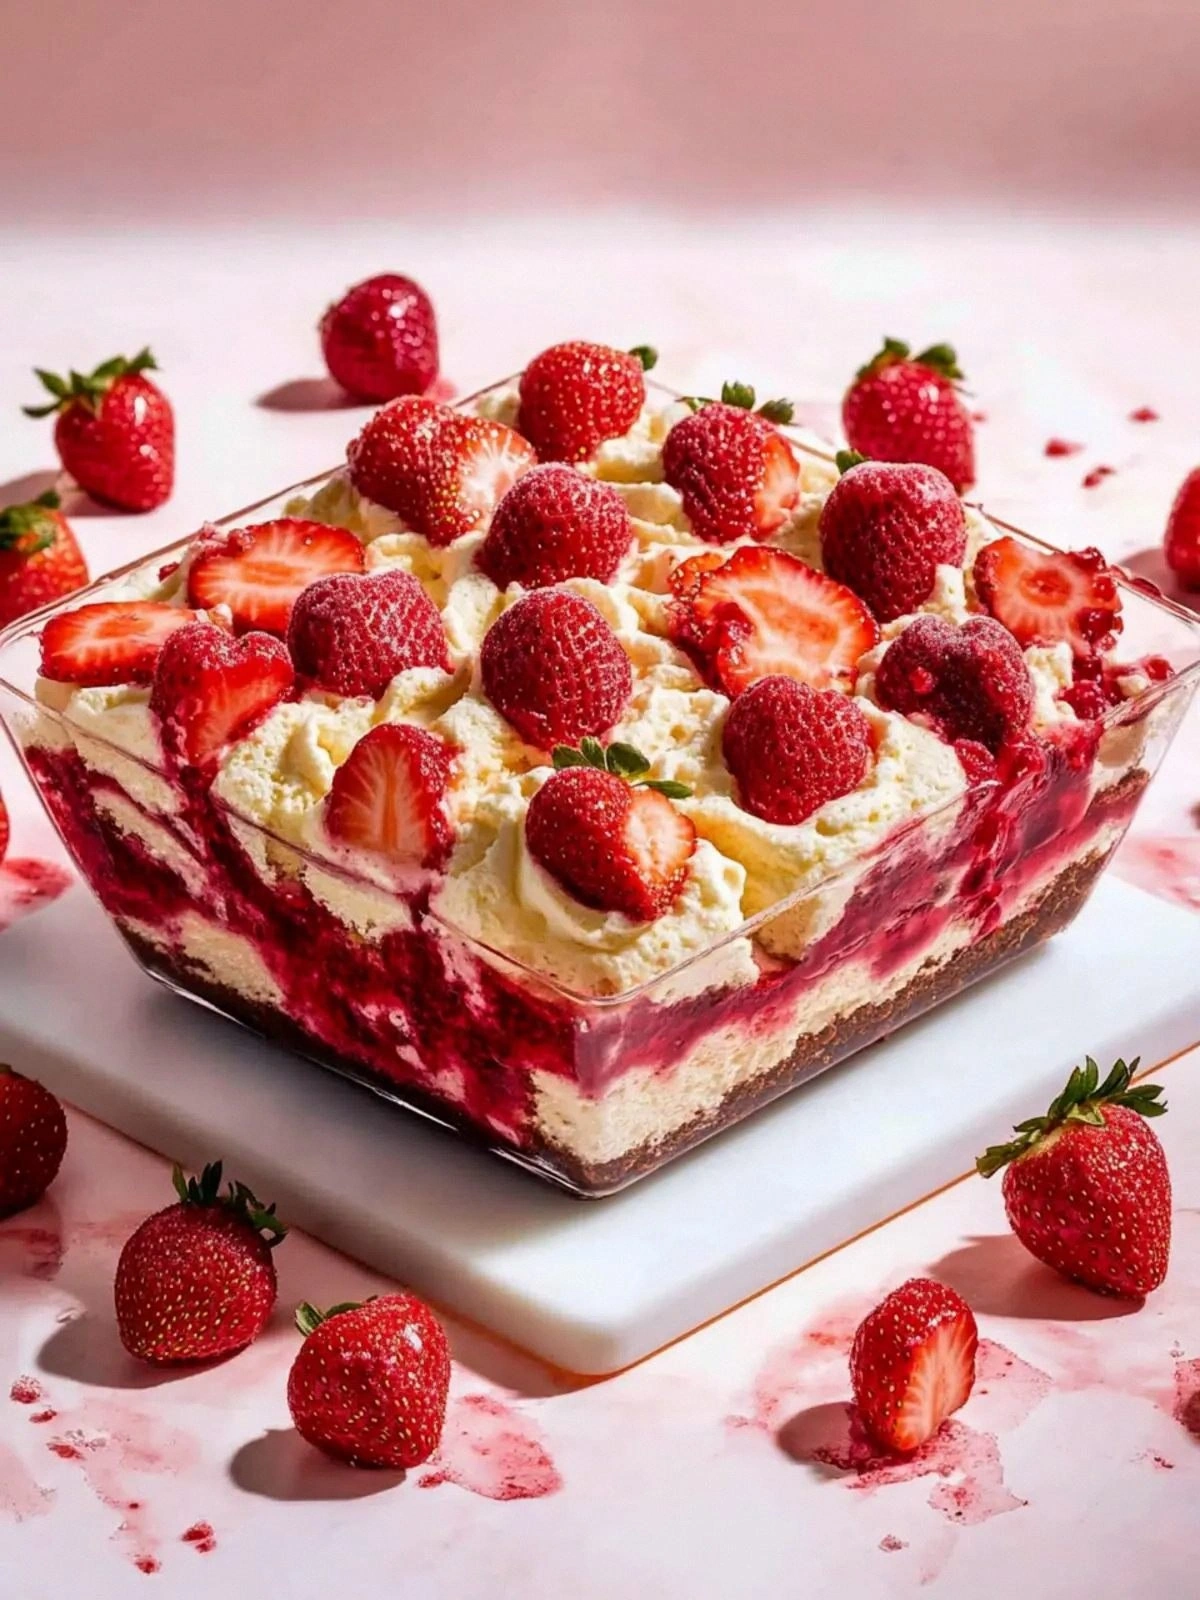
Picture the scene: the buttery scent of fresh pound cake drifting through the air, the bright ruby glow of sliced strawberries, the silky swirl of whipped cream that melts like a cloud, and the sweet, jam‑laden ribbon that ties everything together. The kitchen hummed with the gentle pop of the oven and the clink of a spoon against a glass bowl. You could almost taste the sweet burst of strawberries as they hit your tongue, the creamy texture of the whipped cream, and the comforting crunch of the cake’s golden crust. The whole experience feels like a warm hug wrapped in a dessert.
Why does this version stand out from every other strawberry shortcake out there? Because it’s a deliberate mash‑up of textures and flavors that play together like a perfectly tuned orchestra. The pound cake gives a dense, buttery backbone that holds the airy strawberries and whipped cream in place. The jam adds a syrupy sweetness that cuts through the richness. And the strawberries are sliced just right, juicy and fragrant, so they’re not overpowering but rather a bright, fresh counterpoint. Every bite is a layered experience that satisfies both the sweet tooth and the craving for something comforting.
I dare you to taste this and not go back for seconds. I’ll be honest — I ate half the batch before anyone else got to try it. Most recipes get this completely wrong, but here’s what actually works: a loaf of pound cake, fresh strawberries, whipped cream, and a splash of jam. Picture yourself pulling this out of the oven, the whole kitchen smelling incredible, and you’ll feel like a culinary hero. Let me walk you through every single step — by the end, you’ll wonder how you ever made it any other way.
What Makes This Version Stand Out
- Texture: The pound cake’s buttery crumb provides a sturdy base that contrasts beautifully with the light, airy whipped cream. The strawberries add a juicy burst that cuts through the richness, creating a satisfying play of mouthfeel. The result is a dessert that feels indulgent yet balanced.
- Flavor Depth: The jam isn’t just a sweetener; it’s a flavor enhancer that adds a subtle tang and a glossy sheen. It also helps the strawberries cling together, preventing them from sliding off the cake. This layering of flavors keeps each bite interesting.
- Visual Appeal: The vibrant red of the strawberries against the pale cake and white cream turns the dish into a feast for the eyes. The jam’s glossy finish adds a touch of sophistication. When plated, it looks like a piece of edible art.
- Ease of Assembly: No complicated sauces or baking steps—just slice, layer, and serve. This simplicity makes it an ideal dessert for busy evenings or last‑minute gatherings. The only “baking” is the initial loaf of pound cake, which you can buy pre‑made.
- Make‑Ahead Friendly: The cake can be prepared a day ahead, and the strawberries can be pre‑sliced and stored in the fridge. The whipped cream can be made in advance and kept chilled. This makes the dessert a perfect choice for parties where you want to stay on the move.
- Versatility: Swap the pound cake for a fresh scone, use frozen strawberries for a budget option, or add a splash of liqueur for an adult twist. The core concept remains intact, giving you endless creative freedom.
- Audience Appeal: Whether you’re a seasoned baker or a kitchen newbie, this recipe is approachable. The ingredients are pantry staples, and the steps are straightforward. It’s a crowd‑pleaser that works for any gathering.
Alright, let's break down exactly what goes into this masterpiece…
Inside the Ingredient List
The Flavor Base
The pound cake is the backbone of this dessert. It’s a rich, buttery loaf that provides a sturdy, melt‑in‑your‑mouth texture. If you skip it, you lose the structure that holds the other elements together. For the best results, choose a loaf that’s freshly baked or at least a day old so it’s firm enough to slice cleanly. A good tip: let the cake sit at room temperature for 30 minutes before slicing to soften it just enough for easy cutting.
The Texture Crew
Fresh strawberries bring a juicy, vibrant pop that contrasts with the dense cake. They’re sliced thinly so they distribute evenly across each layer. If you can’t find fresh berries, frozen strawberries work too—just thaw them and pat dry. The whipped cream is the airy, sweet counterbalance that coats the tongue. It’s best made with cold heavy cream for a stable, fluffy consistency. If you’re short on time, a store‑bought whipped topping will do, but homemade always tastes better.
The Unexpected Star
Strawberry jam is the secret sauce that ties everything together. It’s not just a sweetener; it adds a glossy, tangy finish that elevates the overall flavor profile. If you prefer a lighter version, you can use a strawberry coulis or a drizzle of honey instead. However, the jam’s thick consistency helps the strawberries cling to the cake, preventing them from sliding off when you bite.
The Final Flourish
A sprinkle of fresh mint or a dusting of powdered sugar can add a finishing touch. Mint brings a cool contrast to the sweet, buttery layers, while powdered sugar adds an extra layer of sweetness and visual appeal. If you’re feeling adventurous, a splash of lemon zest can brighten the entire dish. These final touches are optional but can elevate the dessert to a gourmet level.
Everything's prepped? Good. Let's get into the real action…
The Method — Step by Step
- Step 1: Slice the Cake. Take the loaf of pound cake out of the fridge and let it sit at room temperature for 10 minutes. Using a serrated knife, cut the loaf into 1‑inch thick rounds. The knife should glide through the cake without crushing it. This step is crucial because uneven slices can cause the layers to be unbalanced.
- Step 2: Prepare the Strawberries. Rinse the strawberries under cold water, then pat them dry with a paper towel. Remove the stems and slice them into halves or quarters, depending on size. If you’re using frozen berries, thaw them gently in a colander and squeeze out excess liquid. The strawberries should be juicy but not soggy.
- Step 3: Whip the Cream. In a chilled bowl, pour in the heavy cream. Using an electric mixer, beat on medium speed until soft peaks form. Be careful not to over‑whip; you want the cream to be fluffy yet stable. If you’re short on time, pre‑whipped cream works fine, but homemade is always superior.
- Step 4: Spread the Jam. Take a small amount of strawberry jam and spread it evenly across the top of each cake slice. The jam should coat the surface lightly, creating a sticky base for the strawberries. A thin layer is enough; you don’t want it to overwhelm the cake’s flavor.
- Step 5: Layer the Strawberries. Arrange the sliced strawberries on top of the jam, making sure they’re spread evenly. The berries should sit snugly against the cake, not floating. This layering not only looks beautiful but also ensures every bite has a balanced flavor.
- Step 6: Add the Cream. Generously spoon the whipped cream over the strawberries, letting it cascade down the sides of the cake. The cream should be airy and light, providing a creamy contrast to the dense cake. This is the moment of truth—watch the whipped cream settle into the gaps between the strawberries.
- Step 7: Garnish. Sprinkle a pinch of fresh mint leaves or a light dusting of powdered sugar over the top. If you’re feeling adventurous, add a zest of lemon to brighten the dish. These garnishes add a final layer of flavor and visual appeal.
- Step 8: Serve Immediately. Plate the assembled shortcakes on individual dessert plates or a large platter. Serve right away to enjoy the fresh, juicy strawberries and the airy whipped cream at their best. If you’re preparing ahead, cover the dish with plastic wrap and refrigerate for up to 2 hours.
That’s it — you did it. But hold on, I’ve got a few more tricks that will take this to another level…
Insider Tricks for Flawless Results
The Temperature Rule Nobody Follows
Cold equipment is your best friend when whipping cream. Keep your mixing bowl and whisk in the freezer for 10 minutes before starting. This ensures the cream stays cold and incorporates air more efficiently. If you’re using a hand mixer, pause occasionally to let the mixture cool if it starts to feel warm. The result is a stable, airy whipped cream that holds its shape.
Why Your Nose Knows Best
Before adding the strawberries, give the cake a quick sniff. If it smells buttery and slightly sweet, it’s ready. If it has a faint, stale odor, let it rest longer or toast it briefly. Your nose is a reliable indicator of freshness and flavor. This simple check can prevent a bland dessert.
The 5‑Minute Rest That Changes Everything
After assembling the shortcake, let it rest for 5 minutes before serving. This allows the flavors to meld, the jam to soften, and the whipped cream to settle. The rest period also gives the cake a chance to warm slightly, enhancing its aroma. A short pause can transform a good dessert into a memorable one.
The Sweet Spot for Whipped Cream
If you prefer a sweeter dessert, fold a tablespoon of powdered sugar into the cream before whipping. This gives the cream a subtle sweetness that complements the strawberries. However, be careful not to add too much sugar, as it can cause the cream to become too dense. Balance is key for the perfect texture.
The Final Flourish
A drizzle of balsamic reduction can add a surprising depth of flavor. The acidity cuts through the sweetness, creating a sophisticated palate. If you’re serving a crowd, a small bowl of extra jam on the side lets guests add their own sweetness. This simple touch adds personalization to the dessert.
Creative Twists and Variations
This recipe is a playground. Here are some of my favorite ways to switch things up:
Chocolate‑Infused Shortcake
Swap the pound cake for a chocolate sponge or add a tablespoon of cocoa powder to the cake batter. The chocolate pairs beautifully with strawberries, creating a decadent treat. Serve with a drizzle of chocolate ganache for an extra wow factor.
Almond‑Laced Layers
Add sliced toasted almonds between the cake and strawberry layers. The almonds provide a nutty crunch that contrasts the soft cake and juicy berries. A sprinkle of almond extract in the whipped cream enhances the flavor profile.
Mango Madness
Replace the strawberries with ripe mango slices for a tropical twist. The mango’s sweetness and texture complement the pound cake and whipped cream. Add a splash of lime juice to brighten the flavors.
Boozy Delight
Stir a tablespoon of Grand Marnier or strawberry liqueur into the whipped cream. The alcohol adds a subtle depth that pairs well with the jam. This version is perfect for an adult gathering or a celebratory dessert.
Vegan Version
Use a dairy‑free pound cake, a plant‑based whipped topping, and a vegan strawberry jam. This version keeps the same structure and flavor but is suitable for vegan diners. The texture remains light and airy, just like the original.
Mini Shortcake Cups
Instead of a loaf, bake or buy mini pound cake cupcakes. Layer each cup with jam, strawberries, and whipped cream. These bite‑size treats are perfect for a dessert bar or a party.
Storing and Bringing It Back to Life
Fridge Storage
Store the assembled shortcakes in an airtight container in the refrigerator for up to 2 days. The cake will stay moist, and the strawberries will remain fresh. If you notice the cake drying out, lightly drizzle a teaspoon of water over it before sealing the container.
Freezer Friendly
For longer storage, keep the pound cake and strawberries separate. Freeze the cake slices in a single layer on a parchment‑lined tray, then transfer to a freezer bag. The strawberries can be frozen in a single layer as well. Reheat the cake slices in a toaster oven before assembling.
Best Reheating Method
Reheat the cake slices in a toaster oven at 350°F (175°C) for 4–5 minutes until warm. The cake should be soft and fragrant. Add a tiny splash of water before reheating to keep it moist and prevent it from drying out. This trick restores the cake’s original texture.