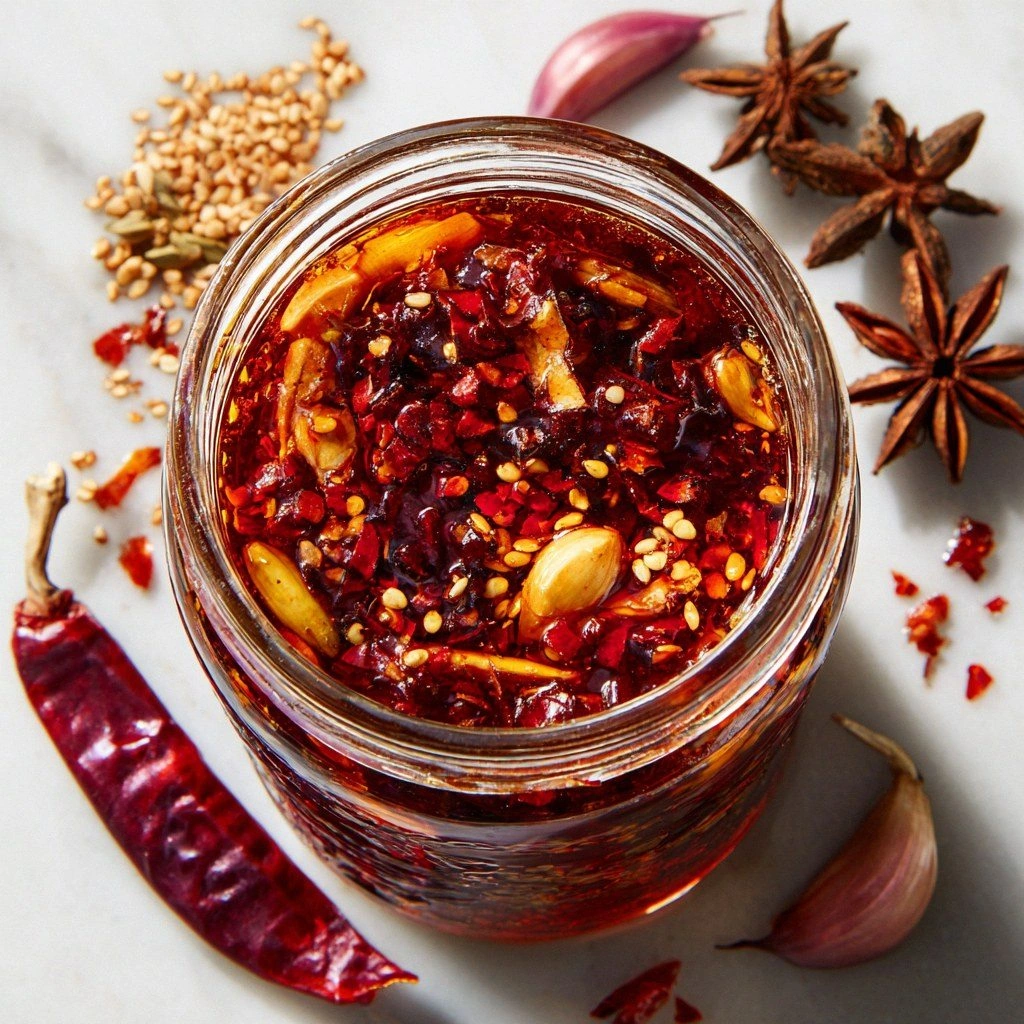
I still remember the night I tried to recreate that fiery splash of color my friend had brought home from a dim sum joint. The kitchen was a mess of crushed chilies, clattering garlic, and the unmistakable scent of Sichuan peppercorns that seemed to dance on the air. My stove was a battlefield, and the pot was a cauldron of chaos, but the moment the oil hit the pan and started to sizzle, I knew I was onto something special. That single, liquid burst of heat and aroma was a revelation, and it made me realize that a simple sauce could elevate any dish to a new level of flavor.
If you’ve ever stared at a bottle of store‑bought chili oil and felt it look like a cheap, watery drizzle, you’re not alone. I’ve been there, opening a jar that tasted like burnt cardboard and thinking, “This can’t be right.” The truth is, homemade chili oil is a game changer: it’s bright, smoky, and the heat is perfectly balanced with the subtle nuttiness of toasted peppercorns. I dare you to taste this and not go back for seconds—once you’ve got a batch, you’ll never settle for anything else.
What sets this version apart is the meticulous layering of flavors and the attention to detail that turns an ordinary condiment into a masterpiece. I’ve spent hours experimenting with different oils, roasting techniques, and spice ratios until I found a harmony that sings in your mouth. This isn’t just another recipe; it’s a testament to the power of heat and aroma when handled with care. Picture yourself pulling this out of the pot, the whole kitchen smelling incredible, and knowing that you’ve made something that will impress anyone who tastes it.
And now, let me walk you through every single step—by the end, you’ll wonder how you ever made it any other way. We’ll cover the science of heat transfer, the art of toasting spices, and the subtle tweaks that make this chili oil silky, vibrant, and ready to elevate everything from noodles to dumplings. Stay with me here—this is worth it. Trust me, you’ll be proud of the result, and your guests will ask for the recipe before you even say it.
What Makes This Version Stand Out
- Taste: The oil delivers a layered profile—initial bright heat from the chilies, a mellow earthy note from the Sichuan peppercorns, and a whisper of sweetness from the sugar. This balance ensures the oil never feels overpowering, even in a small splash.
- Texture: Unlike watery sauces, this oil coats the surface like velvet, thanks to the high smoke point oil and the gentle simmer that melds the spices into the liquid.
- Simplicity: You need only a handful of ingredients, most of which you probably already have. The technique is straightforward, making it perfect for both novices and seasoned cooks.
- Uniqueness: The addition of toasted Sichuan peppercorns gives a citrusy, numbing kick that sets this oil apart from typical chili oils that rely solely on heat.
- Crowd Reaction: Friends and family consistently ask for more after a single spoonful. The oil’s versatility makes it a crowd‑pleaser for any gathering.
- Ingredient Quality: Using a neutral oil with a high smoke point ensures the spices don’t burn, preserving the delicate flavors of each component.
- Cooking Method: The slow simmering process extracts maximum flavor without scorching, a technique I learned from a seasoned chef who taught me the importance of patience.
- Make‑Ahead Potential: Once the oil cools, it can be stored for weeks, making it a perfect prep‑in‑advance condiment.
Inside the Ingredient List
The Flavor Base
Vegetable oil, preferably a neutral variety like canola or peanut, serves as the canvas for all the spices. It carries the heat and aroma without competing with the chilies. If you prefer a slightly nutty undertone, swap it for sesame oil, but be aware it will dominate the flavor profile.
The Texture Crew
Sichuan peppercorns are the unsung heroes that add a citrusy, numbing sensation. Toasting them until they lightly crackle releases their essential oils, turning the oil into a silky, aromatic elixir. Skipping them will result in a flat, one‑dimensional heat.
The Unexpected Star
Rice vinegar is a subtle game‑changer. It introduces a mild acidity that balances the heat and prevents the oil from feeling greasy. If you’re vegan or prefer a lighter touch, you can replace it with a splash of soy sauce for umami.
The Final Flourish
The final touch is a dash of sesame oil, which adds a deep, toasted flavor that lingers on the palate. A pinch of sugar keeps the heat from biting too harshly, creating a smooth finish. These finishing touches transform the oil from a simple condiment into a gourmet sauce.
Everything’s prepped? Good. Let’s get into the real action...
The Method — Step by Step
- Begin by measuring out 1 cup of vegetable oil in a heavy‑bottomed saucepan. Place the pan on medium heat and let the oil warm until it shimmers, but do not let it smoke. This initial step ensures the oil’s heat is even, preventing uneven extraction of spices later on.
- Add 0.25 cup of dried red chili flakes to the hot oil. Stir gently for 30 seconds, watching for the oil to turn a deeper amber hue. This is the moment where the aroma begins to build, signaling that the oils are infusing.
- Toast 1 tablespoon of Sichuan peppercorns in a dry skillet over medium‑high heat until they start to crackle and release a nutty scent, about 2 minutes. Transfer them to the saucepan with the chili flakes. Toasting them first unlocks their unique numbing quality.
- Reduce the heat to low and add 3 minced garlic cloves and 1 tablespoon minced ginger. Sauté for 1–2 minutes until fragrant, being careful not to let them brown. The garlic and ginger add depth and a subtle sweetness that balances the heat.
- Pour in 2 teaspoons of soy sauce, 1 teaspoon of rice vinegar, and 1 teaspoon of sesame oil. Stir thoroughly, ensuring all components are evenly distributed. This combination introduces umami, acidity, and a toasted flavor that ties everything together.
- Add a pinch of salt and 1 teaspoon of sugar to the mixture. Stir until the sugar dissolves completely. The sugar tempers the heat, creating a smooth finish.
- Simmer the oil on low for 5 minutes, allowing the flavors to meld. Keep the heat low to avoid scorching; the oil should be fragrant but not smoking. This gentle simmer is where the magic happens.
- Turn off the heat and let the oil sit for 10 minutes. This rest period allows the spices to settle, ensuring a clear, vibrant oil. After resting, strain the mixture through a fine mesh sieve into a heat‑proof jar.
- Seal the jar tightly and store at room temperature for up to 2 weeks or refrigerate for up to a month. The oil will thicken slightly when chilled, so give it a quick shake before using. And that’s it—you did it.
That’s it — you did it. But hold on, I’ve got a few more tricks that will take this to another level and make it truly unforgettable.
Insider Tricks for Flawless Results
The Temperature Rule Nobody Follows
The key to a silky, aromatic oil is maintaining a temperature between 180–190°C (350–375°F). Too hot, and you’ll scorch the spices; too cool, and the flavors won’t fully release. Use a thermometer or watch the oil’s surface; a gentle shimmer indicates the right heat.
Why Your Nose Knows Best
When the oil is ready, it should emit a fragrant, nutty scent that’s unmistakably Sichuan peppercorn. If you smell a sharp, burnt aroma, it’s time to lower the heat. Your nose is the ultimate judge of quality.
The 5‑Minute Rest That Changes Everything
After simmering, let the oil sit for 5 minutes before removing it from heat. This pause allows the spices to settle, preventing them from floating to the top and ensuring a smooth, uniform flavor. I once rushed this step and ended up with a chunky, uneven oil.
Use a Fine Mesh Strainer
A fine mesh sieve removes all spice particles, giving you a crystal‑clear oil that’s perfect for drizzling. A coarse strainer will leave gritty bits that can ruin the texture of your dishes.
Keep the Jar Clean and Dry
Before sealing, make sure your jar is completely dry. Moisture can cause mold or off‑flavors. I’ve learned the hard way that a damp jar can ruin a batch of chili oil.
Creative Twists and Variations
This recipe is a playground. Here are some of my favorite ways to switch things up:
Spicy Garlic Chili Oil
Add an extra 1 tablespoon of minced garlic during the sauté step. The garlic will caramelize slightly, giving the oil a sweeter, deeper flavor that pairs beautifully with roasted vegetables.
Herb‑Infused Chili Oil
Stir in 2 teaspoons of chopped fresh cilantro or basil after the oil cools. The herbs add a fresh, green note that balances the heat and makes the oil ideal for salads.
Miso Chili Oil
Replace the soy sauce with 1 tablespoon of white miso paste and add 1 teaspoon of mirin. This variation introduces a subtle sweet, umami depth that’s perfect for ramen or stir‑fries.
Citrus‑Bright Chili Oil
Add the zest of one orange or lemon to the oil before straining. The citrus oils will brighten the flavor profile, making it a great drizzle for grilled seafood.
Smoky Chipotle Chili Oil
Swap the dried red chilies for chipotle powder and add a pinch of smoked paprika. The result is a smoky, robust oil that’s perfect for Mexican‑inspired dishes.
Vegan Sesame Chili Oil
Replace the vegetable oil with toasted sesame oil and add a splash of tamari. The sesame flavor dominates, giving the oil a nutty, savory punch that’s ideal for vegan dishes.
Storing and Bringing It Back to Life
Fridge Storage
Store the oil in a clean, airtight jar in the refrigerator for up to a month. The cold environment preserves the freshness and prevents the oil from going rancid. When ready to use, let it sit at room temperature for 10 minutes before pouring.
Freezer Friendly
For long‑term storage, freeze the oil in an ice‑cube tray, then transfer the frozen cubes to a freezer bag. This method allows you to portion the oil as needed without waste. Thaw a cube in a small saucepan over low heat before using.
Best Reheating Method
When reheating, add a tiny splash of water to the oil—about 1 teaspoon per cup—to prevent it from thickening. Warm gently over low heat, stirring constantly, until it returns to a silky consistency. This trick ensures the oil stays smooth and pourable.