Picture this: a Sunday afternoon, the kitchen smells like fresh bread and the clock ticks toward dessert time. I’m standing in front of a pile of plain white sandwich bread, feeling that familiar pang of “I need something sweet, but not too heavy.” That’s when I remembered the last night’s fiasco—an over‑baked cheesecake that left my kitchen smelling like burnt sugar and my taste buds in a state of disbelief. I swore I’d never let a dessert become a disaster again.
The moment I cracked open the fridge, the bright reds of fresh strawberries glimmered like tiny, juicy jewels. I could almost taste the burst of sweetness that would soon meet the mellow creaminess of full‑fat cream cheese. The air was thick with anticipation, the sound of my stove’s burner humming like a quiet lullaby. I imagined the final product: golden, crispy edges that would crack like thin ice, a creamy center that would melt in your mouth, and strawberries that would burst with natural sugar.
This isn’t just another fried sandwich; it’s a revelation. The secret? A perfect balance of textures, a dash of vanilla that elevates the strawberries, and a meticulous frying technique that keeps the interior silky while the exterior turns a buttery caramel. I dare you to taste this and not go back for seconds, because once you bite, you’ll be transported to a carnival of flavors. If you’ve ever struggled with a fried dessert that ends up soggy or too sweet, you’re not alone—this recipe is the fix you’ve been waiting for.
Let me walk you through every single step — by the end, you'll wonder how you ever made it any other way. The journey begins with simple, fresh ingredients and a few clever hacks that will make your kitchen sing. Keep your eyes on the process, because the next few minutes are pure magic.
What Makes This Version Stand Out
- Flavor: The combination of sweet strawberries with a subtle vanilla‑infused cream cheese creates a layered taste that feels both familiar and adventurous. The strawberries’ natural tartness cuts through the richness, preventing any single element from overpowering the others.
- Texture: The sandwich’s exterior achieves a crisp, golden crunch while the interior remains luxuriously soft. This contrast feels like biting into a cookie that suddenly reveals a silky center.
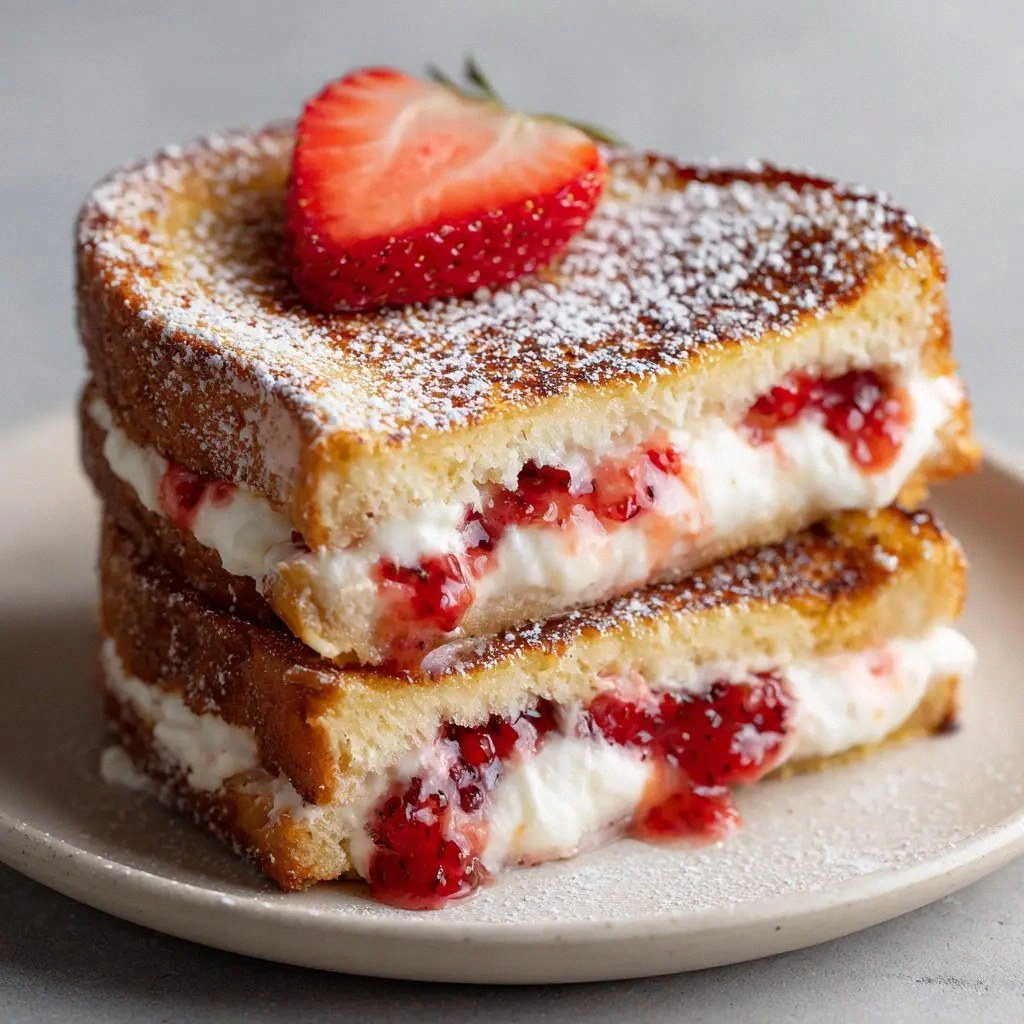
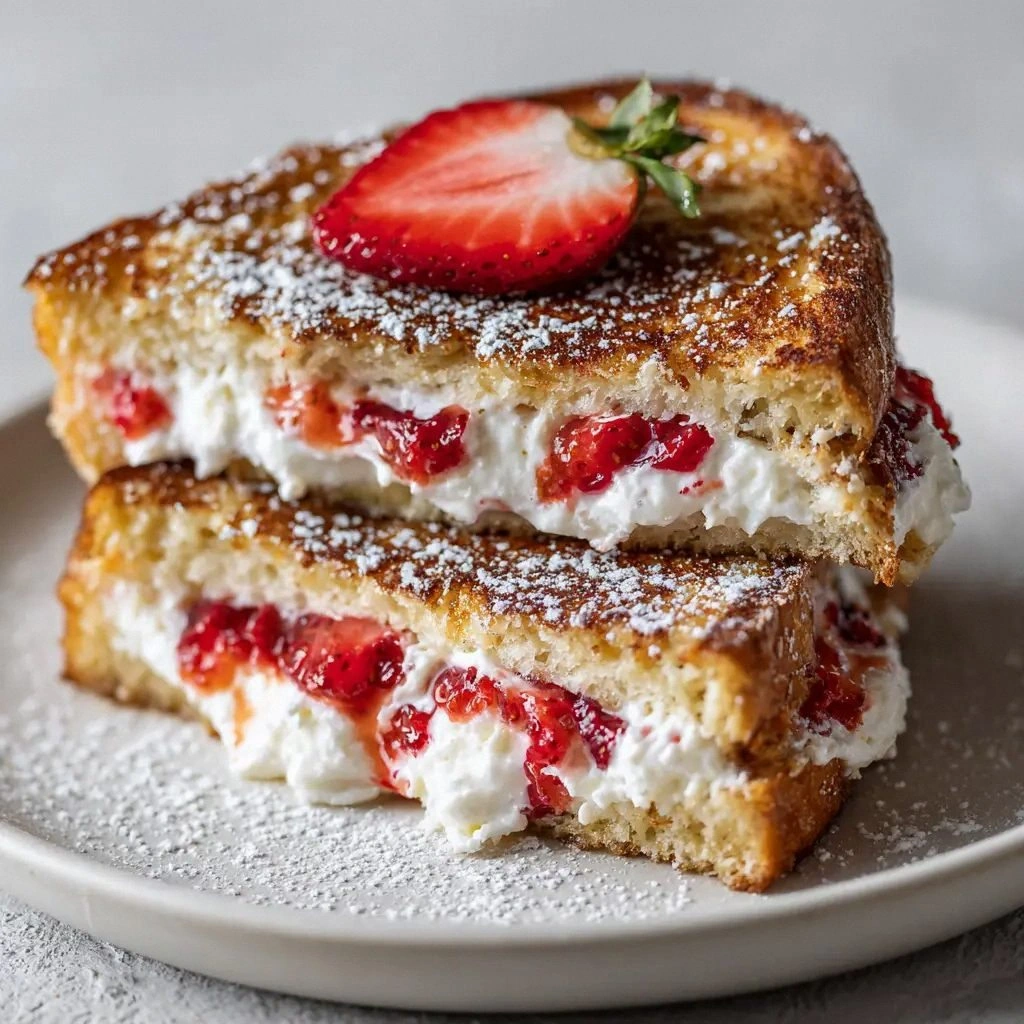
- Visual Appeal: Each sandwich looks like a golden slice of heaven, with a glossy strawberry glaze that glistens under the kitchen light. It’s a dessert that’s as beautiful as it is delicious.
- Simplicity: With only seven ingredients and a straightforward method, you can whip up a showstopper without spending hours in the kitchen.
- Make‑Ahead Potential: You can assemble the sandwiches ahead of time, refrigerate them, and fry them just before serving. This flexibility makes it a perfect choice for parties or last‑minute gatherings.
- Ingredient Quality: Using full‑fat cream cheese and fresh, ripe strawberries ensures a depth of flavor that store‑bought substitutes simply can’t match.
- Audience Reaction: Friends who have tasted this version say it’s “hands down the best version you'll ever make at home.” The crowd’s enthusiasm is proof that this recipe delivers.
- Health‑Friendly Twist: By using only a tablespoon of granulated sugar and fresh fruit, you keep the dessert indulgent yet relatively light compared to traditional fried sweets.
Inside the Ingredient List
The Flavor Base
Cream cheese is the heart of this dessert. Its silky texture provides a creamy canvas that balances the tartness of strawberries. Choosing a full‑fat variety guarantees a rich mouthfeel that melts on the tongue. If you’re on a lower‑fat diet, a light cream cheese will still work, but expect a slightly drier center.
The Texture Crew
White sandwich bread, thick‑cut for maximum surface area, is the vessel that holds everything together. The thickness allows for a substantial bite without compromising the crunch. If you’re craving a gluten‑free option, swap for a gluten‑free loaf of similar density, but be aware the texture may differ slightly. The butter, melted and warmed, creates a golden crust that feels like a buttery cookie bite.
The Unexpected Star
Fresh strawberries are the showstopper. They add natural sweetness, bright color, and a juicy burst that contrasts beautifully with the creamy interior. When selecting strawberries, look for plump, firm berries with a deep red hue and a fragrant aroma. If strawberries are out of season, frozen berries can be used, but thaw and drain them well to avoid excess moisture.
The Final Flourish
Confectioners’ sugar and a tablespoon of granulated sugar create a subtle glaze that enhances the strawberries’ flavor without overpowering them. Vanilla extract adds depth, lifting the overall taste profile. A pinch of sea salt can be added to the cream cheese mixture to balance sweetness, but it’s optional.
Everything’s prepped? Good. Let's get into the real action.
The Method — Step by Step
- Begin by mixing the cream cheese, confectioners’ sugar, vanilla extract, and a pinch of salt in a bowl until the mixture is smooth and creamy. The goal is a silky consistency that will coat the strawberries without dripping. If the mixture feels too thick, add a teaspoon of milk to loosen it slightly.
- Slice the strawberries into thin rounds, about 1/8 inch thick. The thinness ensures they will soften quickly during frying and release their juices into the cheese. Gently pat them dry with a paper towel to remove excess moisture, which would otherwise make the bread soggy.
- Spread a generous layer of the cream cheese mixture onto one slice of bread. This layer should cover the entire surface, creating a smooth base for the strawberries. The amount should be enough to hold the fruit but not so much that the bread becomes saturated.
- Arrange the strawberry slices on top of the cream cheese, slightly overlapping like a waterfall. The strawberries should be evenly distributed to avoid any one sandwich being fruit‑heavy. Sprinkle the granulated sugar lightly over the strawberries; this will caramelize slightly during frying, giving the sandwich a sweet glaze.
- Top with the second slice of bread, pressing gently to ensure the sandwich stays together. If you’re making multiple sandwiches, repeat the process until all slices are used. For a cleaner edge, you can lightly press the sandwich’s sides to seal the filling.
- Heat a non‑stick skillet over medium heat and add the melted butter. Let the butter swirl around the pan until it starts to foam, but be careful not to let it brown too quickly. This butter creates a golden, buttery crust that is essential for the final crunch.
- Place the sandwich in the skillet. Allow it to cook for about 3 minutes on one side until it turns a deep golden brown and the edges begin to crisp. The internal temperature should reach around 160°F (71°C) to ensure the cream cheese melts fully. Flip carefully with a spatula, and cook the other side for another 2–3 minutes.
- Once both sides are golden and the interior is creamy, remove the sandwich from the skillet and place it on a paper towel to drain any excess butter. Let it rest for a minute; this resting period allows the flavors to settle and the sandwich to firm up slightly.
- Serve immediately while the crust is still crisp. If you prefer a slightly sweeter finish, drizzle a small amount of honey or a dusting of powdered sugar over the top. The contrast of sweet glaze against the buttery crust is a delightful finishing touch.
That’s it — you did it. But hold on, I've got a few more tricks that'll take this to another level.
Insider Tricks for Flawless Results
The Temperature Rule Nobody Follows
Many people fry at high heat, which quickly darkens the bread while leaving the center undercooked. The secret is medium heat; this allows the butter to coat the bread evenly and the cream cheese to melt without scorching. If your stove’s temperature is inconsistent, use a thermometer to maintain 350°F (177°C) for consistent results.
Why Your Nose Knows Best
Before flipping, pause and inhale the aroma of the frying sandwich. A warm, buttery scent with a hint of caramelized sugar signals that the crust is ready. Trusting your senses can save you from over‑frying or under‑cooking.
The 5-Minute Rest That Changes Everything
After frying, let the sandwich rest for exactly five minutes on a wire rack. This brief pause allows the residual heat to finish cooking the center and lets the butter redistribute, resulting in a crispier crust and a more cohesive filling. Skipping this step often leads to a soggy interior.
The Sweet‑Savory Balance
If you find the sandwich too sweet, sprinkle a tiny pinch of sea salt on top after frying. The salt sharpens the fruit’s sweetness and elevates the overall flavor profile. This small tweak can make a world of difference for those who prefer a more balanced taste.
The Quick Cooling Trick
When you’re making multiple sandwiches, place them on a cooling rack immediately after frying. This prevents the bottom of each sandwich from absorbing excess butter and keeps the texture consistent across all servings.
Creative Twists and Variations
This recipe is a playground. Here are some of my favorite ways to switch things up:
Chocolate‑Covered Strawberry Sandwich
After frying, drizzle melted dark chocolate over the top and let it set. The chocolate adds a bitter depth that balances the fruit’s sweetness, turning the sandwich into a dessert with a chocolate twist.
Balsamic Glazed Version
Replace the granulated sugar with a splash of balsamic vinegar. The vinegar’s acidity cuts through the cream cheese, giving the sandwich a sophisticated, tangy kick that pairs wonderfully with strawberries.
Coconut‑Infused Delight
Swirl in shredded coconut into the cream cheese mixture and sprinkle toasted coconut on top after frying. The coconut adds a tropical flavor and a pleasant crunch that complements the buttery crust.
Nutty Crunch Variation
Add chopped toasted almonds or pistachios to the strawberry layer. The nutty crunch provides an extra textural layer and introduces a savory note that balances the dessert’s sweetness.
Low‑Calorie Swap
Use a low‑fat cream cheese and reduce the amount of butter to 1 tbsp. This version retains the same flavor profile while cutting calories, making it a lighter option for health‑conscious diners.
Holiday Spice Edition
Incorporate a pinch of cinnamon or nutmeg into the cream cheese mixture. The warm spices give the sandwich a cozy, holiday vibe, perfect for festive gatherings.
Storing and Bringing It Back to Life
Fridge Storage
Store assembled sandwiches (not yet fried) in an airtight container for up to 24 hours. Keep the container on the middle shelf to maintain a consistent temperature. When ready to serve, reheat in a skillet or oven at 350°F until the crust is crisp.
Freezer Friendly
Wrap each sandwich individually in parchment paper and place them in a freezer bag. Freeze for up to 2 weeks. To reheat, thaw at room temperature for 30 minutes and then fry or bake at 350°F for 5 minutes.
Best Reheating Method
The secret to restoring crispiness is a quick pan‑fry at medium heat. If the sandwich feels dry, add a teaspoon of butter to the pan before reheating. A tiny splash of water in the pan can also steam the sandwich slightly, preventing it from becoming too hard.