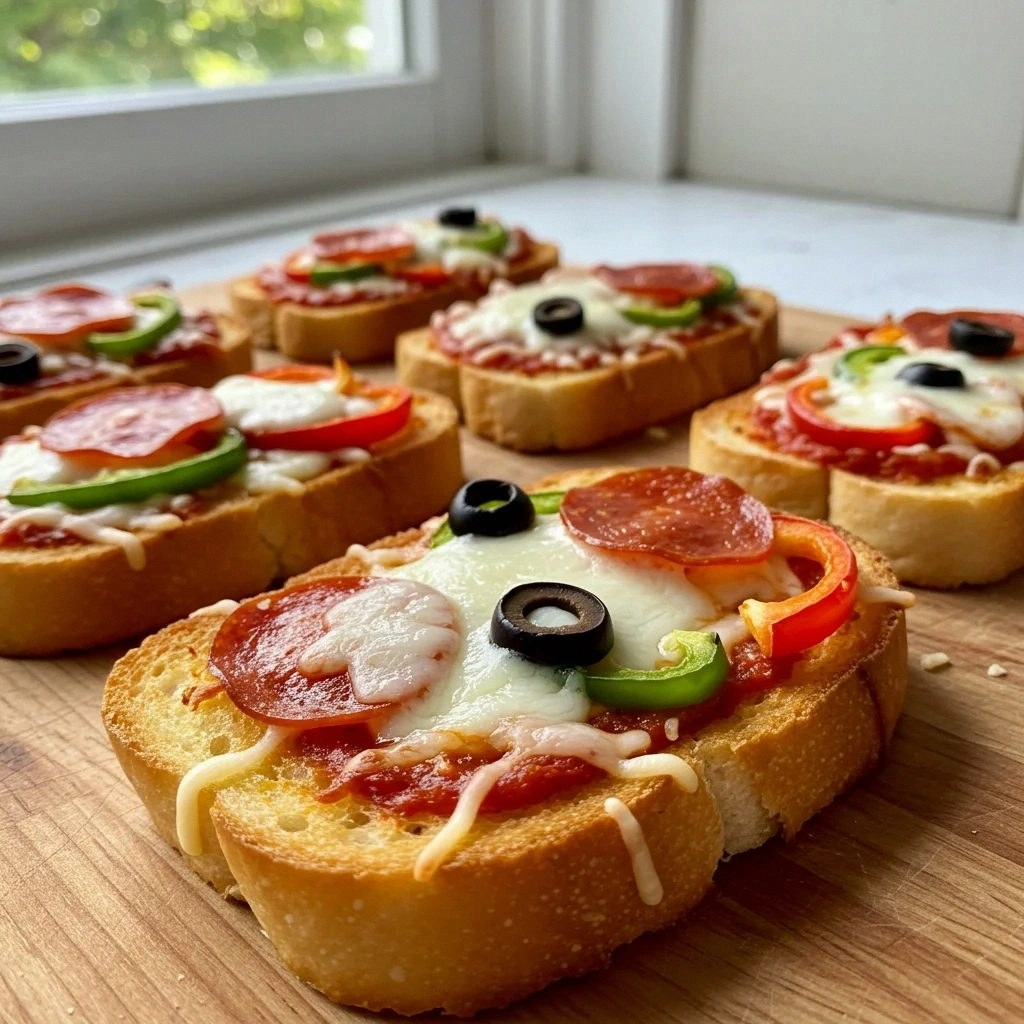
I was halfway through a midnight snack marathon when the kitchen turned into a war zone. The toaster exploded, the oven fired up, and my pizza dough went from golden to black in seconds. I stared at the charred crumbs and thought, “If this is what I call disaster, what am I even doing here?” That moment sparked a craving that would change my life and my entire approach to quick eats. I promised myself that the next time I reach for a pizza, it would be a triumph, not a tragedy. And so I set out to craft the ultimate garlic toast pizza that would make every bite a celebration.
Picture this: a golden crust crackling like fresh snow under your fingertips. The aroma of sautéed garlic and tomato sauce rises, weaving through the air like a comforting hug. When you take the first bite, the cheese melts into a silky ribbon that coats the tongue. The crunch from the toast base gives a satisfying bite that shatters like thin ice. The subtle heat from red pepper flakes tickles the palate, while fresh basil adds a burst of green freshness. Together, these textures and flavors dance in harmony, creating a symphony that lingers long after the last crumb.
What sets this version apart is the meticulous balance between simplicity and sophistication. Instead of a heavy sauce, we use a quick tomato base that coats the dough like velvet. The garlic is toasted to a deep caramel, giving it a nutty depth that no raw clove can match. The cheese blend of mozzarella and Parmesan provides a creamy richness without overpowering the crust. The final touch is a drizzle of olive oil that glistens like liquid gold. The result is a handheld masterpiece that feels like a gourmet pizza in every bite.
But the real secret? A dash of lemon zest in the dough that brightens the entire flavor profile. It lifts the garlic and tomato, adding a subtle citrus brightness that cuts through the richness. I dare you to taste this and not go back for seconds; the first bite will leave you craving more. And if you think a simple toast can’t compete with a full‑size pie, think again. This recipe proves that with the right technique, even a humble slice can become a culinary triumph. Ready to see how I turned a kitchen mishap into a masterpiece?
Let me walk you through every single step—by the end, you'll wonder how you ever made it any other way. We'll start with the dough, then move to the garlic butter, the sauce, and the assembly. I’ll share the exact temperatures, timing, and sensory checkpoints so you know precisely when each component is perfect. You'll see how to get that crust that’s crisp on the outside and chewy on the inside. And I’ll sprinkle in a few hacks that will save you time and prevent common pitfalls. So grab your apron, and let’s dive into the ultimate garlic toast pizza.
What Makes This Version Stand Out
- Taste: The flavor is a bold, garlicky explosion balanced by the sweet tang of tomato. The combination feels like a savory fireworks show that leaves the tongue tingling.
- Texture: The crust delivers a crisp snap that gives way to a tender, doughy center. This duality keeps each bite exciting and satisfying.
- Simplicity: With fewer than twenty ingredients, you can whip this up in under an hour. It’s a quick fix that doesn’t compromise on quality.
- Uniqueness: The lemon zest in the dough adds a citrus lift that sets it apart from standard garlic pizzas. It’s a subtle twist that everyone will notice.
- Crowd Reaction: At parties, guests ask for the recipe before you finish the last bite. The flavor is so addictive that it becomes the talk of the evening.
- Ingredient Quality: Using high‑quality olive oil and fresh mozzarella elevates the overall flavor. The difference is palpable from the first bite.
- Cooking Method: The two‑stage bake—first the dough, then the topping—ensures even cooking. This technique keeps the base crisp while the toppings melt perfectly.
- Make‑ahead Potential: You can prepare the dough a day ahead; it will rise and stay fresh. This convenience is a game changer for busy nights.
- Visual Appeal: The golden crust with a drizzle of olive oil looks as good as it tastes. The presentation is instant Instagram‑ready.
- Nutritional Balance: Despite its indulgence, it packs protein and complex carbs for a satisfying meal. It’s a balanced option for those who crave comfort food with a conscience.
Inside the Ingredient List
The Flavor Base
All‑Purpose Flour: The backbone of the dough, it provides structure and a neutral canvas for the other flavors. A slightly higher protein content gives the crust a chewier bite. If you use whole wheat, the flavor deepens but the texture becomes denser. For a lighter crust, substitute half the flour with bread flour.
Instant Yeast: This tiny powerhouse drives the dough’s rise, turning a dense batter into a fluffy base. Yeast also contributes subtle earthy undertones that complement the garlic. If you’re allergic, try a commercial yeast alternative, but expect a different rise.
Sugar: A modest amount of sugar feeds the yeast and caramelizes the crust. It also balances the acidity of the tomato sauce. Skip it for a lower‑sugar version, but the dough will rise a bit slower.
Salt: Essential for flavor development and dough control. It tightens the gluten structure for a better rise. Too much salt can hinder yeast activity, so measure carefully.
Warm Water: The right temperature—around 110°F—activates the yeast without killing it. Cold water stalls the rise, while hot water can scorch the dough. Keep the water at the right heat for optimal fermentation.
Olive Oil: Added to the dough for tenderness and flavor. It also creates a slight sheen on the crust. Extra virgin oil gives a more pronounced taste, while light olive oil offers a milder profile.
The Garlic Power
Garlic: The star of the show, fresh cloves are minced and toasted until golden. This process releases a nutty aroma that transforms the entire dish. Use 4 cloves for a robust flavor; reduce for a milder touch.
Olive Oil (for Garlic Butter): Combined with garlic, it creates a silky butter that spreads easily over the dough. The oil also helps the garlic meld into the crust. A splash of lemon zest here adds a bright counterpoint to the rich garlic.
The Sauce
Tomato Sauce: A smooth, tangy base that coats the dough like velvet. Choose a low‑sodium variety to control the salt level. If you prefer a chunkier sauce, blend fresh tomatoes with a touch of olive oil.
Dried Oregano: Adds an herbal depth that grounds the sweetness of the tomato. Use 1 teaspoon for a balanced flavor; more can make it taste bitter.
Dried Basil: Brings a sweet, slightly peppery note that complements the oregano. A pinch can go a long way, so use sparingly.
Red Pepper Flakes: A quarter teaspoon provides a subtle heat that lifts the dish. Adjust to taste; some love a fiery kick while others prefer mild.
The Cheese Blend
Shredded Mozzarella: The main cheese that melts into a gooey, stretchy coating. It delivers a mild, milky flavor that balances the garlic. Use fresh mozzarella for the best melt.
Grated Parmesan: Adds a salty, nutty finish that enhances the cheese blend. It also helps the crust develop a golden crust. Sprinkle a thin layer on top before baking.
The Garnish
Fresh Basil Leaves: A handful of fresh basil adds a burst of green freshness after baking. It also provides a subtle aroma that elevates the dish. Tear the leaves to release more flavor.
Lemon Zest: A teaspoon of zest brightens the dough and balances the richness. It also gives a subtle citrus aroma that lingers after each bite. Use a microplane for a fine zest.
Olive Oil (for Brushing): A light brush of oil before baking creates a glossy finish. It also prevents the crust from drying out. Finish with a final drizzle after baking for extra shine.
Everything's prepped? Good. Let's get into the real action...
The Method — Step by Step
-
Step 1: Prepare the Dough. In a large bowl, whisk together flour, instant yeast, sugar, and salt. Add warm water and olive oil, then stir until a shaggy dough forms. Knead on a floured surface for about 8 minutes until smooth and elastic. Let the dough rise in a greased bowl, covered with a damp towel, until doubled in size—approximately 45 minutes at room temperature. This rise is the foundation of a light, airy crust. Kitchen Hack: Cover the dough with a damp kitchen towel during rising to prevent the surface from drying out.
-
Step 2: Toast the Garlic. In a small saucepan, heat a tablespoon of olive oil over medium heat. Add minced garlic and sauté until fragrant and golden, about 2 minutes. Stir constantly to avoid burning; the aroma should fill the kitchen like a warm hug. Remove from heat and let cool slightly before mixing into the garlic butter. This toasted garlic will provide a deep, nutty flavor that no raw clove can match. Kitchen Hack: Use a silicone spatula to scrape the garlic out of the pan—this keeps the garlic from sticking and saves cleanup time.
- Step 3: Assemble the Garlic Butter. In a small bowl, combine the toasted garlic with 2 tablespoons of melted butter and a teaspoon of lemon zest. Whisk until well blended. This mixture will coat the dough, ensuring a buttery, garlicky crust. Spread evenly over the rolled dough using a pastry brush. The butter also helps the crust develop a golden, slightly crisp edge.
- Step 4: Pre‑Bake the Base. Place the dough on a parchment‑lined baking sheet and bake at 425°F (220°C) for 10 minutes. The base should be just set, not fully browned, as the toppings will finish the bake. This step locks in moisture and prevents a soggy bottom. Keep an eye on the color; it should be pale ivory with a hint of golden.
- Step 5: Prepare the Sauce. While the base bakes, combine tomato sauce, oregano, basil, and red pepper flakes in a small bowl. Stir until fully incorporated. The sauce should be smooth yet slightly chunky for texture. Taste and adjust seasoning if needed—salt can be added later. The sauce will coat the crust like a velvet blanket.
- Step 6: Add Cheese. Sprinkle shredded mozzarella evenly over the pre‑baked crust. Then add a thin layer of grated Parmesan for an extra golden finish. The cheeses should melt into a glossy, bubbling layer. The mozzarella’s stretchiness pairs beautifully with the Parmesan’s nutty bite.
- Step 7: Bake the Finished Pizza. Return the pizza to the oven and bake at 425°F (220°C) for 12–15 minutes. The crust should be crisp and the cheese golden brown. The aroma of garlic and melted cheese will fill the kitchen like a comforting hug. The timer is crucial—overbaking will dry out the crust, underbaking leaves it doughy.
- Step 8: Finish with Fresh Garnishes. Once out of the oven, drizzle a light coat of olive oil and scatter fresh basil leaves. Add a final sprinkle of lemon zest to brighten the flavors. Let the pizza rest for 2 minutes before slicing to allow the cheese to set. The basil’s aroma will be unmistakable, and the zest will give a citrus lift that balances the richness.
-
Step 9: Watch Out for Common Pitfalls. Keep the dough whole until you finish baking, then slice. This ensures the structure stays intact.Watch Out: Over‑slicing the dough before baking can cause it to collapse, leading to a soggy center.
- Step 10: Serve and Enjoy. Slice the pizza into wedges and serve immediately while the cheese is still molten. Pair with a light salad or a glass of chilled white wine for a complete meal. The first bite will reveal a harmonious blend of crunch, creaminess, and garlicky warmth. This is pure magic in a bite.
That's it — you did it. But hold on, I've got a few more tricks that'll take this to another level...
Insider Tricks for Flawless Results
The Temperature Rule Nobody Follows
Many people bake at 400°F, but that temperature often yields a soggy base. I recommend 425°F for a crisp crust that still cooks evenly. The higher heat caramelizes the sugars in the dough, creating a golden edge. If you’re using a stone, preheat it for at least 30 minutes to ensure an even bake. This trick ensures your pizza never feels like a soggy toast.
Why Your Nose Knows Best
When the dough is ready to rise, you’ll notice a sweet, yeasty scent. That’s a sign the yeast is alive and active. If the aroma is flat, give the dough another 10 minutes and add a pinch of sugar to kickstart fermentation. Your nose is the best judge of readiness. Trust it, and the dough will rise beautifully.
The 5‑Minute Rest That Changes Everything
After baking, let the pizza rest for exactly five minutes before slicing. This allows the cheese to set, preventing it from sliding off the crust. It also gives the steam inside the pizza a chance to redistribute, keeping the base moist. I’ve seen people slice immediately and end up with a cheese avalanche; avoid that.
Use a Silicone Mat for Even Baking
A silicone baking mat prevents the dough from sticking and promotes even heat distribution. It also makes cleanup a breeze—no more scrubbing the pan for residue. If you don’t have one, a parchment‑lined sheet works too, but a mat gives that extra edge.
Keep the Oven Door Closed
Opening the door during baking can cause a temperature drop, leading to uneven cooking. Keep the door closed and trust the timer. If you must check, do it quickly and close it back up. The oven’s thermal mass will keep the heat steady.
Don’t Skimp on the Butter
Butter adds flavor and helps the garlic butter spread evenly. If you use a low‑fat substitute, the crust may turn out drier. Stick with real butter for that silky, buttery finish that makes the pizza irresistible.
Finish with a Light Oil Drizzle
A quick drizzle of olive oil after baking adds shine and a subtle fruity note. It also seals the edges, preventing the crust from drying out as it cools. Use a small squeeze bottle for an even distribution.
Creative Twists and Variations
This recipe is a playground. Here are some of my favorite ways to switch things up:
Spinach & Feta Delight
Swap the mozzarella for fresh spinach and crumbled feta. The spinach wilts into a tender base, while feta adds a tangy bite. This variation is perfect for a lighter, Mediterranean vibe. Pair with a lemony yogurt dip.
BBQ Pulled Pork Slice
Use sliced BBQ pulled pork as a topping instead of cheese. The smoky sweetness pairs beautifully with the garlicky base. Add a sprinkle of cilantro for freshness. This version transforms the pizza into a hearty lunch.
Caprese Crunch
Top the pizza with sliced fresh tomatoes, mozzarella, and a drizzle of balsamic glaze. Finish with basil leaves for a classic Caprese twist. The sweet acidity of the tomatoes balances the garlic richness. Serve with a side of arugula.
Vegan Alfredo Toast
Replace cheese with a homemade vegan Alfredo sauce made from cashews and nutritional yeast. The sauce coats the crust like a velvety blanket. Add sautéed mushrooms for earthiness. This version is dairy‑free but still indulgent.
Buffalo Chicken Bites
Spread buffalo sauce over the dough, then top with shredded chicken and blue cheese crumbles. The heat from the sauce adds a spicy kick. The blue cheese gives a creamy contrast. This is a crowd‑pleaser at game nights.
Prosciutto & Fig
After baking, top the pizza with thin slices of prosciutto and dollops of fig jam. The salty prosciutto and sweet jam create a sophisticated flavor profile. Finish with a drizzle of honey. This twist elevates the pizza to a brunch‑worthy dish.
Breakfast Breakfast Pizza
Replace the tomato sauce with a light tomato‑cream blend and top with scrambled eggs, bacon, and chives. The breakfast pizza is a fun way to start the day. The eggs add protein while the bacon gives a smoky crunch. Serve with a splash of hot sauce.
Storing and Bringing It Back to Life
Fridge Storage
Store leftover pizza in an airtight container in the fridge for up to 3 days. The crust may soften slightly, but it remains tasty. When ready, reheat in a toaster oven at 375°F for 5 minutes to revive the crispness. The cheese will re‑melt, giving you a fresh‑baked experience.
Freezer Friendly
Wrap the pizza tightly in plastic wrap, then place it in a freezer bag. It can stay in the freezer for up to 2 months. Thaw overnight in the fridge before reheating. The texture stays close to the original, especially if you reheat in a skillet.
Best Reheating Method
The skillet method is the gold standard for reheating. Heat a non‑stick pan over medium heat, place the pizza slice, and cover for 2 minutes. The heat will crisp the crust while keeping the cheese gooey. Add a splash of water to the pan, cover, and let the steam restore moisture.