I was in the middle of a late‑night Netflix binge when my roommate dared me to combine two of our favorite comfort foods into something that would make us both question reality. I grabbed a half‑eaten bag of nacho cheese sauce, a lonely flour tortilla, and the last bit of ground beef from the fridge. The kitchen filled with the sound of sizzling butter, the smell of toasted dough, and the unmistakable hum of a cheese‑pull that could have been a love song. I was skeptical, but the moment the first bite hit my tongue, I realized I had just stumbled onto a culinary revelation that would forever change my snack game.
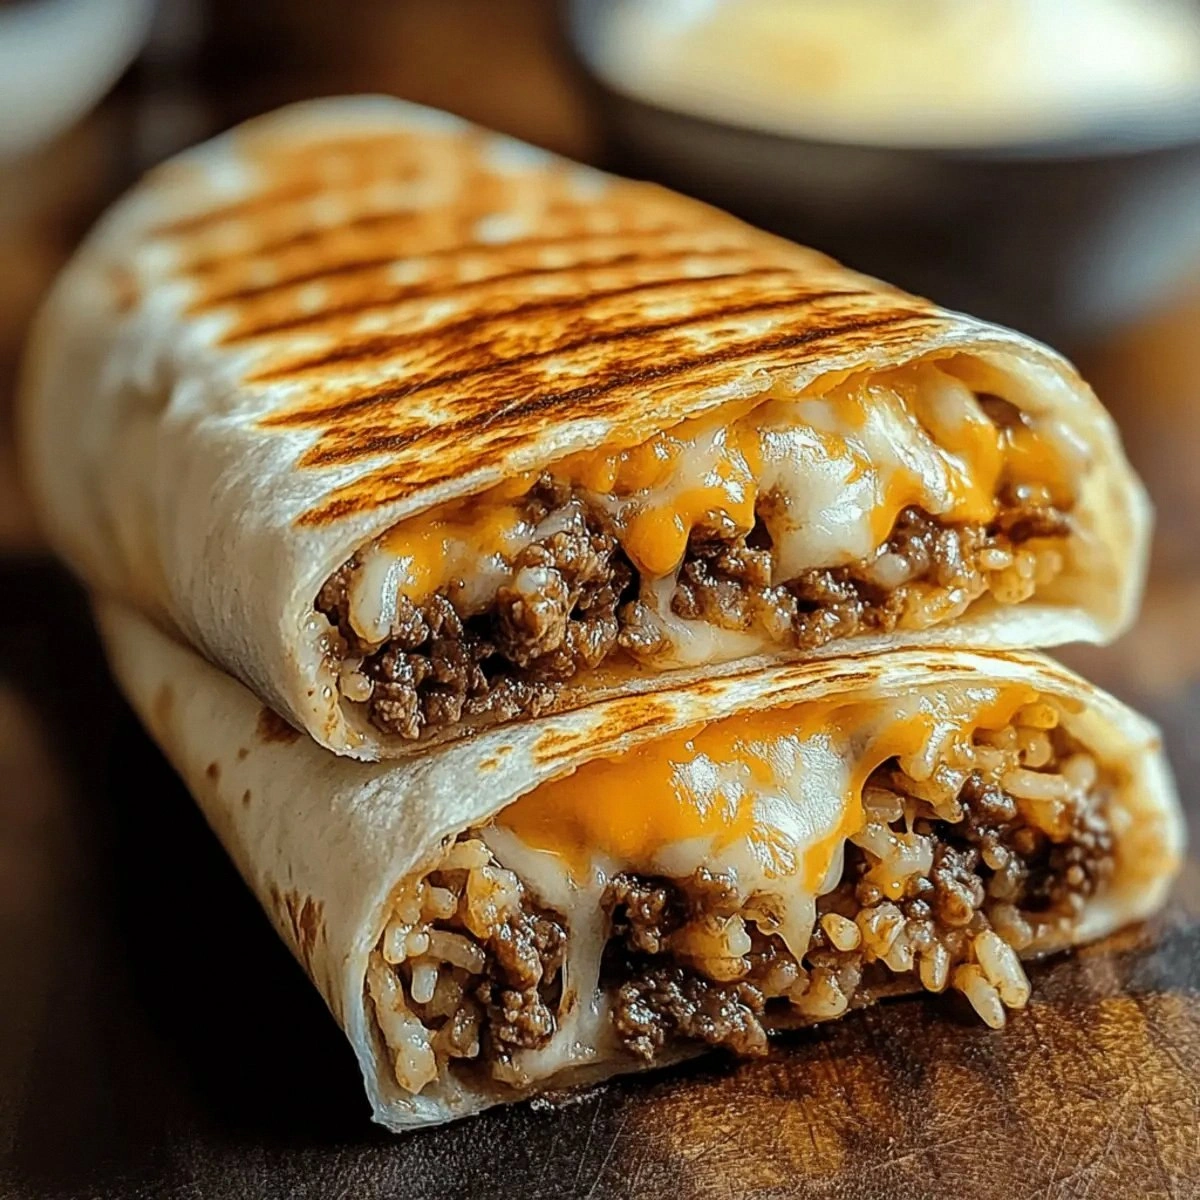
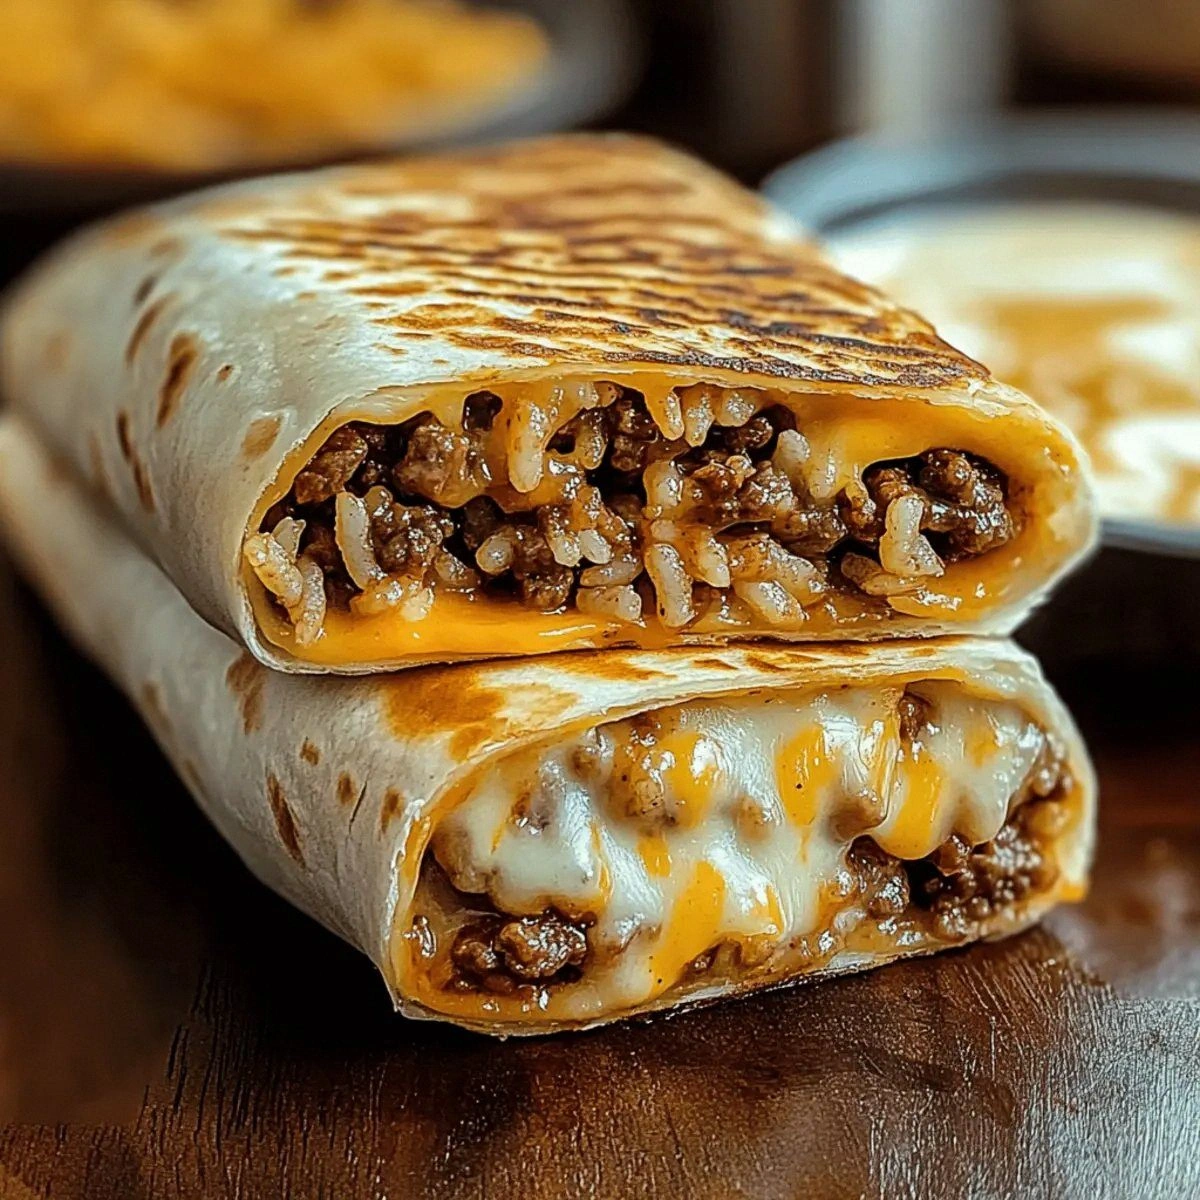
Picture this: the crisp, golden exterior of a grilled cheese, but inside, a hearty, taco‑spiced beef mixture, fluffy rice, and a molten river of nacho cheese that stretches like molten lava across a volcanic landscape. The crunch of the tortilla gives way to a creamy, slightly smoky interior that feels like a warm hug from the inside out. The aroma alone—think smoky chipotle, buttery toast, and a hint of sour cream—makes the whole house feel like a bustling Mexican‑style diner, and the first bite? Pure, unadulterated comfort that makes you forget about the world outside.
Most grilled‑cheese burrito recipes I've seen either drown the tortilla in soggy cheese or skimp on the flavor base, leaving you with a bland, greasy mess. This version stands out because it balances the richness of cheese with the robust seasoning of taco spice, and it incorporates a rice component that keeps every bite satisfying without turning the tortilla into a soggy sack. The secret? A quick sear of the beef in butter, a dash of chipotle sauce that adds a smoky kick, and a strategic flip that creates those perfect, crunchy edges that shatter like thin ice when you bite into them.
I’m about to reveal a technique that most home cooks overlook: the double‑sear method that locks in juices and creates a caramelized crust on the tortilla, while the cheese melts uniformly inside. Trust me, once you master this, you’ll never settle for a plain grilled cheese again. Let me walk you through every single step — by the end, you'll wonder how you ever made it any other way.
What Makes This Version Stand Out
- Flavor Explosion: The taco seasoning and chipotle sauce create a smoky, slightly spicy backbone that cuts through the richness of the cheese, delivering a balanced bite every time.
- Texture Symphony: You get a crunchy, buttery tortilla exterior, a gooey cheese interior, and a tender beef‑rice filling that keeps each mouthful interesting.
- Simplicity Meets Sophistication: Only ten ingredients, but each one plays a pivotal role, making the recipe approachable for beginners yet impressive enough for guests.
- Unique Ingredient Pairing: Combining nacho cheese sauce with shredded mozzarella gives you that perfect stretch and melt that ordinary cheddar alone can’t achieve.
- Crowd‑Pleaser Factor: This dish has been known to clear plates faster than a fire alarm—people keep coming back for seconds, thirds, and sometimes the whole pan.
- Ingredient Quality: Using freshly ground beef and high‑quality cheese elevates the whole experience; you’ll taste the difference in every bite.
- Cooking Method Magic: The double‑sear technique ensures a golden crust without soggy centers, a trick most recipes miss.
- Make‑Ahead Potential: You can prep the filling ahead of time, store it, and assemble the burritos when you’re ready to eat, saving precious weeknight minutes.
Inside the Ingredient List
The Flavor Base
The ground beef is the heart of this burrito. Its rich, meaty flavor carries the taco seasoning and chipotle sauce, creating a depth that plain cheese alone could never achieve. If you skip the beef, you lose that savory backbone and the dish becomes a one‑dimensional cheese melt. For a leaner version, try ground turkey, but expect a slightly milder taste. When shopping, look for meat with a bit of fat—about 15%—to keep the filling juicy.
Taco seasoning is the spice cocktail that transforms ordinary ground beef into a fiesta. It typically contains chili powder, cumin, garlic, and oregano. If you’re feeling adventurous, blend your own with smoked paprika for extra depth. Skipping this would make the filling bland, and the whole burrito would feel flat.
The Texture Crew
Cooked white rice acts as a moisture regulator. It soaks up excess sauce, preventing sogginess while adding a subtle bite that balances the creamy cheese. If you’re gluten‑free, substitute with quinoa for a nutty twist. Missing the rice? You’ll end up with a dense, overly cheesy pocket that’s hard to bite through.
Sour cream adds a cool, tangy contrast to the hot, melty interior. It also lends a silky mouthfeel that makes each bite feel luxurious. For dairy‑free diners, a dollop of cashew cream works surprisingly well.
The Unexpected Star
Chipotle sauce is the secret weapon. Its smoky heat cuts through the richness, adding a lingering warmth that makes the burrito addictive. Use a high‑quality canned sauce or blend chipotle peppers in adobo with a splash of olive oil for a fresher taste. Omit it, and you’ll lose that signature smoky punch.
Nacho cheese sauce provides that velvety, gooey melt that makes the whole experience feel indulgent. It’s richer than plain cheddar and spreads more evenly. If you can’t find it, melt shredded cheddar with a splash of milk and a pinch of flour to mimic the texture.
The Final Flourish
Shredded cheddar and mozzarella work together like a dynamic duo. Cheddar brings sharpness, while mozzarella gives stretch. Using only one cheese would either make the burrito too sharp or too rubbery. For a twist, try pepper jack for extra heat.
Flour tortillas are the canvas. Large, soft, and pliable, they hold the filling without tearing. Look for tortillas that are at least 10‑inch in diameter; smaller ones will be hard to roll. If you can’t find flour tortillas, corn works, but expect a different texture.
Butter or oil is essential for that golden, crispy exterior. Butter adds a nutty flavor, while oil raises the smoke point. I recommend a 50/50 blend for the best of both worlds.
Everything's prepped? Good. Let's get into the real action...
The Method — Step by Step
-
Heat a large skillet over medium‑high heat and add 1 tablespoon of butter (or oil). Once the butter foams and starts to turn light golden, toss in the ground beef. Break it up with a wooden spoon, letting it sizzle loudly—that sizzle when it hits the pan? Absolute perfection. Cook for about 5‑6 minutes until the meat is browned, stirring occasionally to ensure even caramelization.
Kitchen Hack: Sprinkle a pinch of salt while browning; it draws out moisture faster, giving you a crispier crust on the meat. -
When the beef is nicely browned, stir in the taco seasoning and chipotle sauce. Let the spices toast for 30 seconds, then pour in the nacho cheese sauce and sour cream. The mixture should become a thick, glossy coating that clings to each morsel of beef. Reduce the heat to low and let it simmer for 3‑4 minutes, allowing the flavors to meld. Taste and adjust with a pinch more seasoning if you like extra heat.
-
While the filling simmers, combine the cooked white rice with the shredded cheddar and mozzarella in a large bowl. Toss gently so the cheese coats the rice evenly. The rice will act like a fluffy binder, preventing the cheese from sliding out when you bite.
-
Lay a flour tortilla flat on a clean surface. Spoon a generous mound of the beef‑cheese mixture down the center, then add a heaping scoop of the cheesy rice. Drizzle a little extra sour cream on top if you love that tangy bite. Fold the sides in, then roll tightly, tucking the ends as you go—think of rolling a sushi roll, but bigger and cheesier.
-
Heat the remaining 1 tablespoon of butter in the same skillet over medium heat. Once melted, carefully place the rolled burrito seam‑side down. Press gently with a spatula to ensure contact, then let it cook undisturbed for 2‑3 minutes. You’ll hear a faint hissing sound; that’s the butter caramelizing the tortilla’s outer layer.
Watch Out: If the heat is too high, the tortilla will burn before the cheese inside melts. Keep the flame moderate and be patient. -
Flip the burrito using tongs or a wide spatula. Cook the other side for another 2‑3 minutes until the tortilla is deep golden and the cheese inside is bubbling. You’ll notice the edges pulling away slightly from the pan—that’s your cue that the crust is set and ready.
Kitchen Hack: Cover the pan with a lid for the last minute; the trapped steam helps melt the interior cheese without over‑browning the exterior. -
Remove the burrito from the skillet and let it rest on a cutting board for 1‑2 minutes. This brief rest lets the molten cheese settle, preventing a cheesy explosion when you slice into it. While it rests, the tortilla’s crust firms up, giving you that satisfying snap with every bite.
-
Slice the burrito diagonally into 2‑3 thick pieces. Serve immediately with extra sour cream, a drizzle of chipotle sauce, or a side of fresh pico de gallo. The contrast between the crunchy exterior and the oozy interior is the moment of pure joy that will have everyone shouting, “I dare you to taste this and not go back for seconds!”
That's it — you did it. But hold on, I've got a few more tricks that'll take this to another level...
Insider Tricks for Flawless Results
The Temperature Rule Nobody Follows
Most home cooks crank the heat to “high” hoping to speed things up, but that ruins the delicate balance between a crispy crust and a gooey interior. Keep your skillet at medium‑high, around 350°F (175°C) if you have an infrared thermometer. This temperature ensures the butter browns without smoking and the tortilla achieves that buttery crunch without burning. I once tried “full blast” and ended up with a charred shell and cold cheese—lesson learned.
Why Your Nose Knows Best
Your sense of smell is a far more reliable indicator than a timer when it comes to achieving that perfect golden hue. When the butter starts to turn a light amber and you catch that nutty aroma, you’re at the sweet spot. If you smell a burnt, acrid scent, pull the burrito immediately; you can always finish cooking it over lower heat. Trusting your nose will save you from the dreaded “bitter butter” flavor.
The 5‑Minute Rest That Changes Everything
After cooking, let the burrito rest for exactly five minutes. This short pause allows the cheese to re‑solidify just enough to hold its shape, while the steam inside redistributes, making each bite uniformly moist. Skipping this step results in a sloppy mess that falls apart on the plate. I once served a hot burrito straight from the pan, and the cheese oozed everywhere—my guests were impressed, but the cleanup was a nightmare.
Butter‑Oil Blend for the Perfect Crust
Mixing equal parts butter and a neutral oil (like canola) gives you the flavor of butter and the higher smoke point of oil. This combo prevents the tortilla from scorching while still delivering that buttery aroma we all love. If you’re dairy‑free, substitute with a blend of olive oil and a splash of coconut milk for a subtle tropical twist.
Layering Cheese for Maximum Stretch
Don’t just dump shredded cheese into the rice; first toss the rice with a thin layer of nacho cheese sauce, then fold in the shredded cheddar and mozzarella. This creates a “cheese‑infused” rice that melts uniformly, ensuring every bite has that coveted stringy stretch. Skipping this layering step often leads to pockets of dry rice that feel out of place.
Creative Twists and Variations
This recipe is a playground. Here are some of my favorite ways to switch things up:
Southwest Veggie Delight
Swap the ground beef for a medley of black beans, corn, and diced bell peppers. Add a teaspoon of cumin and a splash of lime juice. The result is a lighter, vegetarian version that still packs that smoky punch, perfect for meat‑free diners.
Spicy Jalapeño Kick
Fold finely chopped fresh jalapeños into the beef mixture and drizzle an extra spoonful of chipotle sauce. The heat level rises dramatically, making this the go‑to for spice lovers. Pair with a cooling cucumber salsa to balance the fire.
Breakfast Burrito Remix
Replace the rice with scrambled eggs and add a handful of crumbled breakfast sausage. Top with a drizzle of maple‑chipotle sauce for a sweet‑savory twist that’s perfect for brunch.
Mediterranean Fusion
Use ground lamb instead of beef, swap cheddar for feta, and add a spoonful of tzatziki sauce inside. The tangy yogurt and herbaceous flavor give the burrito an unexpected Mediterranean flair.
Cheesy Bacon Blast
Crisp up some bacon, crumble it into the beef mixture, and add a dash of smoked gouda alongside the mozzarella. The bacon adds a crunchy, salty crunch that amplifies the overall indulgence.
Sweet & Savory Apple
Stir in thinly sliced apples sautéed with a pinch of cinnamon into the rice. The sweet‑spicy contrast pairs surprisingly well with the smoky chipotle, creating a gourmet twist that’s perfect for adventurous eaters.
Storing and Bringing It Back to Life
Fridge Storage
Place cooled burritos in an airtight container or wrap tightly in foil. They’ll stay fresh for up to 3 days. Reheat in a skillet over medium heat, adding a splash of water to the pan and covering for 2‑3 minutes; the steam revives the cheese and prevents the tortilla from drying out.
Freezer Friendly
Wrap each burrito individually in plastic wrap, then place them in a freezer‑grade zip‑top bag. They’ll keep for up to 2 months. To reheat, thaw overnight in the fridge, then pan‑fry on medium heat with a dab of butter, covering for the first minute to melt the interior.
Best Reheating Method
For the ultimate comeback, use a preheated oven at 350°F (175°C). Place the burrito on a baking sheet, brush lightly with butter, and bake for 10‑12 minutes. The crust regains its crispness, and the cheese inside becomes perfectly gooey again. Adding a tiny splash of water to the foil tent creates steam that keeps the interior from drying.