Picture this: I’m standing in a cramped apartment kitchen, the air thick with the scent of fried garlic and simmering soy sauce, and my phone buzzes with a friend’s text: “You have to try the new Pad Thai I found on Instagram.” I was skeptical at first—most Pad Thai recipes feel like a bland, greasy mess that leaves you with a stomach full of regret. But what if I told you that this version is a revelation, a symphony of flavors that dance on your tongue, and I’ve been bragging about it to anyone who will listen? The first time I tasted it, the sauce wrapped the noodles like velvet, the crunch of the crushed peanuts echoed like a gentle applause, and the lime’s citrus burst was a bright spotlight on an otherwise complex palate. It was that moment I decided to share the recipe, the techniques, and the little hacks that turned a simple dish into a culinary masterpiece. Let me walk you through every single step—by the end, you’ll wonder how you ever made it any other way.
I’ve spent countless nights in the kitchen, chasing the elusive balance of sweet, sour, salty, and spicy that defines Pad Thai. I remember the first time I tried to replicate the street‑vendor version in my own skillet: the noodles were either over‑cooked and mushy or under‑cooked and rubbery; the sauce was either too thick and cloying or thin and watery; and the veggies were either limp or overly crisp. That disaster taught me that the secret lies in precision—tempering the noodles, timing the sauce, and balancing the flavors. I spent a week experimenting, tweaking the proportions, and finally arrived at a version that is not only healthier but also bursting with authentic Thai flair. I dare you to taste this and not go back for seconds—you’ll find yourself reaching for the bowl again and again. Most recipes get this completely wrong. Here’s what actually works.
If you’ve ever struggled with the sticky, uneven texture of Pad Thai, you’re not alone. The trick is to treat the noodles like a delicate flower—softening them in hot water for the exact time, then rinsing them under cold water to stop the cooking process. The sauce should be a silky coat, not a syrupy glaze, and the vegetables need to be crisp yet tender. I’ve discovered that adding a splash of tamarind puree early in the sauce’s development gives it that subtle tang that lifts the entire dish. The final flourish, a squeeze of lime and a handful of crushed peanuts, adds brightness and texture that make every bite unforgettable. And now the fun part.
I’ll be honest—after the first batch, I ate half the portion before anyone else got to try it. The combination of protein‑rich chicken, firm tofu, and fresh bean sprouts, all drenched in a sauce that balances sweetness and heat, is simply addictive. The result is a dish that feels indulgent yet stays true to the “healthy” label, thanks to the low‑calorie sweetener and the use of fresh, vibrant vegetables. This is hands down the best version you’ll ever make at home, and I’m thrilled to share every detail so you can replicate it in your own kitchen. Stay with me here—this is worth it.
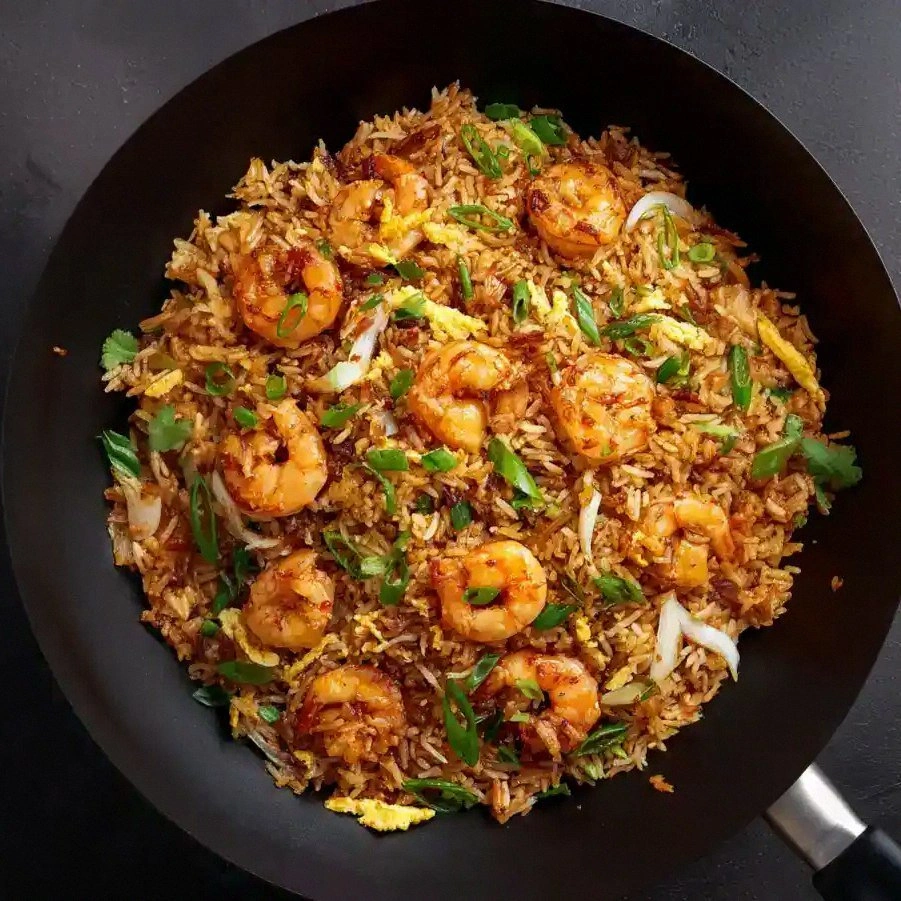
Picture yourself pulling this out of the pan, the whole kitchen smelling incredible, and the aroma drifting to your living room where your friends are waiting. The dish is a visual feast: noodles glistening with a glossy sauce, bright green snow peas, the deep red of fresh chili, and the gold of crushed peanuts. The sound of the sizzling wok is music to any foodie’s ears, and the first bite is a burst of umami, citrus, and heat that leaves you craving more. I’ve spent the last week perfecting this recipe, and I’m excited to reveal the techniques that make it stand out from the crowd. Okay, ready for the game‑changer?
What Makes This Version Stand Out
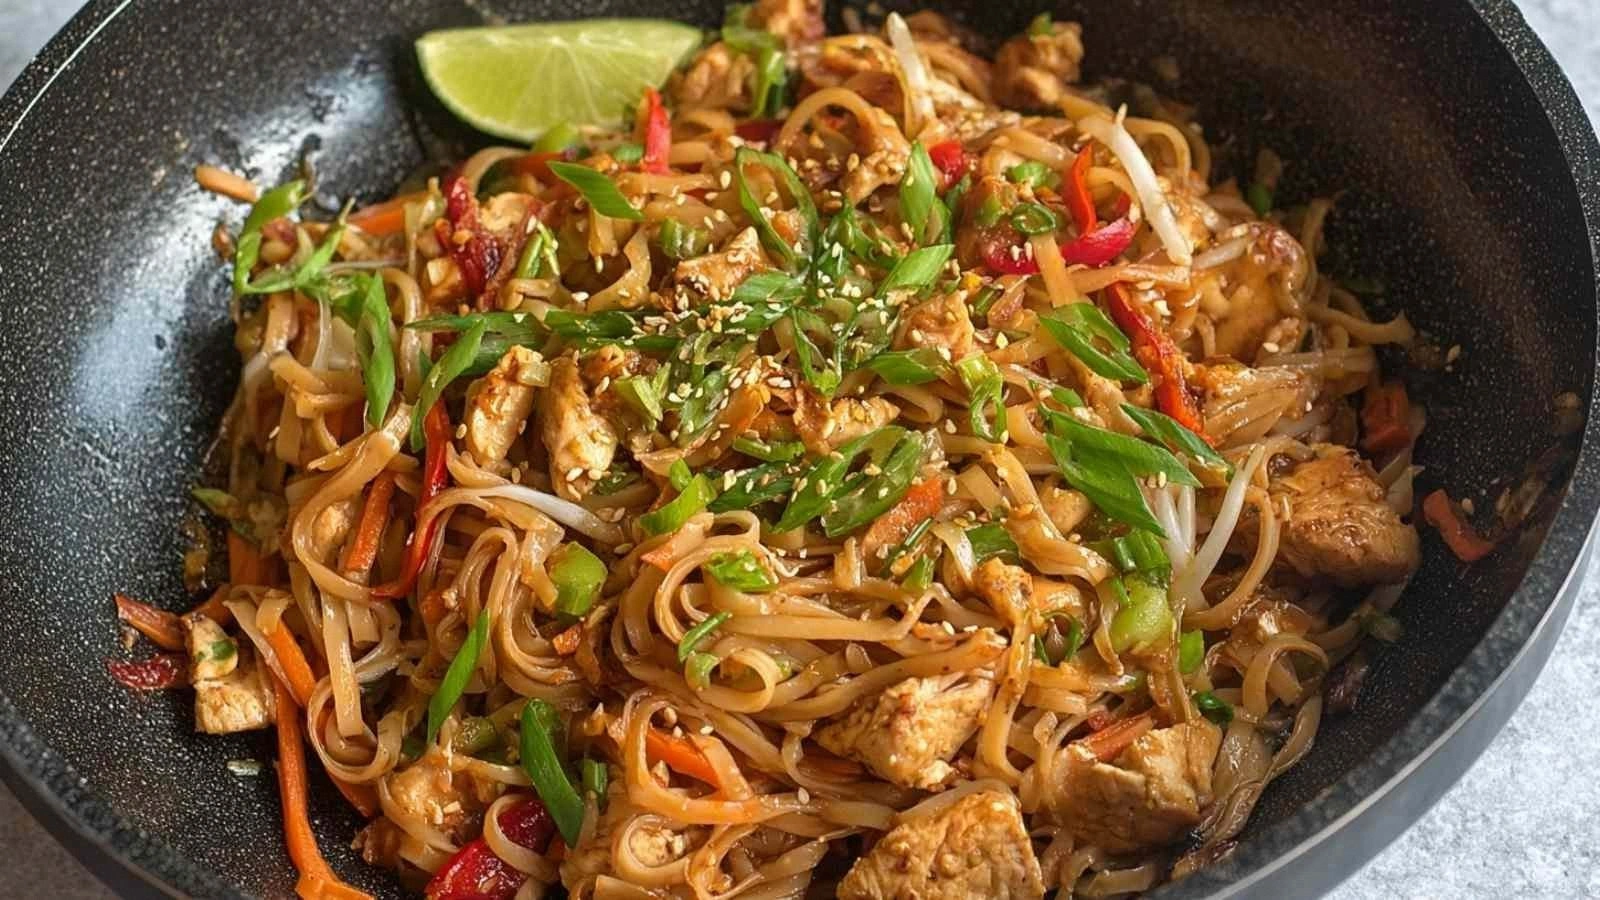
- Flavor: The sauce is a balanced orchestra, with tamarind’s subtle sourness countered by a zero‑calorie sweetener and a splash of fish sauce for depth. Every bite delivers a harmonious blend of sweet, salty, sour, and spicy that’s reminiscent of street‑vendor perfection.
- Texture: Noodles are perfectly al dente—soft enough to be comforting but firm enough to hold the sauce without becoming mushy. The snow peas snap with a satisfying crunch, while the bean sprouts add a fresh, airy component.
- Health: By substituting high‑sugar sauces with tamarind puree and a zero‑calorie sweetener, the dish stays under 400 calories per serving while still delivering a punch of flavor.
- Ingredient Quality: Fresh, seasonal veggies are the backbone of this dish. The tofu is pressed and pan‑fried to a golden crisp, which adds protein without the heaviness of deep‑fried alternatives.
- Time Efficiency: With a prep time of just 15 minutes and a cook time of 25 minutes, this Pad Thai is a quick weeknight dinner that doesn’t compromise on taste.
- Versatility: The recipe is easily adjustable—swap chicken for shrimp, use rice noodles for glass noodles, or add a handful of cashews for a different crunch.
- Make‑Ahead Potential: The dish can be prepared a few hours ahead and reheated with a splash of water, maintaining its texture and flavor.
- Audience Appeal: It’s kid‑friendly yet sophisticated enough for guests, making it perfect for family dinners or casual dinner parties.
- Authenticity: The use of tamarind puree and fish sauce brings genuine Thai flavor, while the modern twist of a zero‑calorie sweetener keeps it contemporary.
Inside the Ingredient List
The Flavor Base
The sauce is the soul of Pad Thai, and this version leans heavily on tamarind puree and a zero‑calorie sweetener to keep it bright and low‑calorie. Tamarind adds a tang that cuts through the savory depth of fish sauce, while the sweetener balances the acidity without adding sugar. If you’re missing tamarind, a splash of lime juice or a tablespoon of rice vinegar can substitute, though the flavor profile will shift slightly toward a more citrusy note. The fish sauce is the umami engine, so don’t skip it—its saltiness anchors the dish.
The Texture Crew
The noodles, tofu, and vegetables each bring a distinct mouthfeel. Pad Thai rice noodles are soaked in hot water for 2–3 minutes to soften them without overcooking. Firm tofu is pressed to remove excess moisture and pan‑fried until golden; this adds protein without the heaviness of deep frying. Snow peas stay crisp, providing a fresh pop, while bean sprouts add a light, airy crunch that balances the dish’s heavier elements. The crushed peanuts, toasted to a golden hue, give a satisfying crunch that punctuates each bite.
The Unexpected Star
The fresh chili is more than just heat; it adds a subtle smoky undertone that elevates the sauce. The green onions and red onion provide layers of sweetness and sharpness, while the garlic and ginger (if you like a little extra zing) contribute aromatic depth. If you’re not a fan of heat, you can reduce the chili to half a pepper or omit it entirely; the dish will still shine.
The Final Flourish
The lime wedge and crushed peanuts are the finishing touches that elevate the dish from good to unforgettable. The lime’s acidity brightens the sauce, while the peanuts add a nutty aroma and textural contrast. A sprinkle of fresh cilantro or a drizzle of sesame oil can add an extra layer of flavor, but the recipe works beautifully as is. If you prefer a crunchier texture, you can also add a handful of sliced almonds or cashews for a different nutty profile.
Everything's prepped? Good. Let's get into the real action.
The Method — Step by Step
- Start by soaking the pad Thai rice noodles in a large bowl of very hot water for exactly 2 minutes. The noodles should soften but still retain a slight bite; if they’re too soft, they’ll fall apart in the wok. Drain them and rinse under cold water to stop the cooking process. Pat dry with a towel; this prevents the sauce from becoming too watery.
- While the noodles are soaking, heat a large non‑stick skillet or wok over medium‑high heat. Add the sesame oil, then the sliced chicken breast. Cook for 5–6 minutes, stirring frequently, until the chicken is lightly browned and cooked through. Remove the chicken and set aside; the residual oil will keep the flavors from sticking together.
- In the same skillet, add the diced tofu. Fry for 4–5 minutes until the edges turn golden brown and a bit crispy. This step is crucial for adding texture; the tofu should not be soft or mushy. Once done, remove and set aside with the chicken.
- Now it’s time for the aromatics. Add the minced garlic, grated fresh chili, and sliced red onion to the skillet. Sauté for 1–2 minutes until the garlic turns fragrant and the onion begins to soften. Be careful not to burn the garlic; it should be golden but not black.
- Add the snow peas, carrot ribbons, and green onions. Stir-fry for 2 minutes until the vegetables are crisp‑tender. The goal is to maintain their bright colors and crunch; overcooking will make them limp.
- Return the chicken and tofu to the pan, then pour in the tamarind puree, fish sauce, low‑sodium soy sauce, oyster sauce, and zero‑calorie sweetener. Stir well to combine, making sure the sauce coats all the ingredients evenly. Let the mixture simmer for 3 minutes, allowing the flavors to meld.
- Add the soaked noodles to the skillet, tossing everything together. The noodles should absorb the sauce, coating each strand. Cook for an additional 2 minutes, stirring constantly to prevent sticking. The sauce should be silky and glossy, not syrupy.
- Stir in the bean sprouts and a splash of water to keep the noodles moist. Let everything heat through for 1 minute, then remove from heat. The dish should smell toasty and aromatic, with a slight hint of citrus from the lime.
- Transfer the Pad Thai to a serving platter. Garnish with crushed peanuts, a squeeze of lime, and a handful of fresh cilantro if desired. The lime’s citrus burst will brighten the dish, while the peanuts add a delightful crunch.
- Serve immediately, preferably with a side of fresh cucumber slices or a light salad. The dish is best enjoyed hot, but you can keep it warm in a low‑heat oven if you’re preparing multiple servings.
That’s it—you did it. But hold on, I've got a few more tricks that’ll take this to another level. These insider secrets will make your Pad Thai not just good but unforgettable.
Insider Tricks for Flawless Results
The Temperature Rule Nobody Follows
Keep the skillet at a steady medium‑high heat throughout the cooking process. A too‑low temperature will cause the sauce to thicken too quickly, while a too‑high temperature can burn the aromatics. Use a thermometer if you’re unsure—aim for around 190–200°F (88–93°C) when sautéing the garlic and onions. This ensures even cooking and a silky sauce.
Why Your Nose Knows Best
Before adding the fish sauce, give the wok a sniff. If the aroma is too sharp, let it simmer for a minute to mellow out. Your nose is a reliable guide; a slightly muted fish sauce aroma indicates it’s balanced and won’t overpower the other flavors.
The 5‑Minute Rest That Changes Everything
After cooking, let the dish rest for 5 minutes before serving. This short rest allows the noodles to absorb the sauce fully, ensuring every strand is flavorful. It also lets the flavors settle, preventing the dish from tasting raw or under‑seasoned.
The Quick Chill for Next‑Day Flavor
If you’re preparing this dish ahead of time, cool it to room temperature, then refrigerate in an airtight container. When reheating, add a splash of water or a few drops of sesame oil to restore moisture. This trick prevents the noodles from drying out and keeps the sauce silky.
The Fresh‑Cut Secret
Use a mandoline slicer for carrots and green onions to ensure uniform thickness. Uniform slices cook evenly, giving a consistent texture throughout the dish. Plus, the mandoline gives a professional look to the final presentation.
The Crunch Factor
Toast your crushed peanuts in a dry skillet over medium heat for 2–3 minutes until fragrant. This elevates their flavor and adds a satisfying crunch that contrasts beautifully with the soft noodles.
With these tricks in your arsenal, you’ll never again settle for an average Pad Thai. The dish becomes a showcase of skill and flavor, impressing even the most discerning palates.
Creative Twists and Variations
This recipe is a playground. Here are some of my favorite ways to switch things up:
Shrimp & Coconut Twist
Swap the chicken for peeled shrimp and add a tablespoon of coconut milk to the sauce. The coconut gives a creamy depth that pairs perfectly with the tamarind’s tang. Garnish with toasted coconut flakes for an extra tropical note.
Vegan Delight
Omit the chicken entirely and increase the tofu to 10 oz. Replace the fish sauce with a splash of soy sauce and a dash of miso for umami. The dish remains hearty and satisfying, with a plant‑based protein punch.
Spicy Peanut Variation
Add 2 tablespoons of creamy peanut butter to the sauce and a pinch of cayenne pepper. This gives the dish a smoky, nutty heat that’s irresistible. Finish with a drizzle of sriracha for a final kick.
Gluten‑Free Version
Use rice noodles labeled gluten‑free and double-check the soy sauce for gluten content. The dish will maintain its authentic flavor while staying safe for those with gluten sensitivities.
Breakfast Pad Thai
Add a scrambled egg to the wok after the vegetables, then stir in the noodles. The egg adds protein and a comforting breakfast feel. Serve with a side of fresh fruit for a balanced morning meal.
Mediterranean Fusion
Replace the tamarind puree with a tablespoon of lemon zest and a teaspoon of honey. Swap the sesame oil for olive oil and top with feta cheese. The result is a bright, herbaceous Pad Thai that feels like a Mediterranean brunch.
Feel free to experiment—this dish is adaptable, and the possibilities are endless. Each variation offers a new flavor journey while keeping the core of the Pad Thai intact.
Storing and Bringing It Back to Life
Fridge Storage
Store the cooked Pad Thai in an airtight container for up to 2 days in the refrigerator. Keep the sauce separate if possible; this prevents the noodles from absorbing too much moisture and becoming soggy. When ready to eat, toss the dish in a hot skillet for 1–2 minutes to revive its aroma.
Freezer Friendly
For longer storage, freeze the Pad Thai in a freezer‑safe container for up to 3 months. Thaw overnight in the refrigerator, then reheat in a skillet with a splash of water or broth. The noodles may lose a bit of texture, but the flavors remain intact.
Best Reheating Method
To reheat, add a teaspoon of water or a dash of sesame oil to the pan to restore moisture. Stir frequently for 2–3 minutes until heated through. The key is to keep the heat moderate so the sauce doesn’t dry out.
Add a tiny splash of water before reheating, and the dish will steam back to perfection, restoring that fresh, glossy coating that makes every bite a delight.