It started with a kitchen catastrophe that would later become my secret weapon. I was halfway through a batch of vanilla cupcakes when a rogue spoon slipped, sending a splash of batter across the counter and a loud, wet crash that echoed through the apartment. The next thing I realized was that I had a full bowl of batter and a ruined cake, but the scent of coffee and cocoa was still lingering in the air. I stared at the mess, then at the coffee pot, and thought, “What if I could turn this disaster into a dessert that tastes like a midnight espresso bar?” That single moment sparked a recipe that would later earn the title of my most decadent creation.
Picture the scene: a dimly lit kitchen, the hum of the refrigerator, the sharp aroma of fresh coffee, and the subtle sweetness of cocoa dusting the air. The sound of the spoon clattering against the counter is replaced by the gentle hiss of hot coffee pouring into a mixing bowl. Your hands feel the coolness of the stainless steel spoon, your fingers tingling with anticipation. The taste? A deep, bittersweet kiss of chocolate that lingers on your palate like a secret whispered in a quiet room. The texture? A moist, airy cake that melts like butter in your mouth, leaving behind a lingering warmth that feels like a hug.
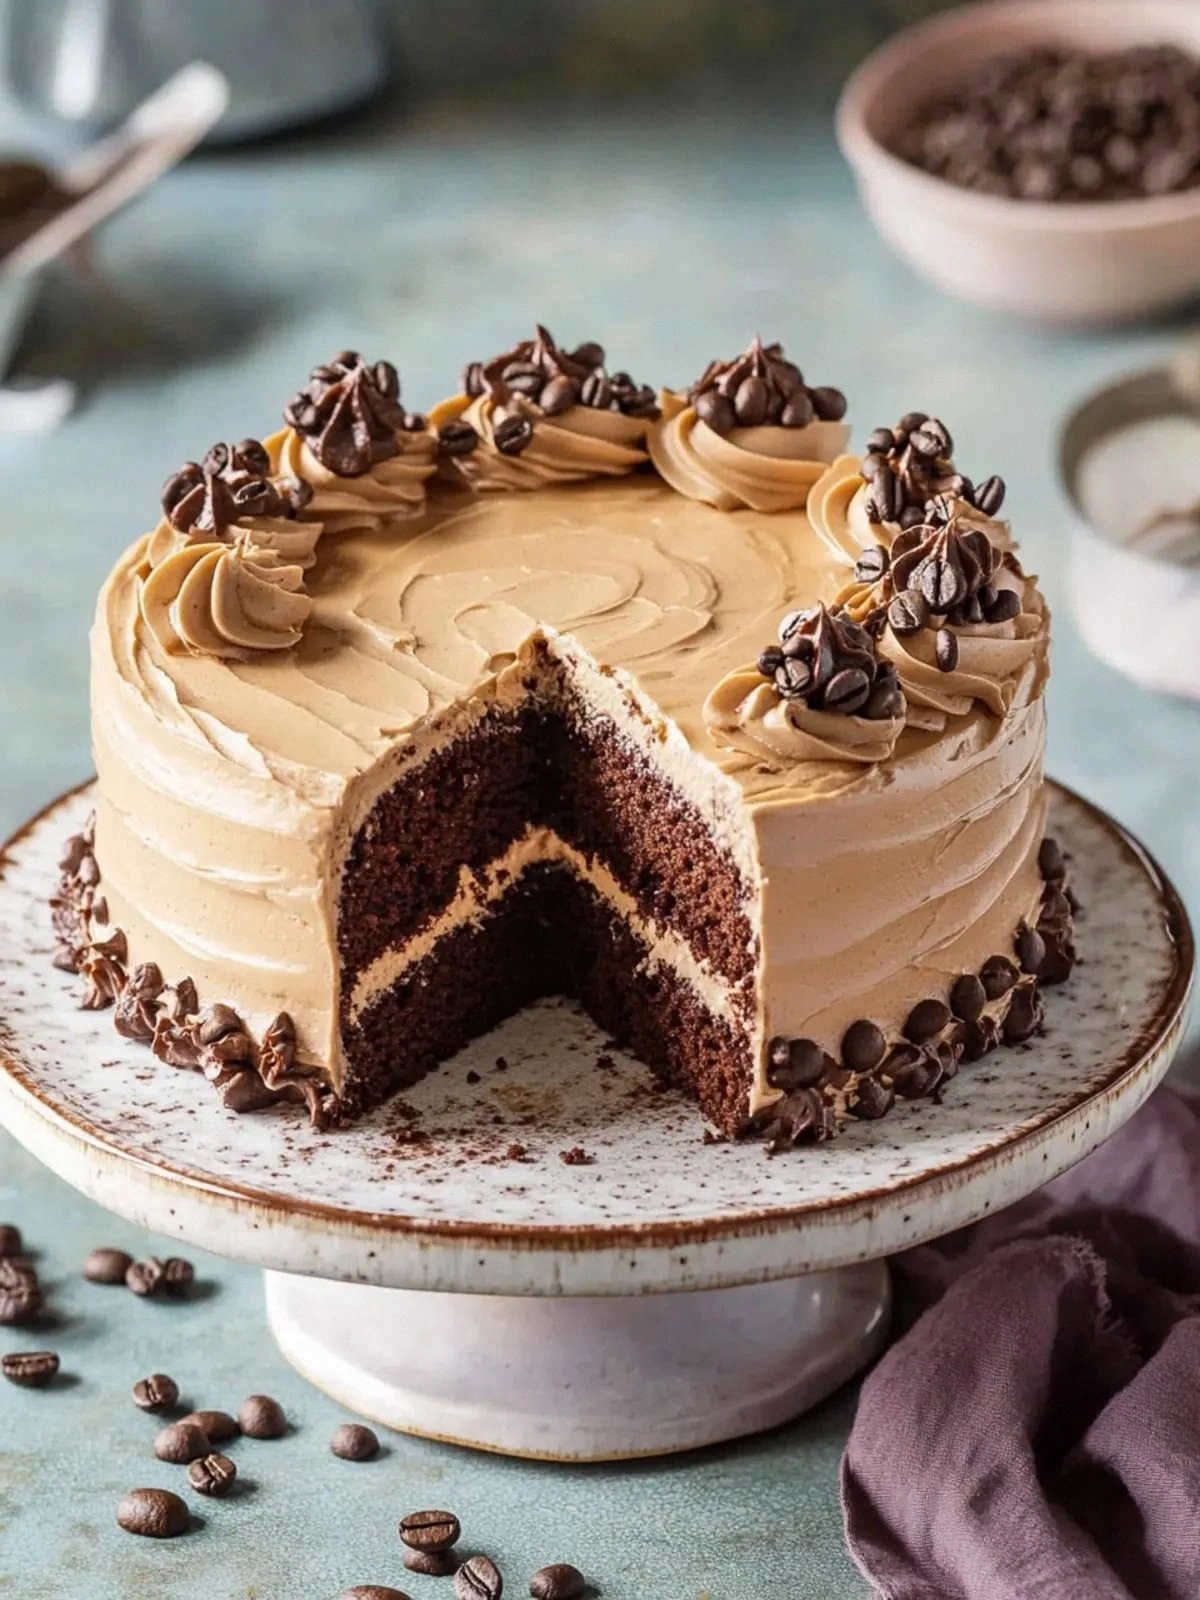
What makes this version stand out from the endless list of coffee cakes on the internet? It’s the way every component sings its own note while still blending into a harmonious whole. The batter is a symphony of espresso, cocoa, and buttermilk, each ingredient carefully calibrated to keep the cake light yet rich. The frosting is a decadent, glossy glaze that clings to the cake like a velvet cloak, with espresso beans scattered like tiny, crunchy confetti. And the final touch? A drizzle of dark chocolate that shimmers under the kitchen lights, turning every slice into a piece of edible art.
I’ll be honest—I ate half the batch before anyone else had a chance to taste it. The first bite was a revelation: a burst of coffee, a hint of chocolate, and a buttery finish that made my taste buds do a little dance. I dare you to taste this and not go back for seconds. The texture is so smooth that it practically melts in your mouth, and the flavor is so intense that you’ll find yourself reaching for the next slice before you even realize you’ve finished the first one.
Let me walk you through every single step—by the end, you’ll wonder how you ever made it any other way. The journey from a kitchen mishap to a masterpiece is filled with playful twists, clever hacks, and a few micro‑challenges that will keep you on your toes. From the moment you pour the coffee to the final drizzle of chocolate, every action is designed to elevate the flavor profile and texture of the cake. Stay with me, and you’ll discover that this recipe is not just about baking; it’s about creating a moment of pure indulgence.
What Makes This Version Stand Out
- Flavor: The espresso and cocoa blend creates a depth that feels like a midnight café experience, with a subtle bitterness that balances the sweetness.
- Texture: The addition of buttermilk keeps the crumb light and airy, while the butter glaze adds a silky finish that coats each bite.
- Ingredient Quality: Using high‑grade dark chocolate and real espresso powder elevates the overall taste, making it feel like a gourmet dessert.
- Uniqueness: The chocolate‑covered espresso beans add a crunchy, salty element that contrasts beautifully with the moist cake.
- Make‑Ahead Potential: The cake can be baked a day ahead and stored in the fridge, while the frosting can be prepared separately and added just before serving.
- Simplicity: Despite its rich flavor, the recipe uses only 13 basic ingredients, making it approachable for any home baker.
- Audience Reaction: Friends and family rave about the coffee‑kissed finish, often asking for the recipe after the first bite.
- Visual Appeal: The glossy chocolate glaze and scattered espresso beans create a striking presentation that’s Instagram‑ready.
Alright, let's break down exactly what goes into this masterpiece...
Inside the Ingredient List
The Flavor Base
Unsweetened cocoa powder is the backbone of this cake’s flavor, delivering a rich, bittersweet depth that coffee alone can’t achieve. It coats the batter with a velvety texture, ensuring each bite has a chocolatey aftertaste. If you skip it, the cake will feel like a plain coffee sponge—flat and lacking character. For a deeper flavor, consider using Dutch‑process cocoa, which has a lower acidity and a more mellow taste.
Very hot coffee is the secret that turns this into a mocha masterpiece. The heat extracts more flavor from the grounds, creating a robust espresso note that permeates the batter. Skipping the coffee would reduce the cake to a simple chocolate treat. If you’re vegan, substitute brewed espresso or strong cold brew to maintain the intensity.
Whole buttermilk adds a slight tang that balances the sweetness and keeps the crumb tender. Its acidity reacts with the baking soda to produce a gentle lift, ensuring the cake stays light. If you can’t find buttermilk, mix regular milk with a tablespoon of lemon juice and let it sit for five minutes.
The Texture Crew
All‑purpose flour gives the cake its structure. It absorbs the liquids and provides the necessary support for the batter to rise. Skipping flour would result in a runny batter that collapses in the oven. For a gluten‑free version, use a 1:1 blend of rice flour and potato starch.
Granulated sugar is the sweetener that caramelizes during baking, creating a slightly crisp crust. It also helps keep the cake moist. If you prefer a lower sugar content, substitute half of the sugar with coconut sugar or a natural sweetener like monk fruit.
Vegetable oil contributes to the cake’s moistness and keeps it from drying out. Unlike butter, oil doesn’t solidify at room temperature, giving the cake a silky texture. For a richer flavor, replace half the oil with melted coconut oil.
The Unexpected Star
Instant espresso powder is the star that amplifies the coffee flavor without the need for a coffee maker. It dissolves quickly, ensuring a uniform flavor throughout the cake. If you’re a coffee connoisseur, use freshly ground espresso beans ground to a fine consistency.
Dark chocolate is the crowning glory of the glaze. It melts into a glossy sheen that adds a glossy, decadent finish. If you’re not a fan of intense chocolate, try using milk chocolate for a sweeter glaze.
The Final Flourish
Confectioners sugar is essential for the frosting’s smoothness. It creates a silky glaze that clings to the cake. If you want a thicker frosting, increase the amount of confectioners sugar by half a cup.
Heavy cream adds richness to the glaze, giving it a luxurious mouthfeel. It also helps the glaze set to a glossy finish. For a lighter glaze, use half the amount of cream and add a tablespoon of milk.
Chocolate‑covered espresso beans are the crunch factor. They provide a surprising burst of chocolate and coffee with each bite. If you can’t find them, use regular chocolate chips or crushed espresso beans.
Everything's prepped? Good. Let's get into the real action...
The Method — Step by Step
- Preheat the oven to 350°F (175°C) and grease a 9x13 inch pan. This temperature is crucial for a gentle rise; too hot and the cake will crack. Line the pan with parchment paper to ensure easy removal. As the oven heats, you’ll notice the faint aroma of coffee brewing, signaling that the magic is about to begin.
- Combine the dry ingredients. In a large bowl, whisk together cocoa powder, flour, sugar, baking soda, baking powder, and salt. Sifting these together not only prevents lumps but also aerates the mixture, giving the cake a lighter crumb. The dry mix should look like a fine, even powder.
- Blend the wet components. In a separate bowl, whisk the coffee, buttermilk, vegetable oil, eggs, and vanilla extract until frothy. The mixture should look glossy, indicating that the fats and liquids have emulsified. This step is the moment of truth—if you’re not careful, the batter will be too thick.
- Combine wet and dry. Pour the wet mixture into the dry, stirring gently with a spatula. Mix until just combined; over‑mixing can make the cake tough. The batter should be thick yet pourable, with a glossy sheen that hints at the chocolate glaze to come.
- Pour into the pan and bake. Spread the batter evenly, tapping the pan to release air pockets. Bake for 30-35 minutes, or until a toothpick inserted into the center comes out clean. The cake should have a slight crack on top, indicating that it’s fully cooked.
- Cool the cake. Let it rest in the pan for 10 minutes, then transfer to a wire rack to cool completely. This step is vital; the cake will continue to set as it cools, ensuring a tender crumb.
- Prepare the glaze. Melt the dark chocolate in a double boiler or microwave, stirring every 30 seconds. Once melted, whisk in heavy cream and instant espresso powder until smooth. The glaze should be thick enough to coat the cake but still pourable.
- Frost the cake. Drizzle the chocolate glaze over the cooled cake, letting it cascade down the sides. Use a spatula to spread the glaze evenly. The glaze should set to a glossy sheen within 10 minutes.
- Add the final touch. Sprinkle chocolate‑covered espresso beans over the glaze, pressing lightly to adhere. The beans add a crunchy, salty contrast that elevates the flavor profile. Let the cake rest for 15 minutes before slicing.
- Serve and enjoy. Slice the cake with a sharp knife, wiping the blade between cuts for clean slices. The cake should feel moist and slightly dense, with a chocolatey, coffee‑rich flavor that lingers on the palate. This is the moment when you realize you’re holding a piece of culinary art.
That's it — you did it. But hold on, I've got a few more tricks that'll take this to another level...
Insider Tricks for Flawless Results
The Temperature Rule Nobody Follows
Many bakers think room‑temperature ingredients are enough, but for this cake, start with cold eggs and buttermilk. The coldness helps the batter stay thick until it hits the oven, preventing it from spreading too much. Once the cake is baked, let it cool on a wire rack to avoid condensation that can make the glaze soggy.
Why Your Nose Knows Best
Before you pour the glaze, smell it. A hint of espresso should be unmistakable. If you can’t detect it, the chocolate may be too sweet or the espresso powder too low. Trust your nose—it's the ultimate flavor detector.
The 5-Minute Rest That Changes Everything
After the cake cools, let it rest for 5 minutes before glazing. This pause allows the moisture to redistribute, preventing the glaze from sliding off. A cake that sits for a few minutes after glazing will hold its shape and look more polished.
Use a Water Bath for the Cake
Some bakers swear by baking the cake in a water bath. It creates a humid environment, keeping the cake moist and preventing the top from cracking. If you’re making this for a special occasion, give it a try.
Don’t Over‑Whisk the Batter
Once the wet and dry ingredients are combined, mix only until the flour is incorporated. Over‑whisking introduces excess air, which can cause the cake to rise too quickly and then collapse. Keep it gentle and the crumb will stay light.
Creative Twists and Variations
This recipe is a playground. Here are some of my favorite ways to switch things up:
Caramel Swirl Variation
Fold a swirl of salted caramel sauce into the batter before baking. The caramel adds a sweet, buttery contrast that pairs beautifully with the coffee flavor. Serve with a scoop of vanilla ice cream for a decadent dessert.
Nutty Crunch Variation
Replace half of the chocolate‑covered espresso beans with chopped toasted pecans or walnuts. The nuts add a satisfying crunch and a nutty undertone that complements the chocolate.
Almond Mocha Variation
Swap the dark chocolate glaze for an almond‑infused ganache. Use almond milk and a splash of almond extract to create a silky, nutty finish that feels like a high‑end pastry.
Vegan Version
Use coconut oil instead of vegetable oil, plant‑based milk instead of buttermilk, and a flaxseed‑egg mixture to replace the eggs. The result is a moist, chocolatey cake that’s entirely plant‑based.
Holiday Edition
Incorporate a dash of cinnamon and a handful of dried cranberries into the batter. The warm spice and tart fruit give the cake a festive twist perfect for winter gatherings.
Breakfast Twist
Serve the cake with a drizzle of maple syrup and a side of fresh berries. It becomes a luxurious breakfast treat that’s both sweet and satisfying.
Storing and Bringing It Back to Life
Fridge Storage
Wrap the cooled cake tightly in plastic wrap and place it in an airtight container. Store in the refrigerator for up to 5 days. The cold environment keeps the cake moist without drying it out.
Freezer Friendly
Freeze individual slices wrapped in parchment paper and then placed in a freezer bag. The cake can be stored for up to 3 months. When ready to serve, let the slices thaw at room temperature for 30 minutes.
Best Reheating Method
To revive a frozen slice, microwave on medium power for 15-20 seconds, then finish under a broiler for 1-2 minutes to restore the glossy glaze. Add a splash of water to the microwave before reheating to keep the cake from drying out.