I was standing in my kitchen on a lazy Saturday morning, staring at a half‑empty maple syrup bottle and a stack of plain bagels that had somehow survived the weekend. The air was thick with the smell of fresh coffee, but my mind was stuck on a single, stubborn craving: something sweet, something soft, something that would make my brunch spread look like a bakery’s secret weapon. I tried a quick fix—drizzling maple over toast—but that was like putting a band‑aid on a broken tooth; the flavor fizzled out before it even hit the palate. Then, in a moment of reckless inspiration, I tossed together flour, butter, and maple syrup, and the kitchen filled with a caramel‑kissed aroma that made the coffee taste jealous.
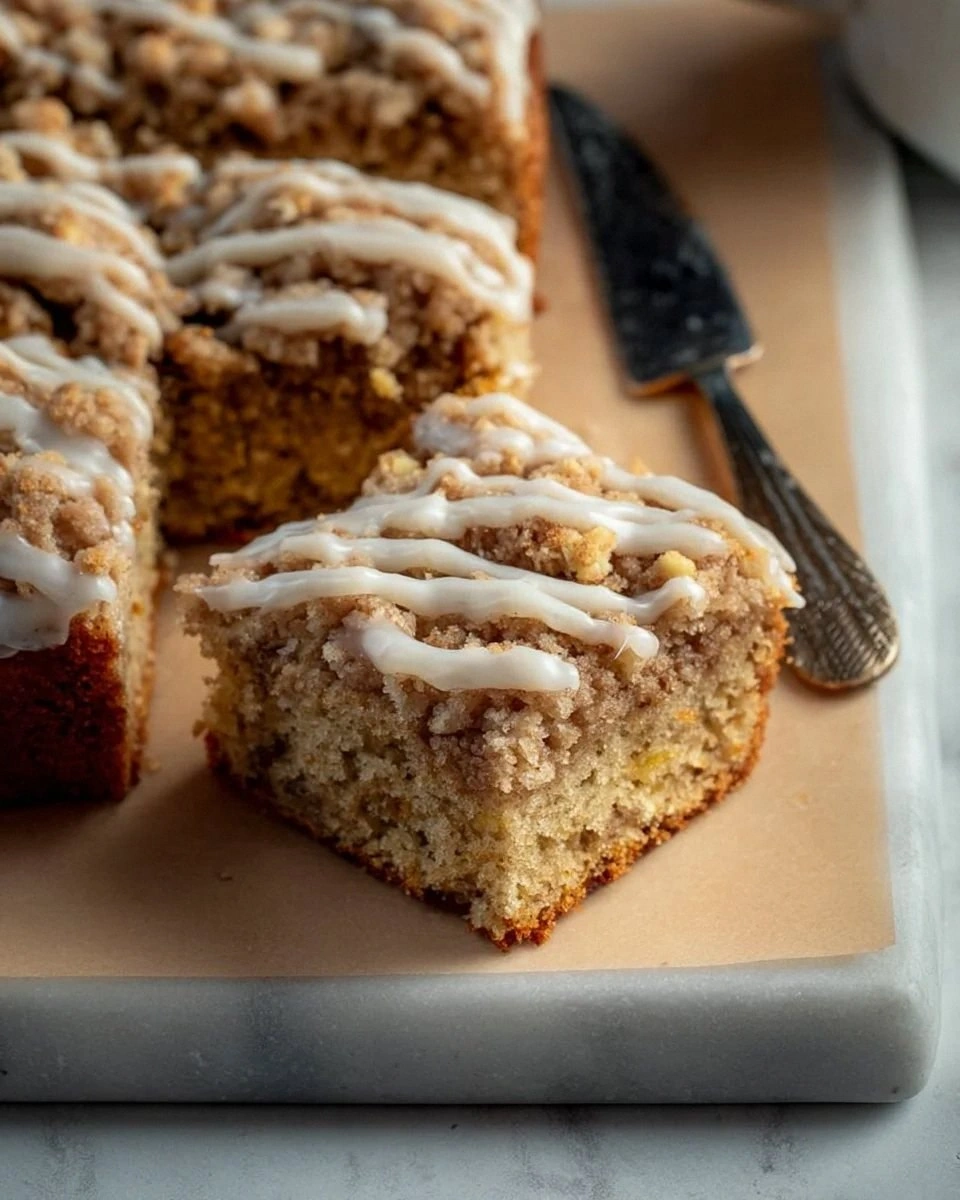
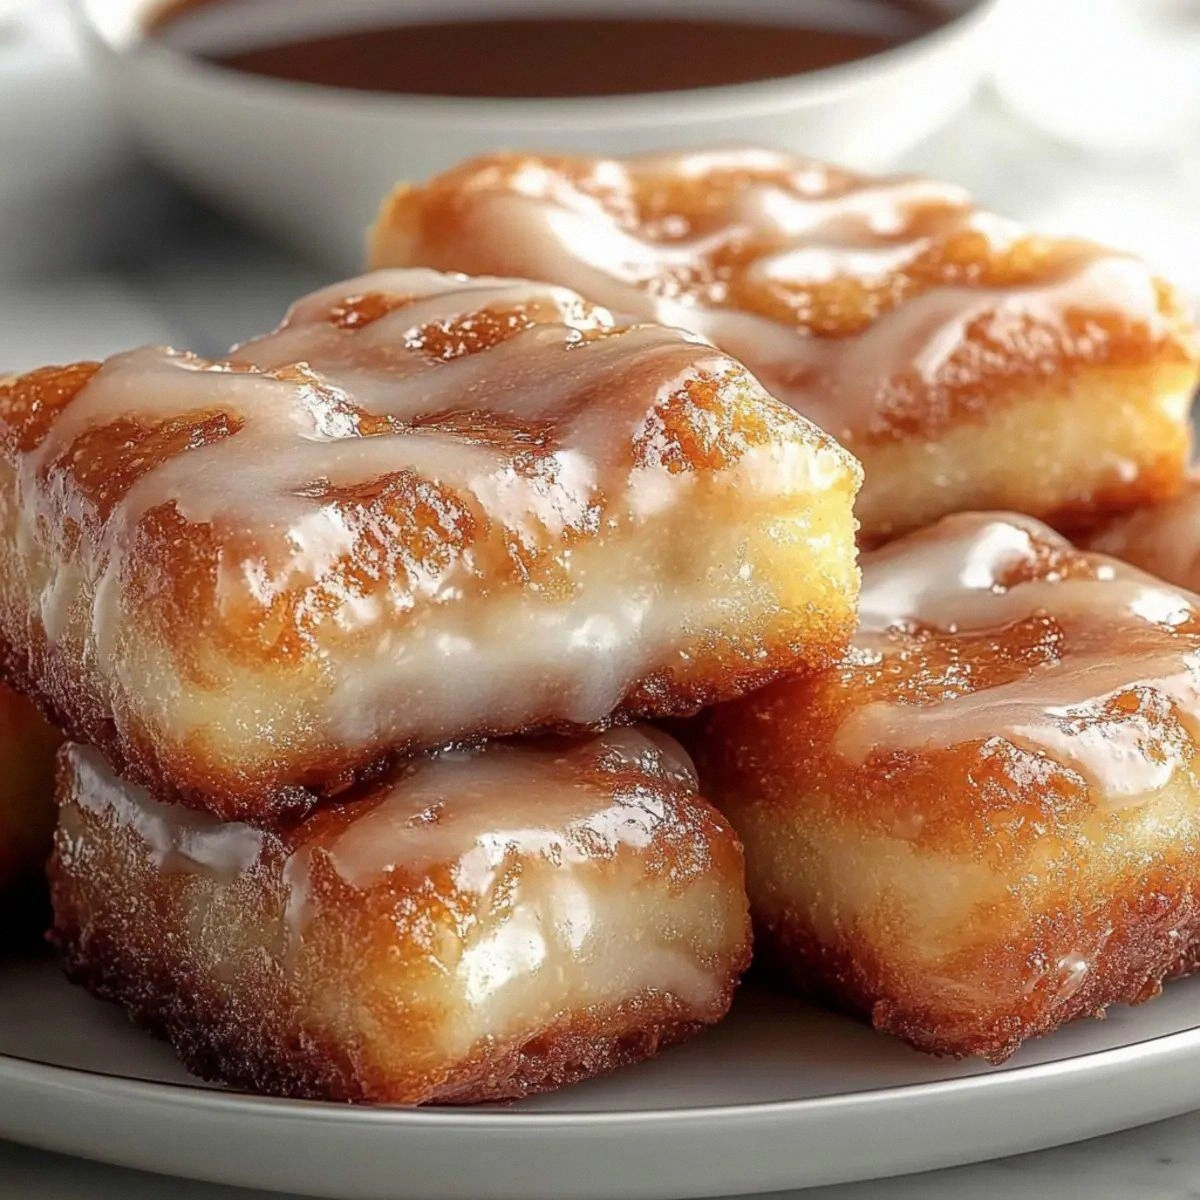
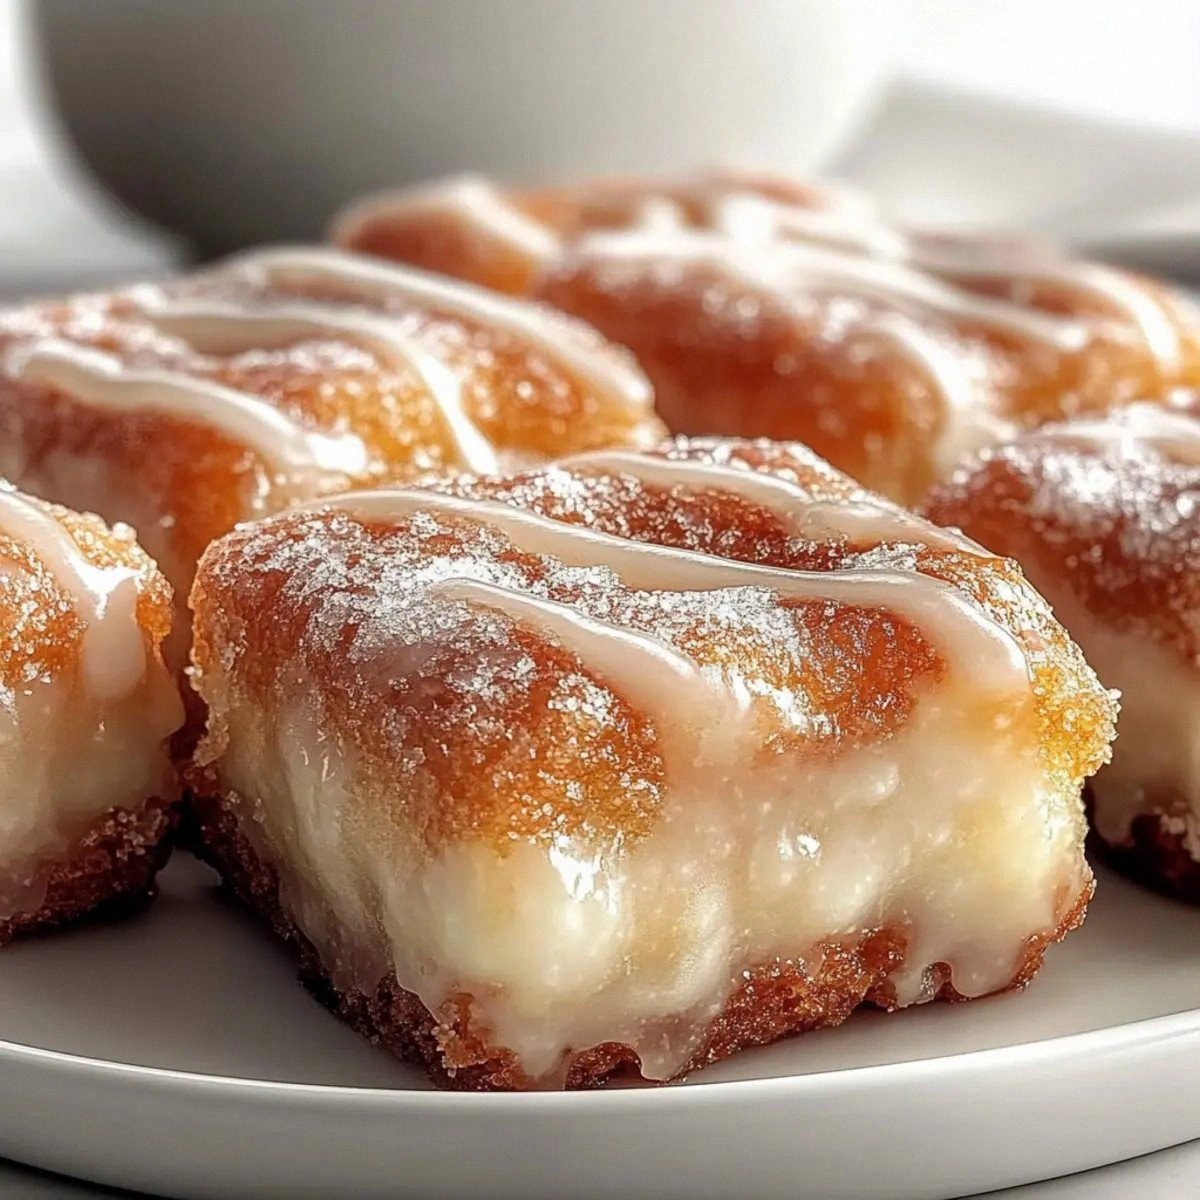
Picture this: the batter is glossy, like a sunrise over a maple forest, and when it hits the hot oven, the edges puff up with a golden‑brown crust that crackles like fresh autumn leaves underfoot. The interior stays pillowy, a tender crumb that practically melts in your mouth, while the maple glaze on top shimmers like amber liquid gold, inviting you to dive in. I’m not exaggerating when I say that the first bite feels like a hug from a childhood memory of pancakes on a Sunday, only better because it’s a handheld bar you can eat while scrolling through brunch photos on Instagram. The moment the glaze hits your tongue, a wave of sweet‑spicy warmth rolls over you, and you’ll be daring yourself to go back for seconds, thirds, maybe even a whole pan.
Most donut bar recipes I’ve tried either fall flat on texture or drown in syrup, leaving you with a sticky mess rather than a refined treat. This version, however, balances the maple’s natural richness with a subtle spice blend and a perfectly aerated batter that rises just enough to give you that coveted “donut‑like” bite without the deep‑fried guilt. I’m about to spill the beans on a little secret ingredient—a splash of vanilla that lifts the maple to new heights, and a quick chill of the dough that guarantees a tender crumb every single time. Trust me, this is hands down the best version you’ll ever make at home, and I’m willing to bet you’ll be bragging about it at the next brunch gathering.
Let me walk you through every single step — by the end, you’ll wonder how you ever made it any other way. Okay, ready for the game‑changer? This next part? Pure magic. Stay with me here — this is worth it.
What Makes This Version Stand Out
- Taste: The maple syrup isn’t just a topping; it’s woven into the batter, creating a layered sweetness that deepens as the bars cool.
- Texture: A crisp, caramelized edge meets a cloud‑like interior, delivering a contrast that’s as satisfying as a good plot twist.
- Simplicity: Only ten pantry staples are required, and you won’t need any fancy equipment beyond a standard baking sheet.
- Uniqueness: The subtle hint of nutmeg and cinnamon adds a warm spice note that most “maple” recipes completely miss.
- Crowd Reaction: Guests often claim they’ve never tasted anything like these bars, and the “I dare you to taste this and not go back for seconds” challenge becomes a reality.
- Ingredient Quality: Using pure, grade‑A maple syrup makes the flavor sing; artificial syrups simply can’t compete.
- Cooking Method: Baking instead of frying cuts down on fat while still giving you that beloved donut‑like crust.
- Make‑Ahead Potential: These bars store beautifully, meaning you can prep them the night before and still serve fresh‑warm brunch the next morning.
Alright, let's break down exactly what goes into this masterpiece...
Inside the Ingredient List
The Flavor Base
The backbone of these donut bars is the maple syrup, a natural sweetener that brings depth beyond plain sugar. Maple’s complex flavor profile—think caramel, vanilla, and a whisper of wood smoke—infuses the batter from the inside out, ensuring every bite carries that signature richness. If you ever skip this and substitute with honey or corn syrup, you’ll lose the nuanced notes that make these bars unforgettable. For the best results, opt for a Grade A Dark Maple Syrup; its robust character stands up to the baking process without turning bitter.
The Texture Crew
All‑purpose flour provides the structure, while the baking powder acts as the silent lift‑engine that creates that airy interior. The butter, softened but not melted, coats the flour particles, creating a tender crumb that’s reminiscent of a classic cake rather than a dense biscuit. If you’re dairy‑free, a high‑quality plant‑based butter will do the trick, but expect a slightly different mouthfeel. Salt isn’t just a flavor enhancer; it balances the sweetness and accentuates the maple’s natural caramel notes.
The Unexpected Star
A pinch of ground nutmeg and a generous teaspoon of cinnamon introduce a warm, comforting spice that whispers of autumn mornings. These spices are the secret sauce that turns a simple maple bar into a multi‑dimensional experience. If you’re feeling adventurous, a dash of ground ginger can add a zing that pairs beautifully with the maple. The eggs act as a binder, providing structure while also contributing to the bars’ golden hue.
The Final Flourish
The glaze is a simple mixture of powdered sugar, a splash of milk, and an extra drizzle of maple syrup that hardens into a glossy, crackly coating. This glaze not only adds visual appeal but also creates a textural contrast that’s as satisfying as biting into a caramelized apple. If you want a richer glaze, substitute half the milk with heavy cream; just remember that the glaze will set faster, so work quickly. Finally, a light dusting of extra maple syrup right before serving adds a sticky sheen that makes the bars look irresistibly inviting.
Everything's prepped? Good. Let's get into the real action...
The Method — Step by Step
Preheat your oven to 350°F (175°C) and line a 9×13‑inch baking pan with parchment paper, allowing a slight overhang for easy removal later. As the oven warms, the kitchen fills with a faint, sweet scent that hints at the maple goodness to come. This is the moment of truth: if the oven isn’t hot enough, the bars will bake unevenly, resulting in soggy centers. Pro tip: place an oven thermometer on the middle rack to ensure accuracy.
In a large mixing bowl, whisk together the flour, baking powder, salt, cinnamon, and nutmeg. The dry ingredients should look like a speckled sand dune, each particle coated in spice. I dare you to taste this mixture raw—don’t, because the spices are potent enough to tingle your taste buds. Watch Out: over‑mixing at this stage can develop gluten, leading to tougher bars.
In a separate saucepan, melt the butter over medium heat until it just begins to foam, then stir in the maple syrup, vanilla extract, and whole milk. The mixture will bubble gently, releasing a caramel aroma that fills the room. Keep a close eye—once it starts to simmer, reduce the heat to low to prevent scorching. This syrupy blend is the heart of the bars, so let it simmer for exactly two minutes; you’ll hear a faint hissing that signals it’s ready.
Beat the eggs in a small bowl, then whisk them into the warm maple‑butter mixture. The batter will thicken slightly, turning a glossy amber hue. This is where the magic happens: the eggs bind everything together while also contributing to a tender crumb. If the mixture looks too thick, add a splash of milk—just a tablespoon—to loosen it without diluting the flavor.
Create a well in the center of the dry ingredient bowl and pour the wet mixture in. Using a rubber spatula, fold the two together until just combined; you should still see tiny flecks of flour. Over‑mixing at this point will develop gluten, making the bars dense rather than airy. The batter should be thick enough to hold its shape when dropped from a spoon—think of a soft‑serve ice cream consistency.
Spread the batter evenly across the prepared pan, using the back of a spoon or an offset spatula to smooth the surface. The top should be level, but don’t press it down too hard; you want those airy pockets to stay intact. At this stage, the pan looks like a golden canvas awaiting its final brushstroke.
Slide the pan into the oven and bake for 20‑25 minutes, or until the top turns a deep golden‑brown and a toothpick inserted into the center comes out clean. Around the 15‑minute mark, you’ll notice the edges pulling away slightly from the parchment—this is the signature “donut‑like” crust forming. The kitchen will now be saturated with a sweet, buttery aroma that practically invites you to peek inside the oven.
While the bars are baking, prepare the glaze: whisk together the powdered sugar, 1‑2 tablespoons of milk, and an extra drizzle of maple syrup until smooth and glossy. The glaze should be pourable but not runny; if it’s too thick, add a drop more milk, if too thin, sprinkle in a bit more powdered sugar. This glaze will set into a shiny, crackly coating that adds both visual appeal and a textural contrast.
When the bars are done, remove them from the oven and let them cool in the pan for 10 minutes. Then, using the parchment overhang, lift the entire sheet onto a cooling rack. While the bars are still warm, drizzle the glaze evenly over the surface, allowing it to cascade into the crevices. The glaze will begin to set within minutes, creating that coveted crackle that makes each bite a sensory delight.
Allow the glazed bars to cool completely—about 30 minutes—so the glaze hardens fully. Once set, cut them into squares or rectangles, depending on your serving preference. Serve them warm for that melt‑in‑your‑mouth experience, or at room temperature for a firmer bite. And now the fun part: watch your guests devour them, eyes widening with each bite. That’s it — you did it. But hold on, I've got a few more tricks that'll take this to another level...
Insider Tricks for Flawless Results
The Temperature Rule Nobody Follows
Never underestimate the power of a consistent oven temperature. I’ve seen bakers open the oven door too often, causing temperature drops that lead to uneven rising. Keep the door closed until the timer dings, and if you’re using a convection oven, reduce the heat by 25°F to prevent over‑browning. A steady heat ensures those edges stay crisp while the center stays soft, delivering that perfect donut‑like texture every single time.
Why Your Nose Knows Best
Your sense of smell is the ultimate doneness gauge. Around the 18‑minute mark, you’ll start to detect a caramelized, nutty aroma wafting from the pan—this is the signal that the crust is forming. If the scent turns slightly burnt, the bars are likely overcooked. Trust that nose; it’s more reliable than any timer.
The 5‑Minute Rest That Changes Everything
After removing the pan from the oven, let the batter rest for five minutes before adding the glaze. This short pause lets the interior settle, preventing the glaze from sinking into the bars and making them soggy. The result is a glossy top that stays crisp, while the interior remains tender and airy.
Butter Temperature Tactics
Softened butter (room temperature) works best for this recipe because it emulsifies with the maple syrup, creating tiny air pockets. If the butter is too warm, it will melt into the batter and produce a dense crumb. Conversely, if it’s too cold, you’ll end up with a gritty texture. The 10‑minute chill hack mentioned earlier guarantees the perfect consistency.
Glaze Timing Mastery
Apply the glaze while the bars are still warm but not piping hot. If the bars are too hot, the glaze will run off; if they’re too cool, the glaze will set too quickly and won’t spread evenly. Aim for a temperature of about 130°F (55°C) before drizzling. This ensures a uniform, crackly coating that looks as good as it tastes.
Creative Twists and Variations
This recipe is a playground. Here are some of my favorite ways to switch things up:
Apple‑Cinnamon Crunch
Fold in 1 cup of finely diced, lightly sautéed apples and a extra teaspoon of cinnamon into the batter. The apples add a juicy burst that pairs perfectly with the maple glaze, while the extra cinnamon deepens the spice profile. Ideal for fall brunches when apples are at their peak.
Chocolate‑Maple Fusion
Stir ½ cup of dark chocolate chips into the batter just before spreading. After baking, drizzle a thin layer of melted chocolate over the maple glaze for a decadent, sweet‑and‑bitter contrast. Chocolate lovers will swear this is the ultimate indulgence.
Nutty Delight
Add ½ cup of toasted pecans or walnuts to the dry mix. The nuts give a satisfying crunch that balances the soft interior, and their natural oils complement the maple’s richness. Sprinkle a few extra nuts on top of the glaze for added visual appeal.
Citrus Zest Burst
Incorporate the zest of one orange or lemon into the wet mixture. The citrus brightens the deep maple flavor, creating a fresh, spring‑time twist that’s perfect for brunches on a sunny patio.
Savory Herb Version
Swap the maple syrup for a tablespoon of honey and add 1 tablespoon of fresh rosemary, finely chopped, to the batter. Finish with a sprinkle of flaky sea salt on top of the glaze. This savory spin makes the bars a surprising side dish for a brunch spread that includes eggs and cheese.
Storing and Bringing It Back to Life
Fridge Storage
Place the cooled bars in an airtight container and store them in the refrigerator for up to four days. The glaze may become slightly sticky, but a quick wipe with a paper towel restores its shine. This makes them perfect for a quick weekday breakfast.
Freezer Friendly
Wrap individual bars in parchment paper, then seal them in a freezer‑safe zip‑top bag. They’ll keep for up to two months. When you’re ready to enjoy, let them thaw at room temperature for 20 minutes, then pop them in a 300°F oven for five minutes to revive the crisp crust.
Best Reheating Method
To bring a refrigerated bar back to its original glory, preheat a skillet over medium heat, add a tiny splash of water, and cover with a lid for 30 seconds. The steam will re‑moisturize the interior while the bottom regains a light crisp. If you prefer oven reheating, a 5‑minute blast at 350°F does the trick, especially for larger batches.