I was elbow-deep in flour and desperation, staring at a countertop that looked like a confectionery crime scene. My annual cookie swap party was in exactly four hours, and every single batch I'd attempted that morning had ended in disaster. The gingerbread men spread into unrecognizable blobs, the snickerdoodles turned out as hard as hockey pucks, and don't even get me started on the thumbprint cookies that stuck to the pan like they'd been super-glued. Just as I was about to admit defeat and show up with store-bought cookies (the ultimate holiday humiliation), my daughter waddled in carrying her toy kitchen's plastic mixing bowl filled with every snack she could reach from the pantry. Pretzels, potato chips, M&M's, and a handful of sprinkles tumbled out in a chaotic rainbow of potential. That's when it hit me — why was I trying to make the perfect traditional cookie when I could create something that captured the beautiful chaos of Christmas itself?
What emerged from that moment of desperation became the most requested recipe in my collection, the cookie that has relatives calling me in October asking if I'm "making those crazy cookies again this year." These Kitchen Sink Christmas Cookies are everything you love about the holidays thrown together in one glorious, slightly ridiculous package. They're sweet, salty, crunchy, chewy, and completely over-the-top in the best possible way. Picture this: a cookie that tastes like someone emptied the entire holiday aisle into a single bite, yet somehow manages to be more than the sum of its parts. The pretzels provide that satisfying snap, the potato chips bring an addictive saltiness, the M&M's burst with chocolatey sweetness, and the white chocolate chips melt into creamy pockets of decadence. It's like Christmas morning in cookie form — you never know what surprise you'll get in each bite.
But here's the real magic: despite looking like a culinary Jackson Pollock painting, these cookies follow a precise method that ensures they bake perfectly every single time. The dough base is rich and buttery, with dark brown sugar creating those gorgeous caramel notes that make your kitchen smell like Santa's workshop. The secret lies in the balance — just enough flour to hold everything together, the perfect ratio of butter to sugar for optimal spread, and the timing of when to add each mix-in. Trust me, I've eaten my way through enough failed experiments to know that throwing everything into a bowl doesn't guarantee success. There's an art to the chaos.
What started as my baking Hail Mary has become my signature contribution to every cookie exchange, office party, and family gathering. I'll be honest — I ate half the batch before anyone else got to try it that first year, standing over the cooling rack like a cookie gremlin, unable to believe how good these kitchen sink creations turned out. The combination of textures and flavors is so addictive that I've caught neighbors sneaking into my kitchen during parties to grab "just one more." If you've ever struggled with finicky holiday cookies that require royal icing skills you simply don't possess, or if you're tired of the same old sugar cookie routine, this recipe is your new best friend. Let me walk you through every single step — by the end, you'll wonder how you ever made it any other way.
What Makes This Version Stand Out
Every cookie claims to be special, but these Kitchen Sink Christmas Cookies actually deliver on that promise in ways that'll make you the legend of your holiday gatherings. What sets them apart isn't just the outrageous ingredient list — it's the methodical madness behind how each component works together to create something greater than its parts.
- The Texture Symphony: Most cookies settle for one or two textures, but these deliver a full orchestra — crispy edges from the pretzels, soft-chewy centers from the brown sugar base, and surprise crunches from the potato chips. Each bite is like a textural choose-your-own-adventure story.
- The Sweet-Salt Balance: Too many holiday cookies send you into a sugar coma after one bite. The strategic addition of salted pretzels and potato chips creates a sophisticated flavor profile that keeps you reaching for "just one more" without that cloying sweetness overload.
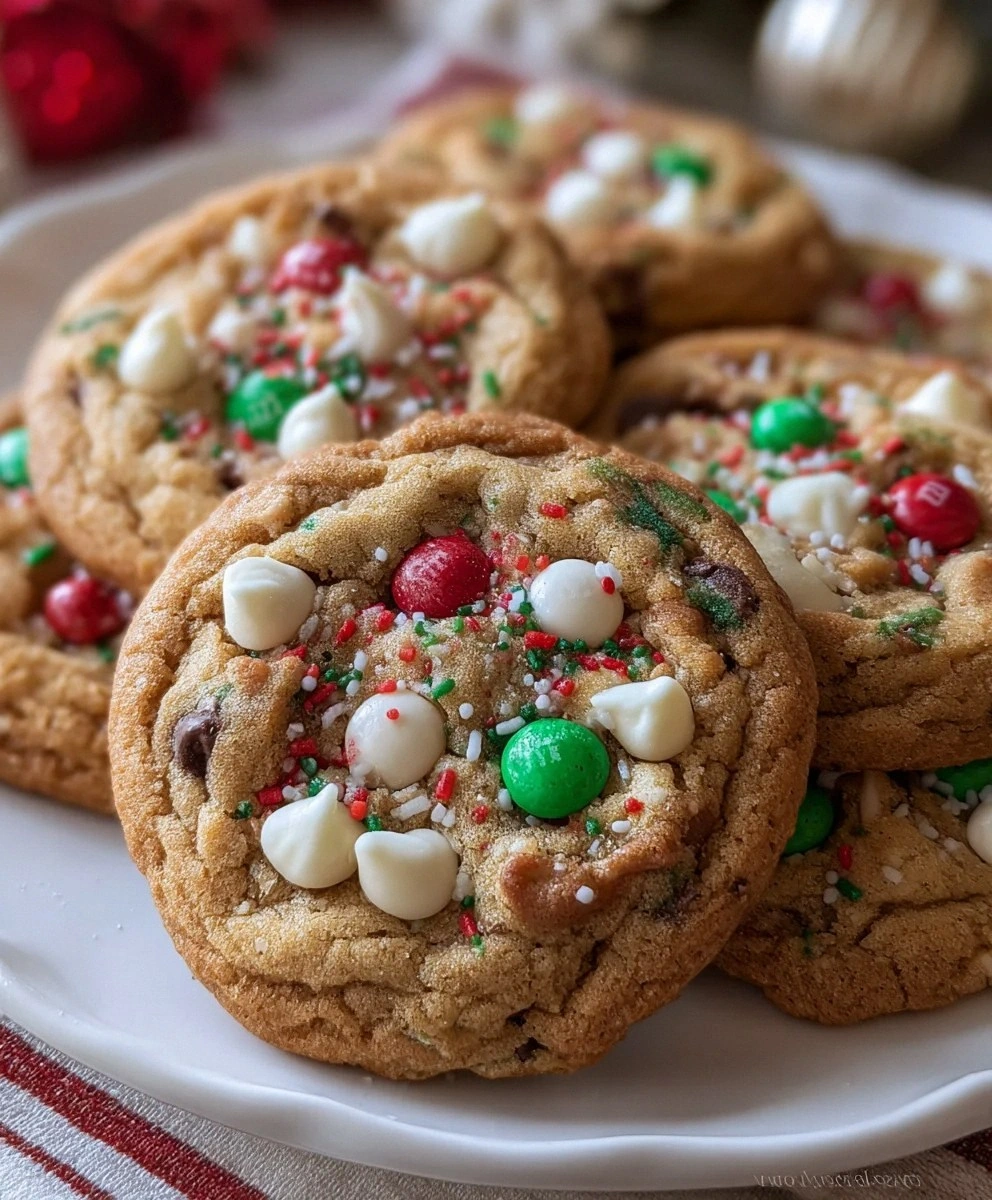
- Visual Impact: These cookies look like Christmas exploded on them — the red and green M&M's peeking through golden dough, festive sprinkles dancing across the surface, and white chocolate chips creating snow-like drifts. They're Instagram gold without any decorating skills required.
- Beginner-Friendly Brilliance: Despite their impressive appearance, these cookies are nearly impossible to mess up. No royal icing, no precise piping, no cookie cutters — just scoop, bake, and watch the magic happen. If you can operate a spoon, you can master these.
- The Conversation Starter Factor: Everyone expects chocolate chip or sugar cookies at holiday parties. When people bite into these and discover potato chips, their faces light up with delighted confusion. You'll spend the entire evening explaining your genius.
- Make-Ahead Magic: The dough actually improves after a day in the fridge, allowing flavors to meld and giving you the gift of spontaneous fresh-baked cookies throughout the holiday season. Picture yourself pulling warm cookies from the oven while guests arrive — domestic goddess status achieved.
Alright, let's break down exactly what goes into this masterpiece...
Inside the Ingredient List
Before we dive into the method, let's get intimately acquainted with every player in this holiday flavor orchestra. Each ingredient earns its place through careful consideration of how it contributes to the final cookie experience. Understanding the "why" behind each component transforms you from a recipe follower into a cookie whisperer.
The Flavor Foundation
All-purpose flour forms the structural backbone of these cookies, providing the gluten network that holds together the chaos of mix-ins. Don't be tempted to swap in whole wheat or alternative flours here — they compete with the delicate balance of flavors we've worked so hard to achieve. The protein content in regular AP flour is perfectly calibrated to give us cookies that are sturdy enough to support pretzels and potato chips without becoming hockey pucks. Baking powder and baking soda work as our leavening dream team, with the baking powder providing lift and the baking soda helping with browning and flavor development through its reaction with the brown sugar's molasses. Salt might seem redundant given our salty mix-ins, but it's essential for enhancing all the sweet flavors and preventing the cookies from tasting flat and one-dimensional.
Dark brown sugar is the secret weapon here, bringing moisture and those deep caramel notes that make your kitchen smell like a holiday candle factory. The molasses content adds chewiness and creates those gorgeous crinkly tops that look professionally bakery-made. White granulated sugar provides the structural sweetness and helps create those delightfully crispy edges that shatter like thin ice when you bite into them. The combination of both sugars gives us the best of both worlds — chew and crisp in perfect harmony.
The Richness Crew
Unsalted butter is non-negotiable here because we need complete control over the salt content, especially with our salty mix-ins waiting in the wings. The butter needs to be at that perfect cool room temperature — soft enough to cream but not so warm that it turns greasy. When properly creamed with the sugars, it creates tiny air pockets that expand during baking, giving us lift and that tender, almost fluffy texture that makes these cookies so addictive. The eggs act as our binding agents, creating a cohesive dough that can support the weight of all our additions. They also contribute to browning and add richness that water-based doughs simply can't achieve.
Vanilla extract might seem like a background player, but it's the aromatic backbone that ties all our disparate flavors together. Don't even think about using imitation vanilla here — the real stuff adds complex floral notes that elevate these from "kitchen sink" to "kitchen spectacular." A good quality Madagascar vanilla extract will make your cookies smell like you're baking in a French patisserie instead of your chaotic holiday kitchen.
The Holiday Stars
Red and green M&M's aren't just pretty faces — they're strategic chocolate delivery systems that melt slightly during baking, creating molten chocolate pockets throughout each cookie. The candy coating prevents them from completely dissolving, so you get that satisfying chocolate burst without the mess of melted chocolate chips spreading everywhere. When selecting your M&M's, grab the regular size, not the mini ones — we want those bold pops of color and chocolate that make each bite feel like finding treasure.
White chocolate chips bring creamy sweetness and visual contrast against the darker dough, melting into gorgeous pools that solidify into creamy white patches as the cookies cool. The vanilla notes in white chocolate complement our extract beautifully, creating layers of vanilla flavor that make these cookies taste more sophisticated than they have any right to be. If you're a white chocolate skeptic, I dare you to taste these and not go back for seconds — the way they interact with the salty elements creates a flavor profile that'll convert even the most ardent critic.
The Texture Rebels
Pretzels are where things get interesting — they provide that crucial salty crunch that prevents these cookies from becoming a sugar bomb. The salt on the pretzels amplifies all the sweet flavors while their crunch offers textural contrast to the chewy cookie base. I prefer using mini pretzels that I roughly crush with my hands, creating varied sizes from powder to chunks. This ensures every bite has a different pretzel experience, keeping things exciting from first bite to last.
Potato chips are the curveball that takes these cookies from "interesting" to "absolutely legendary." Trust me on this one — they bring an incredible salty crunch and a subtle potato flavor that makes these cookies taste like the best parts of a state fair. Use regular salted chips, not the fancy kettle-cooked variety, and crush them gently so you get some larger pieces that maintain their crunch even after baking. The oil in the chips helps create extra crispy edges while their salt content balances the sweetness perfectly.
The Festive Finish
Holiday sprinkles are your opportunity to customize these cookies for any occasion. The round nonpareils add delightful crunch and visual interest, while jimmies provide color without as much textural interference. Don't go overboard — about two tablespoons is perfect for adding festive flair without making the cookies taste like you dropped them in a craft store. The key is adding them at the very end, right before baking, so they stay vibrant and don't bleed their colors into the dough.
Everything's prepped? Good. Let's get into the real action...
The Method — Step by Step
- Start by positioning your oven rack in the center and preheating to 350°F. This isn't the time for shortcuts — a properly preheated oven ensures your cookies spread at the right rate and develop those gorgeous golden edges. While the oven heats, line two baking sheets with parchment paper. I've tried silicone mats and bare pans, but parchment gives you the perfect balance of grip and release, plus it makes cleanup a breeze when melted chocolate inevitably escapes. The smell of anticipation building in your kitchen right now? That's the smell of potential greatness.
- In a medium bowl, whisk together your flour, baking powder, baking soda, and salt. This isn't just about combining — you're ensuring the leavening agents distribute evenly so every cookie rises uniformly. The mixture should look like a pale, fluffy cloud of potential. Set this aside and let it rest while you move to the wet ingredients. Pro tip: Use a whisk rather than a spoon here — it aerates the flour and prevents those annoying lumps that can create pockets of dryness in your finished cookies.
- In your stand mixer (or with hand beaters if you're feeling ambitious), cream the butter and both sugars together on medium speed for a full three minutes. I know it seems excessive, but this is where the magic happens. You're not just mixing — you're incorporating air into the butter while the sugar crystals cut tiny pockets that will expand during baking. The mixture should lighten in color and become fluffy, like butter-colored clouds. Scrape down the sides twice during mixing to ensure everything gets evenly incorporated. The way it smells right now, all caramel and vanilla? That's the smell of cookie success.
- Add the eggs one at a time, beating well after each addition. This isn't just about mixing — it's about creating an emulsion that will give your cookies structure and richness. The first egg might look slightly curdled as it incorporates, but by the second one, the mixture should come together in a smooth, glossy mass. Beat in the vanilla extract and watch as the whole mixture suddenly smells like an ice cream parlor. This is the moment when you know you're on the right track, when your kitchen starts smelling like you should bottle the aroma and sell it as "Holiday Happiness #5."
- Now comes the critical moment — adding the flour mixture. Reduce your mixer speed to low and add the flour in three additions, mixing just until the last streak of flour disappears. Overmixing here develops gluten and makes tough cookies, so channel your inner zen master and stop as soon as the dough comes together. It should look like traditional chocolate chip cookie dough, soft and slightly sticky but able to hold its shape. The transformation from liquid batter to cohesive dough never fails to feel like kitchen magic.
- Okay, ready for the game-changer? Time to add the mix-ins, but here's the crucial part — do it in a specific order. First, fold in the M&M's gently with a spatula. You want them distributed but not crushed. Next, add the white chocolate chips, folding just until they're scattered throughout. Now comes the fun part — add the crushed pretzels and potato chips, folding just 3-4 times. The goal is ribbons of crunch throughout, not a homogenous mixture. Those pockets where you get a cluster of pretzels or a surprise concentration of chips? That's what makes each bite an adventure.
- Using a medium cookie scoop or two spoons, drop rounded mounds of dough onto your prepared baking sheets. Space them about 2 inches apart — they spread more than you'd expect thanks to all the butter and the melting candy coatings. Don't flatten them; let them stay in those rough, craggy mounds. Those nooks and crannies create the perfect texture contrast, with crispy peaks and chewy valleys. Press a few extra M&M's and a sprinkle of holiday confetti on top of each cookie — this ensures they look as festive as they taste after baking.
- Bake for 11-13 minutes, rotating the pans halfway through. Here's the thing — they won't look done when they are. The edges should be just turning golden, but the centers will still look slightly underbaked. That's perfect. They'll continue cooking on the hot pan after you remove them from the oven. The smell wafting through your kitchen right now, all butter and caramel and chocolate with hints of salt? That's the smell of you winning at holiday baking. Resist the urge to leave them in longer — better slightly underdone than hockey pucks.
- Let the cookies cool on the baking sheet for 5 minutes — no more, no less. This is when they set up and develop their final texture. Then transfer to a wire rack to cool completely. But let's be honest, you're going to eat at least one warm cookie, and you absolutely should. The way the white chocolate is still slightly molten, the pretzels are at peak crunch, and the M&M's provide those surprise chocolate bursts? That's the taste of holiday magic happening in real time.
That's it — you did it. But hold on, I've got a few more tricks that'll take this to another level...
Insider Tricks for Flawless Results
The Temperature Rule Nobody Follows
Here's where most recipes get this completely wrong — they don't tell you that ingredient temperature is everything. Your butter should be cool room temperature, meaning you can press a finger into it but it still holds its shape. Too warm and your cookies will spread into greasy puddles; too cold and they won't incorporate properly with the sugar. Same goes for your eggs — they should be room temperature too. Cold eggs can cause the butter to seize, creating little lumps that never quite disappear. If you forgot to take them out (we've all been there), place them in a bowl of warm water for 5 minutes. This tiny detail is the difference between cookies that look like they came from a bakery versus ones that look like they came from a kindergarten art project.
Why Your Nose Knows Best
Your sense of smell is your most underutilized baking tool. When creaming butter and sugar, you're looking for the moment when the mixture loses its sharp sugar smell and develops a rich, almost caramel aroma. That's when you know the sugar has properly dissolved into the butter. During baking, don't rely solely on timers — when your kitchen starts smelling like a gourmet bakery with hints of caramel and toasted nuts, that's your cue to start checking for doneness. If you can smell chocolate strongly, you might have overbaked them. Most recipes get this completely wrong by giving you rigid timing, but ovens vary, kitchens vary, and your nose is more reliable than any clock.
The 5-Minute Rest That Changes Everything
After mixing your dough, let it rest for 5 minutes before adding the mix-ins. This allows the flour to fully hydrate, creating a more cohesive dough that better supports all our chunky additions. Without this rest, you might find your M&M's sinking to the bottom or your pretzel pieces falling out. It's a small step that prevents big disappointments. Plus, during this rest, the butter firms up slightly, which helps prevent excessive spreading during baking. Think of it as the dough's meditation moment before the chaos of mix-ins arrives.
The Scoop Secret for Uniform Cookies
Invest in a medium cookie scoop — it ensures every cookie bakes evenly and looks professional. But here's the insider tip: don't level off the scoop. Let the dough mound slightly above the scoop's edge, creating those beautiful, rustic peaks that catch the light and hold extra mix-ins. When you release the dough onto the sheet, resist the urge to reshape. Those irregular edges become crispy, caramelized bits that everyone fights over. A friend tried skipping this step once — let's just say it didn't end well. Her cookies looked like they'd been through a blender, and the texture was all wrong. The scoop isn't about perfection; it's about controlled imperfection.
Storage Strategy for Maximum Freshness
These cookies stay fresh longer than most because the pretzels and potato chips act as natural moisture absorbers. Store them in an airtight container with a small piece of bread — the bread will stale first, keeping your cookies perfectly textured. But here's the real trick: separate layers with parchment paper not just for sticking prevention, but because it allows just enough air circulation to prevent condensation, which would make your crunchy elements soggy. They'll stay good for up to a week this way, though I've never seen them last more than three days in any household.
Creative Twists and Variations
This recipe is a playground. Here are some of my favorite ways to switch things up:
Winter Wonderland Version
Swap the M&M's for white chocolate peppermint candies and add crushed candy canes instead of holiday sprinkles. The peppermint creates a cooling sensation that makes these incredibly refreshing, perfect for balancing rich holiday meals. The crushed candy canes melt slightly, creating beautiful red swirls against the white chocolate. Kids go absolutely wild for these, and adults appreciate the sophisticated mint notes that cleanse the palate between courses of heavy holiday food.
The Salty Sweet Addiction
Add chopped salted caramel candies and replace half the pretzels with crushed butter crackers. The caramel melts into gooey pockets while the butter crackers provide a different kind of crunch — more tender than pretzels but equally addictive. These disappear faster than anything else at bake sales. I once had someone offer to pay me to make these for their wedding favors. The combination of textures and the hit of salt from the caramel makes these completely irresistible.
Ultimate Chocolate Overload
Replace white chocolate chips with dark chocolate chunks, add cocoa powder to the dough (reduce flour by 2 tablespoons), and use peanut butter M&M's. This creates a triple-threat chocolate experience that's rich enough to satisfy even the most serious chocoholic. The peanut butter M&M's add a nutty note that pairs beautifully with the dark chocolate. Warning: these are so rich you might want to make them smaller — or not. I won't judge.
Summer Holiday Edition
Use red, white, and blue M&M's for July 4th, add crushed freeze-dried strawberries for intense berry flavor, and swap the pretzels for crushed waffle cones. The strawberries rehydrate slightly during baking, creating little bursts of summer flavor that taste like strawberry shortcake in cookie form. The waffle cones add a different kind of crunch that screams county fair and summer memories. These are perfect for potlucks where you want something festive but not specifically Christmas-themed.
International Affair
Add matcha powder to the dough (reduce flour by 1 tablespoon), use green tea M&M's if you can find them, and add black sesame seeds along with the potato chips. The matcha adds an earthy, slightly bitter note that balances the sweetness beautifully, while the sesame seeds provide nutty depth. These have a sophisticated flavor profile that appeals to adults who claim they "don't like sweet things." The umami from the matcha makes these strangely addictive — I've seen people who swore they'd only have one end up eating half the batch.
Breakfast Cookie Makeover
Add 1/2 cup of your favorite granola, use mini chocolate chips instead of M&M's, and add a tablespoon of espresso powder to the dough. These taste like someone turned your morning coffee break into cookie form. The granola adds wholesome oats and honey notes that make you feel slightly less guilty about eating cookies for breakfast. The espresso powder enhances the chocolate flavor while adding a subtle coffee note that makes these perfect for early morning gift openings or New Year's Day brunch.
Storing and Bringing It Back to Life
Fridge Storage
These cookies actually benefit from a brief chill in the refrigerator, which helps the flavors meld and the textures settle. Store them in an airtight container with parchment between layers for up to 10 days. The cold temperature firms up the chocolate and makes the crunchy elements even more satisfying. Just let them come to room temperature for 10 minutes before serving — this allows the butter to soften slightly, bringing back that fresh-baked texture. If they seem to have lost a bit of their crunch, pop them in a 300°F oven for 3-4 minutes to refresh them.
Freezer Friendly
Both the dough and baked cookies freeze beautifully. For dough, scoop into balls and freeze on a sheet pan, then transfer to freezer bags for up to 3 months. Bake from frozen, adding 2-3 minutes to the baking time. For baked cookies, let them cool completely, then freeze in single layers with parchment between. They'll keep for up to 2 months and thaw in about 30 minutes at room temperature. Pro tip: freeze them slightly underbaked so when you reheat them, they finish baking and taste freshly made. The frozen dough makes an excellent emergency dessert for unexpected guests or late-night cravings.
Best Reheating Method
The microwave is your enemy here — it makes the crunchy elements soggy and the chocolate seize. Instead, use a 300°F oven for 5-6 minutes, or until you can smell them warming up. Add a tiny splash of water to the baking sheet before reheating — it creates steam that refreshes the cookies without making them soggy. For individual cookies, a toaster oven works perfectly. The goal is just to warm them through and re-crisp the edges slightly. Serve immediately with a cold glass of milk and prepare for the standing ovation.