Picture this: it's a gray October afternoon, the kind where the sky can't decide between rain and just looking gloomy, and I'm standing in my kitchen wearing mismatched socks and a hoodie that's seen better decades. My best friend just texted me a challenge: "Bet you can't make pumpkin cookies that don't taste like cardboard." Game on. Three hours and one minor kitchen fire later (note to self: parchment paper is flammable), I pulled out a tray of what would become the most requested recipe in my entire arsenal. The smell alone had my neighbor knocking on the door with puppy-dog eyes and an empty plate.
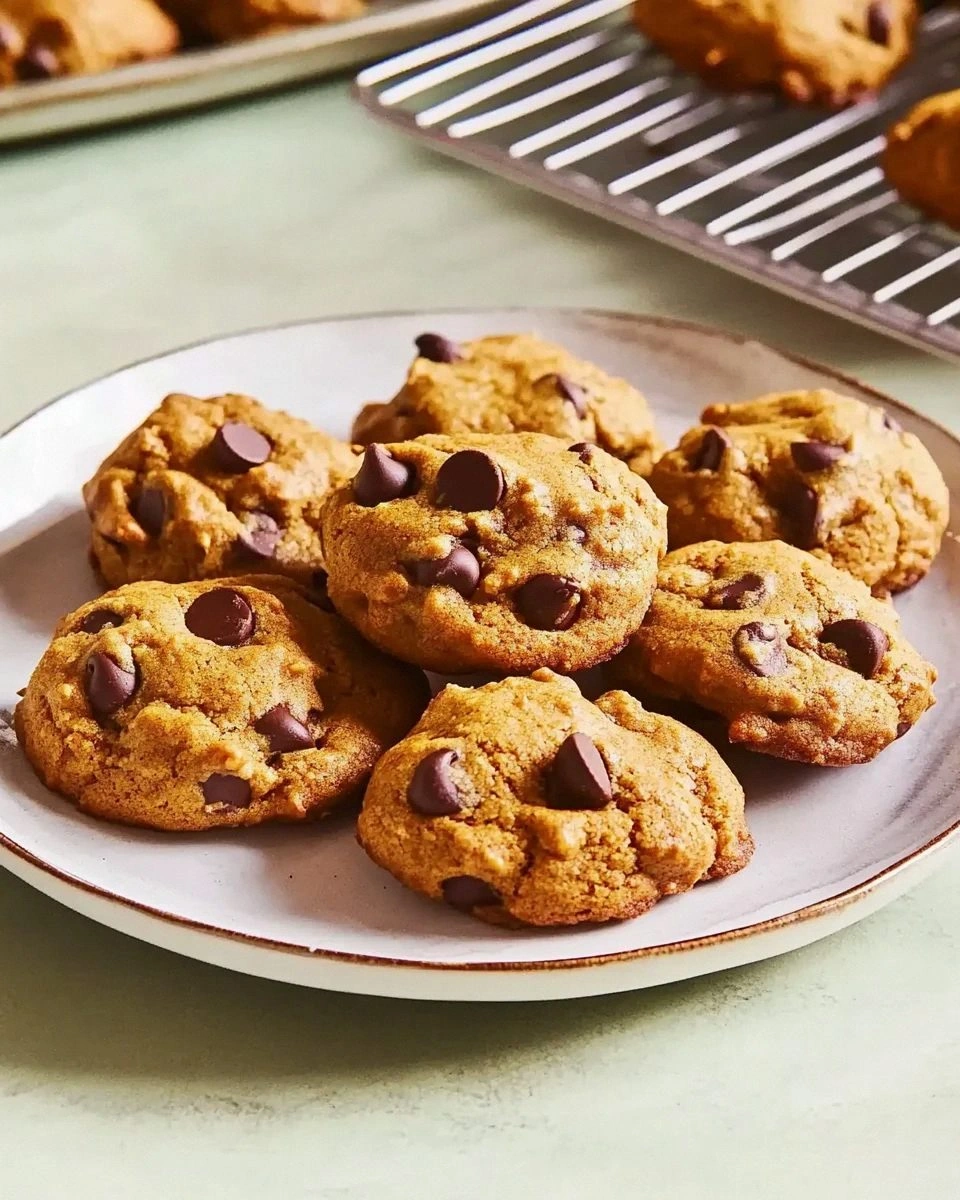
Here's the thing about pumpkin chocolate chip cookies — most recipes get them completely wrong. They either turn out cakey and bland, or they spread into sad little puddles that taste like someone sneezed cinnamon onto a kitchen sponge. But these? These are the cookies that made my cardiologist husband break his "no refined sugar" rule and my gluten-free friend declare them worth the stomach ache. We're talking crispy edges that shatter like thin ice, giving way to a chewy center that's basically autumn in edible form. The pumpkin doesn't just add moisture; it brings this earthy sweetness that makes the chocolate chips taste like they were kissed by maple trees and blessed by a Vermont grandmother.
What makes this version different? I stumbled onto the secret by accident when I ran out of regular butter and had to use brown butter instead. Holy. Moly. The nutty, toasty notes of brown butter dancing with warm spices and molasses-y brown sugar creates this flavor symphony that'll have you hiding cookies from your own family. And here's the kicker — I use a technique I call "spice blooming" where you actually toast the spices in the brown butter for thirty seconds. That sizzle when the cinnamon hits the pan? Absolute perfection. Your kitchen will smell like you've got a candle company doing R&D in your oven.
Okay, ready for the game-changer? We're using a combination of bread flour and cake flour instead of all-purpose. Stay with me here — this is worth it. The bread flour gives us those gorgeous chewy ridges while the cake flour keeps them tender, creating this perfect texture that'll make you wonder why you've been settling for regular cookies your whole life. Let me walk you through every single step — by the end, you'll wonder how you ever made it any other way.
What Makes This Version Stand Out
Texture Perfection: These cookies achieve the impossible — crispy edges with a chewy center that stays soft for days. The secret lies in the flour ratio and the way we cream the butter with the pumpkin, creating air pockets that don't collapse during baking. Most recipes either go too cakey or too crisp, but we've found the sweet spot that makes people close their eyes when they take the first bite.
Depth of Flavor: By browning the butter and blooming the spices, we're building layers of flavor that develop as the cookies cool. The brown butter adds nutty complexity while the toasted spices release essential oils that permeate every bite. It's like the difference between a flat painting and one with shadows and highlights — suddenly everything has dimension.
Chocolate Distribution: Instead of just folding in chocolate chips, we use three types: mini chips throughout, regular chips for melty pockets, and a chopped bar for those gorgeous chocolate puddles on top. This ensures chocolate in every bite but in different forms and intensities, keeping your palate interested from first bite to last crumb.
Pumpkin Balance: Most recipes either taste like pumpkin pie or hide the pumpkin entirely. We've struck the perfect balance where the pumpkin adds moisture and a subtle earthiness without overwhelming the chocolate. It's the supporting actor that makes the star shine brighter, not the annoying cousin who hogs the spotlight at Thanksgiving.
Make-Ahead Magic: The dough actually improves after a 24-hour rest in the fridge, allowing the flour to fully hydrate and the flavors to meld. You can freeze portioned dough balls and have fresh cookies in 12 minutes whenever the craving strikes. Future you will thank present you for this level of preparedness.
Room Temperature Rule: Everything — eggs, pumpkin, even the mixing bowl — needs to be room temperature for proper emulsification. Cold ingredients make the butter seize up, creating cookies that spread like gossip at a family reunion. Set everything out 30 minutes before you start and thank me later.
The Salt Factor: We use both kosher salt in the dough and flaky sea salt on top. The contrast between sweet and salty makes the other flavors sing like they've been taking vocal lessons. Don't skip this unless you want your cookies to taste like they're missing something they can't quite identify.
Alright, let's break down exactly what goes into this masterpiece...
Inside the Ingredient List
The Flavor Base
The unsalted butter is where we build our foundation, and trust me, you want the good stuff here. European-style butter with its higher fat content (82% versus 80%) creates richer flavor and better texture. When you brown it, the milk solids caramelize into tiny flavor bombs that taste like toffee had a baby with hazelnuts. Don't walk away from the pan — butter goes from perfectly browned to burnt and bitter faster than you can say "pumpkin spice."
Dark brown sugar isn't just for color — it brings molasses to the party, adding deep caramel notes that complement the pumpkin's earthiness. The extra moisture helps keep these cookies soft for days, not that they'll last that long. If you only have light brown sugar, add a tablespoon of molasses to fake it, but honestly, dark brown sugar is worth keeping in your pantry for moments like these.
Pure pumpkin puree is obviously the star here, but not all canned pumpkin is created equal. Look for varieties that are 100% pumpkin, not pumpkin pie filling which is pre-sweetened and spiced. Libby's has the smoothest texture, but if you're feeling ambitious, roast a sugar pumpkin and puree it yourself. Just make sure to strain it through cheesecloth — excess water is the enemy of chewy cookies.
The Texture Crew
Bread flour might seem like overkill for cookies, but its higher protein content (12-14%) creates more gluten, giving us those gorgeous chewy ridges. Don't substitute all bread flour though — it would make the cookies tough. The combination with cake flour (low protein, 6-8%) creates the perfect tender-chewy balance that'll have people asking for your secret. If you can't find cake flour, use 2 tablespoons of cornstarch plus all-purpose flour to make up the difference.
Eggs do more than bind — they add structure, richness, and help with that gorgeous golden color. We use one whole egg plus one yolk for extra fat and richness without too much moisture. The yolk contains lecithin, a natural emulsifier that helps everything come together smoothly. Room temperature eggs incorporate better and create more volume when creamed with the butter and sugar.
The Unexpected Star
Instant espresso powder might seem weird in pumpkin cookies, but it doesn't make them taste like coffee — it just amplifies the chocolate flavor like turning up the contrast on a photo. A quarter teaspoon is enough to make the chocolate taste more chocolatey without anyone being able to identify why. If you're serving to kids or caffeine-sensitive folks, you can skip it, but you'll miss that extra oomph that makes people say "what's in these?"
Cornstarch is my secret weapon for tender cookies. Just a tablespoon interferes with gluten formation, keeping the cookies soft even after they cool. It's the same reason we use it in shortbread — it creates that melt-in-your-mouth quality that makes people close their eyes involuntarily. Don't use more than called for though, or your cookies will taste like they have a secret ingredient of chalk.
The Final Flourish
Chocolate chips aren't just chocolate chips here — we're going for a curated chocolate experience. Mini chips distribute throughout, ensuring chocolate in every bite. Regular chips create those classic melty pockets, while roughly chopped chocolate bars create dramatic puddles that look bakery-professional. Use good chocolate here — it's the difference between a Hershey's kiss and a kiss from someone who knows what they're doing.
Pumpkin pie spice is convenient, but making your own lets you customize the flavor profile. I go heavy on the cinnamon (it's the backbone), moderate on ginger (adds brightness), light on nutmeg (too much tastes like soap), and add a whisper of cardamom (expensive but transformative). Toast whole spices and grind them yourself if you're feeling fancy — the difference is like listening to music on phone speakers versus a proper stereo system.
Everything's prepped? Good. Let's get into the real action...
The Method — Step by Step
- Start by browning the butter in a light-colored saucepan over medium heat. This isn't the time to check Instagram — stand there and watch as the butter foams, then subsides, then little brown specks appear on the bottom. Swirl the pan occasionally and when it smells like nutty toffee and the bits are mahogany-colored, immediately pour into a heatproof bowl. Those bits are liquid gold — don't you dare strain them out. Let this cool for 15 minutes while you prep everything else.
- While the butter cools, whisk together your flours, cornstarch, salt, baking soda, and spices in a medium bowl. This ensures even distribution so you don't get a bite that's all cinnamon or worse, all baking soda. The cornstarch goes in now so it can coat the flour particles, creating a barrier against gluten formation. Set this aside and try not to sneak a taste — raw flour isn't the vibe we're going for.
- In a small bowl, whisk together the pumpkin puree, egg, egg yolk, and vanilla until completely smooth. The pumpkin should be room temperature or it'll seize up the butter when we mix them. If there are any stringy bits, press the mixture through a fine-mesh sieve — we're going for bakery-smooth here. This mixture should look like the world's most delicious baby food.
- Now for the fun part — cream the cooled brown butter with both sugars for a full three minutes. I know it seems excessive, but this creates air pockets that give us lift without making the cookies cakey. The mixture should go from grainy to fluffy to looking like wet sand. Scrape down the bowl twice during mixing — unmixed butter pockets are the enemy of uniform cookies.
- Add the pumpkin mixture in two additions, beating well after each. The batter might look slightly curdled — that's totally normal and means we're properly emulsified. If it looks like it's separating, just keep mixing on medium speed for another 30 seconds. The batter should be the color of a perfect latte and smell like fall exploded in your kitchen.
- Turn the mixer to low and add the dry ingredients in three additions. Mix just until you see a few streaks of flour remaining, then add your chocolate and mix just until combined. Overmixing develops gluten and gives you tough cookies — nobody wants to feel like they're doing jaw exercises while eating dessert. The dough should be soft but not sticky, like play-doh that's been handled by warm hands.
- Portion the dough using a medium cookie scoop or two spoons — you want about two tablespoons per cookie. Roll them briefly between your palms to make perfect spheres, then place on a parchment-lined sheet. Space them two inches apart because they spread more than regular chocolate chip cookies thanks to the pumpkin. If you're feeling fancy, press a few extra chocolate chunks on top for those bakery-style puddles.
- Bake at 350°F for 12-14 minutes, rotating the pan halfway through. They're done when the edges are set but the centers still look slightly underbaked — they continue cooking on the hot pan. The tops should be lightly golden with a few crackles, like a desert landscape but delicious. Don't overbake unless you like cookies that could double as hockey pucks.
- Let them cool on the pan for five minutes — this is crucial for setting the structure. Then transfer to a wire rack and try not to burn your mouth on molten chocolate. Sprinkle with flaky sea salt while they're still warm so it adheres but doesn't dissolve. The contrast between sweet and salty will make your taste buds do a happy dance.
That's it — you did it. But hold on, I've got a few more tricks that'll take this to another level...
Insider Tricks for Flawless Results
The Temperature Rule Nobody Follows
Room temperature isn't just a suggestion — it's the law if you want cookies that look like they came from a French bakery. Cold eggs make the butter seize up, creating little pockets of solidified fat that melt unevenly and give you lumpy, misshapen cookies. Set everything out at least 30 minutes before you start, or use my grating trick for butter and place eggs in warm water for 10 minutes. Your cookies will reward you with perfect circles instead of sad amoebas.
Why Your Nose Knows Best
Don't rely on the timer alone — your nose is the most sophisticated piece of kitchen equipment you own. When these cookies are perfectly baked, your kitchen will smell like a cinnamon stick married a chocolate bar and they're living their best life together. If you smell even a hint of burning, you've gone too far. The scent should be warm and inviting, not sharp or acrid. Trust your instincts — if they smell done, they probably are.
The 5-Minute Rest That Changes Everything
After mixing the dough, let it rest for exactly five minutes before portioning. This allows the flour to hydrate fully and the butter to firm up slightly, making the dough easier to handle. But don't go longer than ten minutes or the chocolate will start to melt from the residual heat and create weird streaks. Five minutes is the sweet spot for cookies that look professionally made but still have that homemade charm.
The Underbake Advantage
Pull these cookies when the centers still look raw — I know it feels wrong, but it's the difference between good cookies and life-changing cookies. They'll finish setting as they cool, giving you that perfect contrast between crisp edges and a fudgy center. If you wait until they look fully baked, they'll be overdone by the time they cool. A friend tried skipping this step once — let's just say it didn't end well for anyone involved.
Creative Twists and Variations
This recipe is a playground. Here are some of my favorite ways to switch things up:
The Maple Bacon Dream
Replace half the brown sugar with maple sugar and fold in 1/2 cup of candied bacon bits along with the chocolate. The smoky-salty-sweet combo is like breakfast and dessert had a beautiful baby. Use maple extract instead of vanilla for an extra maple punch that'll have Canadians nodding approvingly.
The White Chocolate Cranberry Edition
Swap the chocolate chips for white chocolate and dried cranberries. The tart cranberries cut through the richness while white chocolate adds buttery sweetness. Add orange zest to the dough for a sophisticated flavor that belongs in a fancy bakery, not your humble kitchen.
The Spicy Mayan Version
Add 1/4 teaspoon cayenne and 1/2 teaspoon cinnamon to the spice mix. Use dark chocolate (70% cacao) and add toasted pepitas on top. The heat builds slowly, creating a warming sensation that pairs perfectly with hot coffee. It's like your cookies are giving you a gentle hug from the inside.
The Gluten-Free Game Changer
Replace the flours with 1:1 gluten-free baking flour plus 1 teaspoon xanthan gum. The pumpkin adds so much moisture that you won't miss the gluten at all. My gluten-free friends say these are better than the original — high praise from people who've suffered through their share of sandy cookies.
The Breakfast Cookie Lie
Add 1/2 cup rolled oats, replace half the chocolate with dried cherries, and add 2 tablespoons of ground flaxseed. Tell yourself these are healthy breakfast cookies because oats and fruit. They're not, but we all need our little fictions, and these are delicious enough to justify the self-deception.
The S'mores Mashup
Use graham cracker crumbs for 1/4 cup of the flour, fold in mini marshmallows with the chocolate, and press a piece of Hershey's bar on top of each cookie before baking. The marshmallows create little pockets of gooey sweetness that'll have you reaching for milk and remembering summer campfires.
Storing and Bringing It Back to Life
Fridge Storage
These cookies stay fresh in an airtight container at room temperature for up to 5 days — if they last that long, you've got more willpower than I do. Add a slice of bread to the container; it'll absorb excess moisture and keep the cookies soft. Replace the bread slice every two days or when it gets hard. Don't refrigerate them — the cold makes the chocolate waxy and the cookies stiff. Room temperature is their happy place.
Freezer Friendly
Freeze portioned dough balls on a sheet pan, then transfer to a freezer bag for up to 3 months. Bake from frozen, adding 2 extra minutes to the baking time. Baked cookies freeze beautifully too — wrap individually in plastic wrap, then freeze in a bag. Thaw for 30 minutes at room temperature or give them 10 seconds in the microwave. They'll taste fresh-baked, making you look like a domestic superhero who always has cookies ready.
Best Reheating Method
To revive day-old cookies, wrap them in a damp paper towel and microwave for 8-10 seconds. The steam rehydrates them, making them taste fresh from the oven. For multiple cookies, place them on a sheet pan in a 300°F oven for 5 minutes. Add a tiny splash of water to the pan before reheating — it creates steam that brings back the soft centers and makes your kitchen smell like you're baking again.