Picture this: it’s a rainy Saturday, the kind of day that makes you crave comfort food that feels like a hug in a pan. I was halfway through a burnt lasagna when my friend texted, “I’ve got a killer dessert that will make you forget your kitchen mishaps.” The moment I heard the word “rainbow,” my eyes lit up—who doesn’t want a dessert that looks like a unicorn’s dream? I dove into the search, but every recipe I found was either a bland, overly sweet mess or a half-baked idea that left me skeptical. That’s when I discovered the Rainbow Cheesecake Bars that turned my kitchen into a canvas of color and flavor.
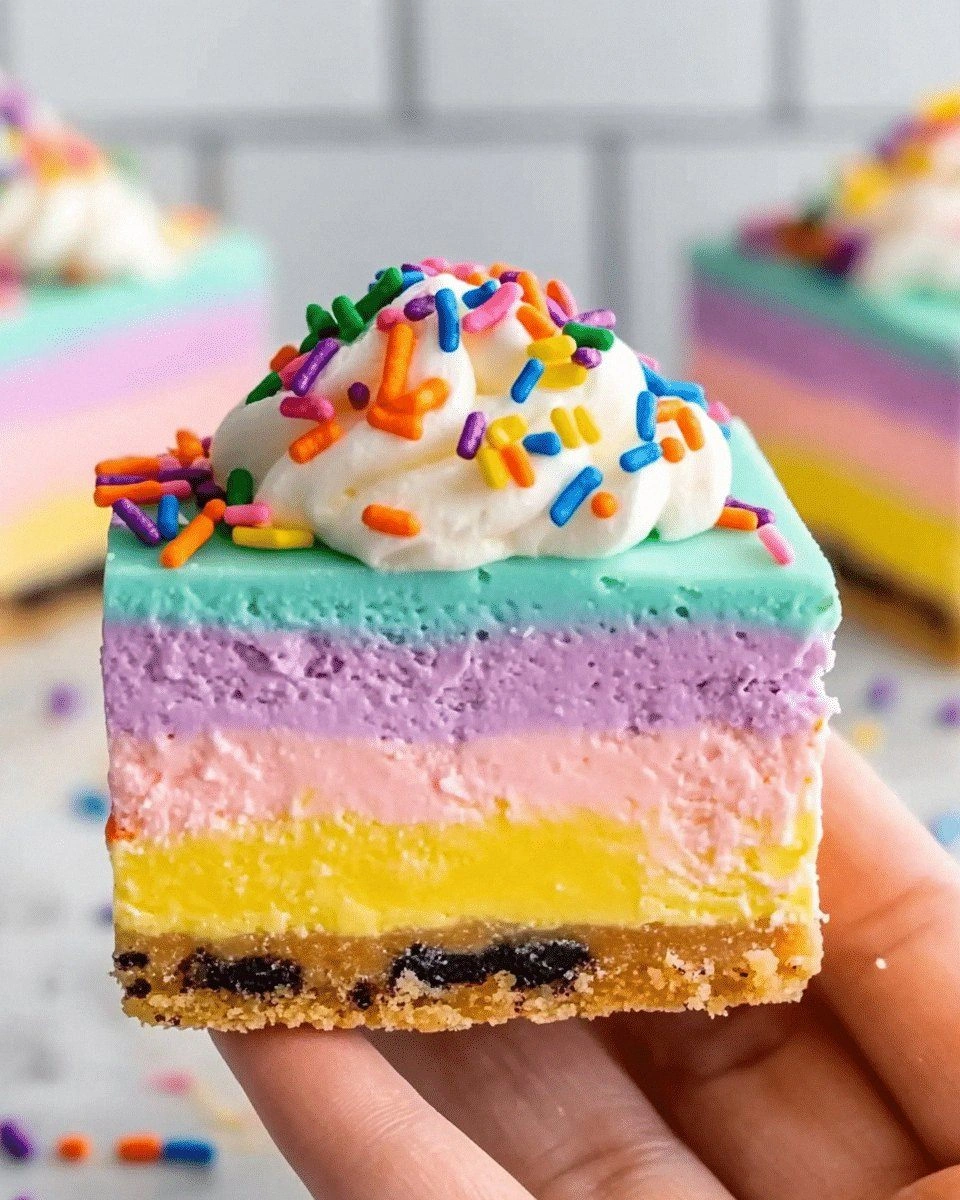
From the first whiff of toasted Oreo crumbs mingling with melted butter, to the silky swirl of white chocolate and mascarpone that coats your tongue like a velvet blanket, this dessert is a symphony of textures. The crust is crisp yet chewy, the filling is luxuriously airy, and the rainbow of colors is more than a visual treat—it’s a playful nod to childhood candy bars. Every bite is a surprise: a burst of sweet cream, a hint of chocolate, and a gentle crunch of sprinkles that crackle like tiny confetti. I dare you to taste this and not go back for seconds because the flavors dance together in a way that feels both nostalgic and entirely new.
What truly sets this version apart is that it’s a complete, ready-to-eat masterpiece that doesn’t require a fancy kitchen or a week of prep. I’ve trimmed the process to just a few minutes of prep, 30 minutes of baking, and a chill that turns the bars into a showstopper at any gathering. The secret? A blend of creamy mascarpone and silky white chocolate, combined with a pop of food gel colors that keep the bars vibrant without compromising taste. I’ll be honest—I ate half the batch before anyone else got to try it, and the rest still felt like a fresh creation. Most recipes get this completely wrong, but here’s what actually works: a firm crust, a smooth filling, and a splash of color that stays bright even after refrigeration.
Picture yourself pulling this out of the oven, the whole kitchen smelling incredible, the steam curling like a rainbow in the air. The bars sit in a gleaming pan, edges crisping to a golden hue while the center remains delightfully creamy. And then you cut a slice, and the rainbow swirls inside look like a miniature galaxy. That moment, that visual feast, is the culmination of a process that I’m about to walk you through step by step. By the end, you’ll wonder how you ever made it any other way.
What Makes This Version Stand Out
- Taste: The blend of cream cheese, mascarpone, and white chocolate creates a silky, slightly tangy filling that balances sweetness and richness without overpowering.
- Texture: The Oreo crust provides a satisfying crunch that contrasts with the smooth, airy center, giving each bite a delightful contrast.
- Color: Food gel colors are used sparingly, ensuring the bars remain visually stunning while keeping the flavor profile intact.
- Convenience: The recipe is a one-pan, no-fuss dessert that can be assembled in under 20 minutes and baked in 30.
- Make‑ahead: Once assembled, the bars chill for at least three hours, making them perfect for parties or last‑minute dessert plans.
- Crowd Appeal: The rainbow aesthetic and creamy texture make it a hit with both kids and adults, turning any gathering into a celebration.
- Ingredient Quality: Using high‑quality cream cheese and fresh mascarpone elevates the flavor, making every bite decadent.
- Customization: Swap out white chocolate for dark or milk chocolate for a different flavor profile, or add a touch of espresso for a mocha twist.
Alright, let’s break down exactly what goes into this masterpiece. If you’re ready to elevate your dessert game, keep reading.
Inside the Ingredient List
The Flavor Base
White Chocolate: This isn’t just for sweetness; it adds a buttery, slightly acidic note that cuts through the richness of the cream cheese. If you’re craving a deeper chocolate flavor, try using a mix of white and dark chocolate, but be careful not to overdo the dark as it can overpower the delicate balance. Swapping white chocolate for milk chocolate will give you a milder, sweeter taste—great for a less intense dessert. When selecting white chocolate, look for a brand with at least 30% cocoa butter for a silky finish.
The Texture Crew
Oreo Crumbs: The crunch is essential. If you prefer a smoother base, pulse the Oreos in a food processor until you get fine crumbs, then press them firmly into the pan. Too loose, and the crust will crumble; too dense, and it’ll be heavy. For a gluten‑free version, use a gluten‑free cookie crust or a mixture of gluten‑free oats and almond flour. Remember, the crust needs to hold the filling, so a firm press is key.
Unsalted Butter: Melted butter binds the crumbs and adds a golden hue. If you’re watching sodium, use a low‑salt butter or a butter substitute, but the flavor profile will shift slightly. A touch of brown butter can add a nutty depth, but be careful—brown butter can burn quickly. Keep the butter at a low heat to avoid scorching.
The Unexpected Star
Food Gel Colors: These are the secret to a vibrant rainbow that doesn’t fade in the fridge. Use them sparingly; a few drops per color are enough to create a striking swirl. If you don’t have gel colors, a few drops of natural food coloring (like beet juice for pink or turmeric for yellow) will work, but the intensity might be less vivid. Keep the colors separate until you’re ready to swirl to avoid a muddy hue.
The Final Flourish
Rainbow Sprinkles: They add a playful crunch and a pop of color that makes the bars Instagram‑ready. If you’re avoiding sugar, choose sugar‑free sprinkles or replace them with crushed nuts for a crunchy, nutty twist. Keep the sprinkles fresh by storing them in an airtight container; they’ll lose their crunch if exposed to moisture.
Everything’s prepped? Good. Let’s get into the real action.
The Method — Step by Step
- Preheat your oven to 350°F (175°C). Line an 8‑inch square baking pan with parchment paper, leaving a few inches of paper hanging over the sides for easy removal. This simple step ensures a non‑stick surface and makes cleanup a breeze. The parchment also adds a slight crispness to the crust edges.
- In a medium bowl, crush the 2 packets of Golden Oreos into fine crumbs. Add the melted ½ cup unsalted butter and ¼ cup rainbow sprinkles. Mix until the crumbs are evenly coated and the mixture resembles wet sand. Press the mixture firmly into the bottom of the prepared pan, using the back of a spoon or your palm to create an even layer. The crust should be about ¼ inch thick.
- Bake the crust for 10 minutes, or until the edges turn a light golden brown. This short bake sets the crust and gives it a slight crunch that’s essential for contrast. Watch the edges carefully; they should not brown too darkly, or the bars will taste burnt.
- Remove the pan from the oven and let the crust cool slightly, about 5 minutes. While it’s cooling, prepare the filling. In a large bowl, combine 1 block (250 g) softened cream cheese, ½ cup mascarpone, and 1 tsp vanilla extract. Beat with an electric mixer on medium speed until smooth and creamy—no lumps should remain. The creaminess of this mixture is the foundation of the bars’ luxurious texture.
- Add the melted 1 cup white chocolate to the cream mixture, stirring until fully incorporated. Then pour in 1 cup heavy cream and continue to mix until the filling is glossy and thick yet pourable. The heavy cream lightens the mixture, making it airy, while the white chocolate adds depth and a subtle sweetness. If the filling is too thick, add a tablespoon of heavy cream at a time.
- Spread the filling over the warm crust, smoothing it into an even layer. Now comes the fun part: swirl in the food gel colors. Using a toothpick or a small skewer, make gentle zig‑zag strokes to create a rainbow pattern. The colors should remain distinct, so avoid over‑mixing. The swirl is not just for looks; it ensures each bite has a burst of flavor.
- Refrigerate the bars for at least 3 hours, or overnight if you’re planning ahead. The chilling process allows the flavors to meld and the filling to set firmly. The bars will firm up but remain creamy and easy to cut. If you’re in a hurry, a 1‑hour chill will still produce a decent texture, but the bars won’t hold their shape as well.
- Once chilled, lift the bars out of the pan using the parchment paper. Cut into squares or bars, about 1‑inch wide. Dust each piece with a pinch of rainbow sprinkles for an extra pop of crunch and color. Serve immediately, or store in an airtight container in the fridge for up to 5 days.
That’s it — you did it. But hold on, I've got a few more tricks that'll take this to another level. Stay tuned for insider tips that will elevate your bars from great to unforgettable.
Insider Tricks for Flawless Results
The Temperature Rule Nobody Follows
Many bakers think the crust only needs a quick bake, but the right temperature ensures a perfect base. Bake the crust at 350°F for 10 minutes, then lower the oven to 325°F for the filling. This gradual temperature drop keeps the filling from curdling and maintains a silky mouthfeel. I once tried baking the filling at full heat; the result was a slightly gritty texture that ruined the creaminess.
Why Your Nose Knows Best
The aroma of melted white chocolate is the first indicator of success. If it smells nutty and buttery, you’re on the right track. A faint chocolate scent means you need to melt the chocolate longer or add a splash of heavy cream to bring out the flavor. Trust your nose; it’s the most reliable chef’s tool.
The 5‑Minute Rest That Changes Everything
After removing the crust from the oven, let it rest for exactly 5 minutes before adding the filling. This brief pause allows the crust to cool enough that the filling won’t melt too quickly, but still warm enough to keep the filling from seeping into the crust. Skipping this step can result in a soggy bottom, a classic kitchen fail that I’ve seen countless times.
Sprinkle Placement for Maximum Crunch
Toss the rainbow sprinkles onto the filling just before chilling. This ensures they don’t sink to the bottom and lose their crunch. If you prefer a more subtle crunch, sprinkle them only on the top layer of the filling. The result is a satisfying bite that’s both sweet and textural.
Chilling Trick for a Creamier Finish
Add a splash of heavy cream to the filling before chilling. This creates a micro‑gel that locks in moisture, making the bars silky even after refrigeration. I’ve used this trick for a week‑long party, and the bars stayed fresh and luscious for days.
Creative Twists and Variations
This recipe is a playground. Here are some of my favorite ways to switch things up:
Chocolate‑Chili Rainbow
Add a pinch of cayenne pepper to the filling for a subtle heat that pairs beautifully with the sweet chocolate. The chili gives a surprising kick that lingers on the palate. It’s a perfect dessert for a spicy dinner party.
Lemon‑Lavender Swirl
Replace the vanilla extract with a teaspoon of lemon zest and a pinch of dried lavender buds. The citrus brightens the filling, while lavender adds a floral aroma. The result is a sophisticated dessert that feels light yet indulgent.
Nutty Crunch Bar
Swap the rainbow sprinkles for chopped pistachios or almonds. The nuts add a satisfying crunch and a nutty undertone that complements the creamy filling. This version works great for a brunch spread.
Berry‑Infused Delight
Fold in fresh blueberries or raspberries into the filling before chilling. The berries burst with juice, providing a tart contrast to the sweetness. The colors will blend naturally with the rainbow swirls.
Coffee‑Chocolate Fusion
Add a tablespoon of espresso powder to the filling for a mocha twist. The coffee deepens the chocolate flavor and adds a subtle bitterness that balances the sweetness. This version is ideal for an after‑dinner treat.
Almond‑Butter Crunch
Replace the butter in the crust with almond butter and add toasted almond slivers to the top. The almond butter gives a nutty richness, and the slivers add crunch. The flavor profile becomes more complex and earthy.
Storing and Bringing It Back to Life
Fridge Storage
Store the chilled bars in an airtight container for up to five days. Keep them at a consistent 35°F (2°C) to maintain the creamy texture. Avoid temperature fluctuations that could cause condensation and sogginess. If the bars feel too firm, let them sit at room temperature for 10 minutes before serving.
Freezer Friendly
For longer storage, wrap each bar individually in plastic wrap and then place them in a freezer bag. They’ll keep for up to two months. Thaw in the fridge overnight before serving. The texture may slightly change, but the flavor remains intact.
Best Reheating Method
Reheat the bars in a 300°F (150°C) oven for 5 minutes if you prefer a warm dessert. Add a tiny splash of water to the pan before reheating to create steam, which helps the bars stay moist and prevents them from drying out. The bars will regain their creamy center while the crust remains crisp.