I still remember the night I tried to impress my friends with a humble “onion and apple” dish and ended up with a kitchen that smelled like burnt sugar and a pot that was a sticky, caramelized mess. The onions had gone from translucent to blackened, the apples from crisp to mush, and my confidence was on the brink of collapse. I stared at the smoldering pan, feeling the heat like a stubborn ember that wouldn’t let go, and thought, “What if I could turn this disaster into something that actually tastes good?” That question became my culinary compass for the next hour.
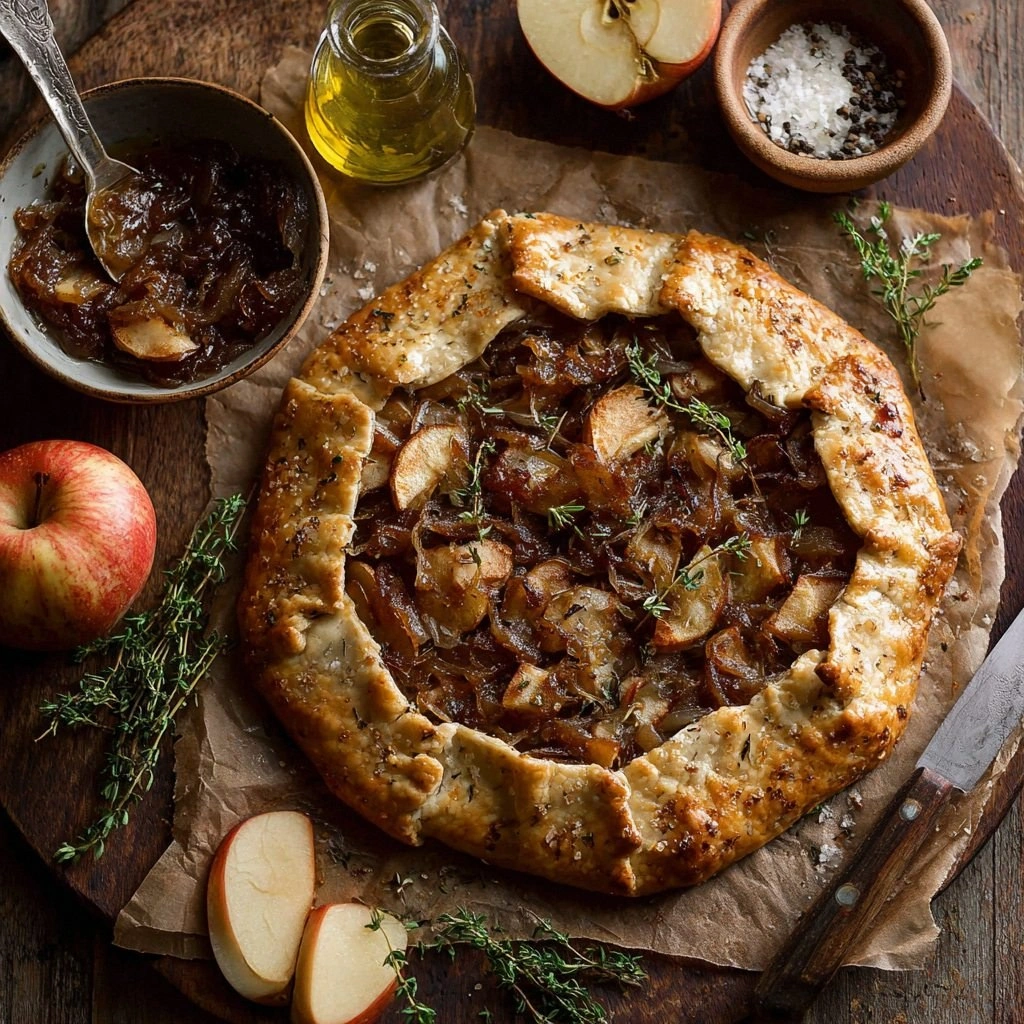
Fast forward a few weeks, and I stumbled upon a recipe that promised to transform caramelized onions and apples into a savory, spiced galette that feels like a hug in a flaky crust. The scent that rises when the onions begin to brown is a deep, nutty perfume that makes your mouth water before you even taste it. The apples, sliced thin and tossed with cinnamon, nutmeg, and a pinch of cloves, add a bright, almost citrusy brightness that cuts through the sweetness. The crust, buttery and flaky, offers a gentle crunch that’s the perfect counterpoint to the soft, caramelized filling.
What sets this version apart from the countless other “onion and apple” recipes you’ll find online is the meticulous layering of flavors and the bold, unexpected use of spices that dance on the tongue. I dare you to taste this and not go back for seconds, because the first bite is an explosion of sweet, salty, and peppery notes that will make you question why you ever settled for bland. The technique of slow caramelization, combined with a quick sear of the apples, locks in moisture and depth, creating a filling that’s both comforting and sophisticated. It’s hands down the best version you’ll ever make at home, and I’m not exaggerating.
If you’ve ever struggled to get onions to caramelize without burning them, you’re not alone—I've had my share of kitchen catastrophes that ended in smoke alarms and soggy onions. But this recipe offers a simple, foolproof method that guarantees a rich, golden-brown result every time. The secret? A steady, low heat and a generous splash of olive oil that keeps the onions from sticking. And if you’re worried about the apples turning to mush, the quick sear with butter and a pinch of salt will keep them firm and flavorful. Let me walk you through every single step—by the end, you’ll wonder how you ever made it any other way.
What Makes This Version Stand Out
- Flavor Depth: The combination of sweet apples, savory onions, and warm spices creates a taste profile that’s both comforting and adventurous. The caramelized onions add a rich umami base that balances the natural sweetness of the fruit.
- Texture Contrast: A flaky, buttery crust meets a silky, caramelized filling, delivering a satisfying bite that never feels heavy or cloying. The apples retain a slight bite thanks to the quick sear.
- Ingredient Simplicity: Only a handful of pantry staples are needed—no exotic ingredients or complicated techniques. This makes the dish approachable for cooks of all skill levels.
- Versatility: Whether served as an appetizer, a side dish, or a light dinner, the galette adapts to any occasion. Pair it with a crisp salad or a glass of white wine for a complete meal.
- Crowd Appeal: Guests rave about the unexpected blend of sweet and savory, making this dish a conversation starter at dinner parties.
- Make-Ahead Friendly: The galette can be assembled ahead of time and baked just before serving, which is perfect for entertaining.
Alright, let's break down exactly what goes into this masterpiece…
Inside the Ingredient List
The Flavor Base
All-purpose flour and cold butter form the backbone of the crust, creating that signature flaky texture that’s impossible to resist. The flour’s protein content allows the dough to rise slightly, giving it a light, airy feel, while the butter’s moisture content ensures a tender crumb. Skipping the flour will leave you with a greasy, doughy mess that won’t hold together.
Ice water is the secret to a tender crust. It hydrates the flour just enough to bind the dough without activating too much gluten, which would make the crust tough. If you forget the water, the dough will be dry and crumbly, so keep a small bowl of ice water handy.
The Texture Crew
Onions are the star of the show, providing a savory backbone that balances the sweetness of the apples. Thinly sliced, they caramelize slowly, releasing a deep, buttery flavor that’s both comforting and complex. If you prefer a milder onion flavor, try using red onions or shallots, but the caramelization will be slightly different.
Apples add brightness and natural sweetness. Choosing a firm variety like Honeycrisp or Granny Smith keeps the texture from turning mushy during the quick sear. The apple’s acidity also cuts through the richness of the butter, creating a harmonious balance.
The Unexpected Star
Ground cinnamon, nutmeg, and cloves give the dish a warm, aromatic quality that transports you to a cozy kitchen. These spices are the difference between a simple sweet dish and a sophisticated flavor profile. If you’re allergic to nutmeg, you can replace it with allspice or omit it entirely, but the depth will be slightly altered.
The Final Flourish
Olive oil and butter provide richness and help the onions caramelize without burning. The olive oil adds a subtle fruity note, while the butter gives a silky finish. If you prefer a dairy-free version, you can use coconut oil, but the flavor profile will shift slightly.
Brown sugar is the sweetener that ties the whole filling together, creating a caramelized glaze that’s both glossy and flavorful. A pinch of salt is essential to balance the sweetness, and fresh thyme adds a herby freshness that lifts the dish. The optional cheese—cheddar or Gruyère—adds a creamy, melty component that enhances the savory aspect.
Everything’s prepped? Good. Let’s get into the real action…
The Method — Step by Step
- First, preheat your oven to 425°F (220°C). While the oven heats, prepare the dough by mixing flour, salt, and cold butter in a large bowl. Cut the butter into the flour using a pastry cutter or your fingertips until the mixture resembles coarse crumbs. This is the moment of truth: if the butter is too warm, the dough will become sticky.
- Add ice water a tablespoon at a time, tossing the dough with a fork after each addition until the dough just comes together. Pat the dough into a disc, wrap it in plastic, and refrigerate for at least 30 minutes. A chilled dough means a flaky crust.
- While the dough chills, heat a large skillet over medium heat and add the olive oil. Once the oil shimmers, add the sliced onions and a pinch of salt. Sauté, stirring frequently, until the onions are translucent and start to brown, about 8–10 minutes. The sizzle is the soundtrack of caramelization.
- Add the diced apples and cook for 3–4 minutes, allowing them to soften but not fully disintegrate. Sprinkle the cinnamon, nutmeg, and cloves over the mixture, stirring to coat. The aroma that fills the kitchen at this point is a promise of what’s to come.
- Stir in the butter and let it melt, coating the onions and apples. The butter should create a glossy sheen that indicates the filling is ready. Remove the skillet from heat and set aside to cool slightly.
- Roll out the chilled dough on a floured surface to a 12-inch circle. Transfer the dough to a parchment-lined baking sheet. This is the base of your galette, so handle it gently to preserve the layers.
- Spread the caramelized onion and apple mixture evenly over the dough, leaving a 2-inch border. Sprinkle the thyme and, if using, the cheese over the top. The border will become a golden, flaky edge that’s the highlight of the dish.
- Fold the edges of the dough over the filling, pleating them to create a rustic enclosure. Brush the exposed dough with beaten egg to give it a shiny, golden finish. This step is essential for that beautiful, buttery look.
- Place the galette in the preheated oven and bake for 25–30 minutes, or until the crust is puffed, golden, and the filling is bubbling. The final sizzle as the crust crisps is the climax of the cooking process.
That’s it — you did it. But hold on, I've got a few more tricks that'll take this to another level. The next section will give you insider tips that will elevate the flavor and texture even further.
Insider Tricks for Flawless Results
The Temperature Rule Nobody Follows
Many cooks bake at a lower temperature, hoping the crust will stay tender. In reality, a high heat of 425°F forces the crust to puff quickly, creating that coveted flaky texture. I’ve found that preheating the oven for at least 15 minutes is crucial; otherwise, the dough will be undercooked.
Why Your Nose Knows Best
The aroma of caramelizing onions is a powerful cue that the flavor is developing correctly. If the onions start to smell burnt, lower the heat immediately. A good rule of thumb is to listen for a gentle crackling sound, not a hissing one.
The 5-Minute Rest That Changes Everything
After baking, let the galette rest on a wire rack for at least five minutes. This allows the juices to redistribute, preventing a soggy bottom. I’ve seen people skip this step and end up with a wet crust that’s hard to cut cleanly.
Cheese Choice Matters
Gruyère adds a nutty depth that complements the spices, while cheddar offers a sharper, tangier bite. If you prefer a milder flavor, mozzarella or a blend of mild cheeses will work, but the meltiness will be different.
Serve with a Fresh Green Salad
A crisp green salad with a simple vinaigrette balances the richness of the galette. The acidity of the dressing cuts through the buttery crust and sweet filling, creating a harmonious plate.
Creative Twists and Variations
This recipe is a playground. Here are some of my favorite ways to switch things up:
Smoky Chipotle Galette
Add a teaspoon of chipotle powder to the onion mixture for a smoky, slightly spicy kick. The heat pairs wonderfully with the sweetness of the apples and the richness of the crust.
Maple-Balsamic Fusion
Drizzle a tablespoon of maple syrup and a splash of balsamic vinegar over the filling before baking. The combination creates a complex, sweet-and-sour profile that feels like a dessert.
Mediterranean Twist
Replace thyme with rosemary and add a handful of chopped Kalamata olives. The briny olives give a Mediterranean flair that’s unexpected yet delightful.
Vegan Version
Swap the butter for coconut oil, use a dairy-free cheese substitute, and replace the egg wash with a thin layer of melted vegan butter. The result is a plant-based galette that still delivers on flavor.
Mini Tartlets
Cut the dough into smaller circles and bake in a muffin tin to create bite-sized tartlets. These are perfect for parties or as individual servings.
Herb-Infused Crust
Add finely chopped sage or tarragon to the dough for an herbal undertone that complements the sweet filling. This subtle addition elevates the overall dish.
Storing and Bringing It Back to Life
Fridge Storage
Let the galette cool completely, then wrap it tightly in plastic wrap and store in the refrigerator for up to three days. The crust will remain firm, and the filling will keep its flavor.
Freezer Friendly
Wrap the cooled galette in parchment paper, then in foil, and freeze for up to two months. When ready to eat, thaw overnight in the refrigerator before reheating.
Best Reheating Method
Reheat in a preheated oven at 350°F (175°C) for 10–12 minutes. Add a splash of water to the baking dish before reheating to create steam that restores the crust’s crispness. A quick microwave burst is not recommended, as it will make the crust soggy.