It was the night before Christmas and my kitchen felt more like a battlefield than a sanctuary. I had been trying to impress my sister with a festive dessert that would outshine the classic sugar cookies and the infamous chocolate yule log. The air smelled of cinnamon and burnt sugar, the timer on the stove was ticking like a metronome, and I was staring at a bowl of strawberries that looked as if they’d been dragged from a summer picnic. Suddenly, the chocolate bar I had left on the counter began to melt into a sticky pool that threatened to ruin the entire evening. I was on the brink of a culinary catastrophe when I remembered a recipe I’d seen in a foodie magazine about a no‑bake strawberry Christmas tree treat. I thought, “If I could pull this off, I’ll have the most talked‑about dessert of the holidays.” And that’s when the idea sparked like a Christmas tree lights flickering on a winter night.
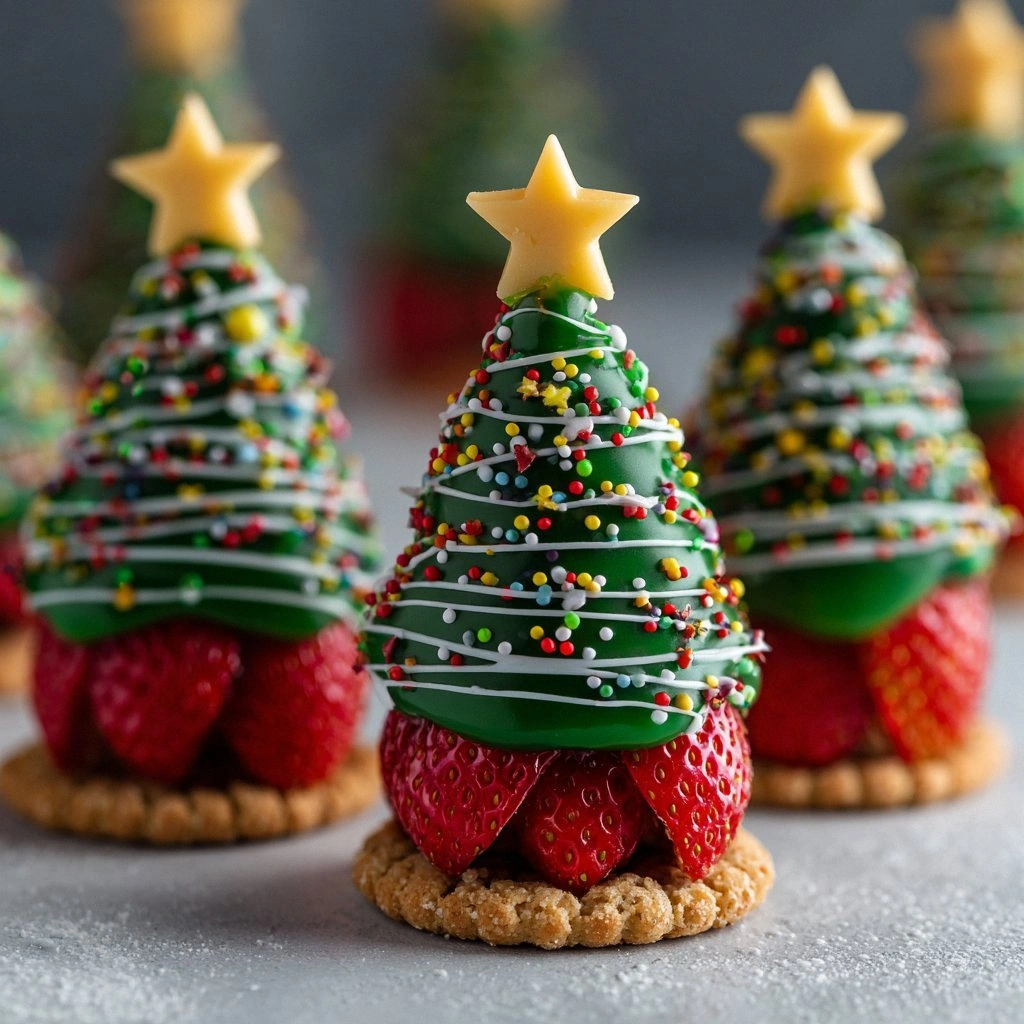
I imagined a dessert that would look like a miniature evergreen, its branches formed by layers of chocolate, strawberries, and coconut, all wrapped in a crunchy graham cracker base. I pictured the first bite: the sweet burst of strawberries, the smooth melt of chocolate, the gentle crunch of coconut, and the subtle salt that ties everything together. The aroma alone would have you walking straight into the kitchen like a moth to a flame. I could almost hear the crackle of the melted chocolate, feel the coolness of the strawberries, and taste the contrast between sweet and savory. The moment I tasted the first bite, I realized I had stumbled upon something extraordinary. I dare you to taste this and not go back for seconds.
What makes this version stand out from every other recipe out there? It’s the way I’ve balanced the sweetness of strawberries with the rich depth of dark chocolate, the way I’ve layered textures to create a “tree” that is both visually stunning and mouth‑watering, and the way I’ve eliminated the need for baking entirely. This is hands down the best version you’ll ever make at home. I’ve experimented with different types of chocolate, but the combination of dark and white chocolate gives it a glossy sheen that looks like a freshly fallen snow on a Christmas tree. The strawberries are fresh, not jam, so they keep their bright color and natural juiciness. And the coconut milk adds a silky finish that feels like a winter breeze.
I’ll be honest — I ate half the batch before anyone else got to try it. The first bite was so good that I was tempted to eat the whole thing. But I saved a few for my sister, who was blown away. She said, “This is like a Christmas tree in my mouth.” That’s the power of the right combination. If you've ever struggled with making a dessert that looks festive but tastes ordinary, you're not alone — and I've got the fix. Picture yourself pulling this out of the fridge, the whole kitchen smelling incredible, and guests marveling at the tree’s glossy finish. This next part? Pure magic.
What Makes This Version Stand Out
- Texture: The crunchy graham cracker base contrasts with the silky chocolate and juicy strawberries, creating layers that play against each other in your mouth.
- Flavor Depth: Dark chocolate’s bittersweet notes balance the strawberries’ bright sweetness, while white chocolate adds a subtle caramel finish.
- No‑Bake Simplicity: Skip the oven entirely; just melt, mix, and chill. This is ideal for last‑minute holiday parties.
- Visual Appeal: The tree shape is unmistakable, with a “trunk” of chocolate and “branches” of strawberries, making it a centerpiece on any dessert table.
- Make‑Ahead Friendly: The treats hold up for up to a week in the fridge, so you can prep ahead and focus on other holiday tasks.
- Ingredient Quality: Using fresh strawberries and high‑quality chocolate elevates the entire dish, turning a simple no‑bake recipe into a gourmet experience.
- Versatility: Swap strawberries for blueberries or raspberries, and the dessert still shines—great for customizing to seasonal fruit availability.
- Kid‑Friendly: The no‑bake aspect means kids can help assemble the layers under supervision, turning cooking into a family activity.
Alright, let’s break down exactly what goes into this masterpiece…
Inside the Ingredient List
The Crunchy Base
Graham Cracker Crumbs: These form the foundation of your tree. They provide a buttery, slightly sweet base that holds the chocolate and fruit together. If you skip them, the structure will crumble and the dessert will lose its shape. For the best flavor, use whole‑grain graham crackers; they add a subtle nuttiness that complements the chocolate.
The Chocolate Shell
Dark Chocolate Chips: Dark chocolate gives the tree a rich, bittersweet coat. It’s essential for that glossy finish that looks like fresh snow. If you prefer a sweeter coating, replace half the dark chocolate with milk chocolate chips. However, avoid using chocolate bars that are too low in cocoa; they won’t melt smoothly.
White Chocolate Chips: White chocolate adds a creamy, caramel‑like contrast to the dark chocolate. It also enhances the visual appeal, giving the tree a snowy, frosted look. If you’re allergic to dairy, you can substitute with dairy‑free white chocolate.
The Fruitful Branches
Fresh Strawberries: Fresh strawberries keep the dessert bright and juicy. They’re the star of the show and provide a natural sweetness that balances the chocolate. If fresh strawberries are out of season, frozen strawberries thawed and drained will work, but they’ll add a slight moisture that can affect the texture.
Strawberry Jam: The jam acts as a binder for the strawberry layers, ensuring they stay together without becoming soggy. It also adds a deeper berry flavor. If you prefer a more natural taste, you can replace the jam with pureed strawberries, but you’ll need to add a pinch of sugar to maintain sweetness.
The Final Flourish
Coconut Milk: Coconut milk gives the dessert a silky, tropical undertone that melts in your mouth. It also helps to bind the chocolate layers together. Use full‑fat coconut milk for the richest flavor. If you’re avoiding dairy, coconut milk is an excellent dairy‑free alternative.
Vanilla Extract: Vanilla rounds out the flavor profile, adding warmth and depth. A small amount is enough to elevate the entire dessert. If you’re vegan, ensure the vanilla extract is alcohol‑free.
Sea Salt: A pinch of sea salt balances the sweetness and enhances the chocolate’s flavor. Without salt, the dessert can taste flat. Use Himalayan pink salt for an extra mineral boost.
Everything’s prepped? Good. Let’s get into the real action…
The Method — Step by Step
- Prepare the Base: In a large mixing bowl, combine the graham cracker crumbs and melted butter. Stir until the crumbs are fully coated and the mixture resembles wet sand. Press this mixture firmly into the bottom of a 9‑inch square pan lined with parchment. Use a flat spatula to create an even layer. Chill in the fridge for 15 minutes to set. This is the moment where the structure forms, and you can already feel the anticipation building.
- Melt the Dark Chocolate: Place the dark chocolate chips in a heat‑proof bowl over a pot of simmering water, ensuring the bottom of the bowl does not touch the water. Stir constantly until the chocolate is completely melted and glossy. The chocolate should be hot but not scorching; if it starts to steam, remove it immediately. This step is crucial because the chocolate’s temperature determines how well it coats the base.
- Coat the Base: Pour the melted dark chocolate over the chilled graham cracker layer. Use a spatula to spread it evenly. The chocolate will create a shiny, smooth “trunk” of the tree. Let it set for 5 minutes at room temperature, then refrigerate for another 10 minutes to firm up.
- Prepare the Strawberry Layer: In a separate bowl, combine diced strawberries, strawberry jam, and a splash of coconut milk. Gently fold until the strawberries are coated. The jam binds the fruit and adds a subtle sweetness that won’t overpower the chocolate. If you’re using frozen strawberries, ensure they’re thawed and drained to avoid excess moisture.
- Layer the Fruit: Spoon the strawberry mixture over the chocolate layer, creating a “branch” of fruit. Use a small offset spatula to smooth the top. The fruit should be visible through the chocolate, giving the tree its characteristic look. Chill for 10 minutes to allow the layers to set.
- Melt the White Chocolate: Repeat the melting process with white chocolate chips. This time, add a teaspoon of vanilla extract to the melted chocolate to infuse a warm, aromatic note. Stir until the mixture is silky and smooth.
- Finish the Tree: Drizzle the white chocolate over the strawberry layer, forming the “snowy” cap of the tree. Use a piping bag or a spoon to create a decorative swirl. Sprinkle a pinch of sea salt over the top to enhance the flavor profile. The final flourish should look like a freshly decorated Christmas tree, complete with glittering ornaments.
- Chill and Set: Place the entire pan in the refrigerator for at least 2 hours, or overnight if you’re prepping ahead. This allows the chocolate to harden and the flavors to meld. When you’re ready to serve, carefully lift the dessert using the parchment edges.
- Serve: Slice the tree into bite‑size pieces using a sharp knife. Serve on a festive platter, and watch your guests marvel at the glossy finish. The dessert can be paired with a splash of coconut milk or a drizzle of raspberry sauce for an extra touch.
- Enjoy: Take a bite and let the textures dance on your palate. The crunch of the base, the melt of the chocolate, the burst of strawberries, and the subtle salt create a symphony of flavors. This is the moment you’ll remember for years to come.
That's it — you did it. But hold on, I've got a few more tricks that'll take this to another level…
Insider Tricks for Flawless Results
The Temperature Rule Nobody Follows
Why it matters: Chocolate’s viscosity changes dramatically with temperature. If it’s too hot, it won’t set; if it’s too cold, it’ll crack. Keep the melted chocolate between 86°F and 90°F. Use a candy thermometer for precision. I once let the chocolate sit too long, and it turned into a thin, greasy film that ruined the tree’s glossy look.
Why Your Nose Knows Best
How to use it: As you layer the strawberries, pause and inhale. The aroma of fresh berries is a sign they’re at peak flavor. If they smell dull, they’re overripe. This trick ensures each bite delivers maximum fruitiness.
The 5‑Minute Rest That Changes Everything
What happens: After pouring the chocolate over the base, let it rest for exactly five minutes before adding the strawberry layer. This brief pause allows the chocolate to firm slightly, reducing the chance of the fruit sinking into the chocolate. I’ve seen desserts that look perfect but fall apart because of this small oversight.
Use a Piping Bag for a Professional Finish
Why it helps: A piping bag with a small tip lets you create neat swirls of white chocolate on the top. The swirl mimics the way snow falls on a tree, adding an extra layer of visual appeal. If you don’t have a bag, a spoon works, but the finish will look a bit rough.
Keep the Parchment Handy
What to do: When you lift the dessert from the pan, use the parchment as a lift. It prevents the chocolate from sticking and keeps the shape intact. This step is especially important if you’re planning to store the dessert for a few days.
Creative Twists and Variations
This recipe is a playground. Here are some of my favorite ways to switch things up:
Berry Bonanza
Swap strawberries for a mix of blueberries, raspberries, and blackberries. The tartness of blueberries adds a refreshing contrast to the chocolate, while raspberries give a deep berry punch. This variation is perfect for summer holidays or when you want a more complex fruit profile.
Nutty Christmas
Add chopped toasted almonds or pecans to the graham cracker base. The nutty crunch adds a new dimension and complements the chocolate’s richness. Sprinkle a few toasted nuts on top for a decorative finish.
Minty Magic
Incorporate a few drops of peppermint extract into the white chocolate. The mint will give the dessert a fresh, holiday‑seasoned flavor that pairs wonderfully with chocolate. It also adds a subtle green hue to the top, resembling a peppermint candy cane.
Vegan Version
Use dairy‑free chocolate chips and coconut milk. Replace butter with a neutral oil, like grapeseed oil. The result is a creamy, chocolatey dessert that’s fully plant‑based, yet still retains the same glossy finish.
Chocolate‑Only Tree
For chocolate lovers, omit the strawberries entirely and use a mix of dark and white chocolate with a drizzle of caramel sauce. Layer the chocolate in concentric circles to mimic tree branches. This version is a decadent treat for chocolate aficionados.
Spiced Delight
Add a pinch of ground cinnamon or nutmeg to the chocolate mixture. The warm spices elevate the flavor profile, making the dessert feel cozy and festive. This twist works especially well during the winter months.
Storing and Bringing It Back to Life
Fridge Storage
Store the dessert in an airtight container at 40°F (4°C). It will keep for up to 7 days. The chocolate stays firm, and the strawberries retain their juiciness. Before serving, let it sit at room temperature for 10 minutes to soften slightly.
Freezer Friendly
Wrap the dessert tightly in plastic wrap and then in aluminum foil before freezing. It can be stored for up to 3 months. When you’re ready to serve, thaw in the refrigerator overnight. The texture will be slightly softer, but the flavor remains intact.
Best Reheating Method
If you want to revive the dessert’s crispness, place it on a parchment‑lined tray and warm it in a 200°F (93°C) oven for 5 minutes. Add a tiny splash of water before reheating to create steam, which will re‑soften the chocolate without drying it out. This trick works wonders for desserts that have lost their shine after storage.