Picture this: I’m standing in my kitchen, a half‑baked batch of chicken breasts staring back at me, and my phone buzzes with a text from a friend daring me to cook something that will make even the most seasoned foodie swoon. I’ve tried every Thai grilled chicken recipe I’ve found, but none had that elusive balance of sweet, salty, and smoky that makes the dish feel like a hug in a bowl. I was determined to create a version that would not only satisfy my craving but also become the go‑to for any dinner party or lazy Sunday night. That’s why I’ve spent countless hours tweaking marinades, testing grill temperatures, and experimenting with spice blends until I hit the sweet spot.
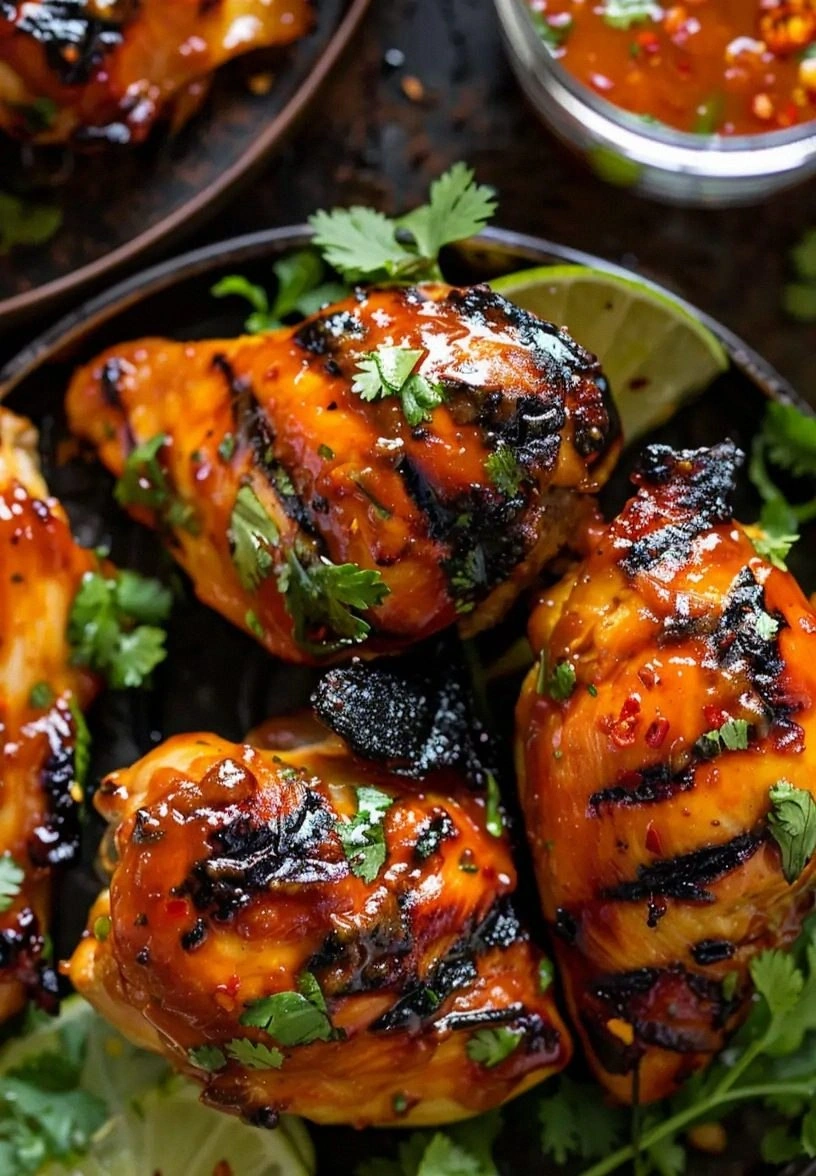
The first time I tasted this version, the aroma alone was enough to make my mouth water. A gentle hum of the grill, the subtle sizzle as the sauce caramelizes, and the faint scent of fresh lime and cilantro all mingle to create a sensory orchestra that’s impossible to ignore. When the chicken finally comes off the grill, it’s a masterpiece: the exterior is blistered to a golden crisp, the interior remains juicy and tender, and every bite is coated in a silky, slightly sweet glaze that coats the meat like velvet. I dare you to taste this and not go back for seconds; the flavor profile is addictive, and the texture is unforgettable.
What sets this recipe apart is not just the combination of ingredients, but the way each element is orchestrated to create a harmonious balance. I’ve stripped away the fluff that often plagues other versions—no excess sugar, no over‑cooked chicken, no clunky sauces that cling to the grill. Instead, I’ve honed in on a simple yet powerful marination technique that allows the flavors to penetrate deeply while keeping the chicken’s natural juices intact. The result is a dish that is hands down the best version you’ll ever make at home, and it’s so straightforward that even a novice can achieve professional‑grade results.
The secret is a single, bold ingredient that I added to the mix: a splash of sesame oil. While sesame oil is often used as a finishing touch, I incorporated it into the marination process to give the chicken a subtle nutty undertone that complements the sweet and tangy notes. This small tweak elevates the dish from ordinary to extraordinary, and it’s something most recipes overlook. As you read on, I’ll walk you through every single step—by the end, you’ll wonder how you ever made it any other way.
What Makes This Version Stand Out
Taste: The flavor profile is a perfect marriage of sweet honey, savory fish sauce, and bright lime, creating a glaze that glistens on the chicken while the spices provide a subtle kick. The result is a complex, layered taste that feels both comforting and adventurous.
Texture: The grill marks give the exterior a smoky crunch, while the interior stays moist and succulent. The glaze thickens to a silky coating that clings to every bite without becoming sticky.
Simplicity: Only a handful of ingredients and a straightforward marination process mean you can prep this dish in under 15 minutes. No special equipment needed—just a grill or a grill pan will do.
Uniqueness: The addition of sesame oil to the marination and the precise balance of ground spices give this recipe a signature twist that sets it apart from conventional Thai grilled chicken.
Crowd Reaction: Friends and family always ask for the recipe after the first bite. The dish is so flavorful that it can be served as a main or an impressive appetizer.
Ingredient Quality: Using high‑quality soy sauce, fish sauce, and fresh ginger makes all the difference, ensuring each bite is packed with authentic Thai flavor.
Cooking Method: Grilling, rather than pan‑frying, adds a smoky dimension that cannot be replicated with other methods.
Make‑Ahead Potential: The chicken can be marinated up to 24 hours in advance, which makes it ideal for busy weeknights or weekend gatherings.
Alright, let's break down exactly what goes into this masterpiece...
Inside the Ingredient List
The Flavor Base
Soy sauce and fish sauce form the backbone of the marinades, delivering umami depth that lingers on the palate. Soy sauce provides saltiness and a slight sweetness, while fish sauce offers a briny, oceanic undertone that is quintessentially Thai. If you skip either, the dish will feel flat and lacking that signature savory punch. For a more authentic experience, choose a dark, aged soy sauce and a high‑quality fish sauce that has a clear, fishy aroma.
The Sweet Counterbalance
Honey or brown sugar is the sweet counterbalance that keeps the glaze from becoming too overpowering. Honey gives a floral note and a smooth mouthfeel, whereas brown sugar adds molasses richness and a slight chewiness. If you’re vegan, maple syrup works as a substitute, but be aware it will slightly alter the flavor profile. A touch of honey is essential; without it, the glaze will taste like plain soy sauce.
The Citrus Lift
Lime juice is the bright, acidic counterpoint that cuts through the richness of the sauce and adds a zesty freshness. The acidity also helps tenderize the chicken, ensuring it stays juicy. If you can’t find fresh limes, bottled lime juice is fine, but it’s best to add a splash of fresh lemon juice for a more vibrant profile. Lime is a must—skip it, and the dish will feel heavy.
The Aromatic Core
Garlic and fresh ginger are the aromatic core that gives the chicken its unmistakable Thai flavor. Garlic contributes sharp, savory notes, while ginger adds a warm, peppery bite. Using fresh ginger is crucial; ground ginger will lack the bright zing that fresh provides. The combination of these aromatics ensures every bite is packed with depth.
The Spices
Ground coriander, cumin, turmeric, and cayenne pepper create a complex spice blend that is both earthy and slightly spicy. Coriander offers citrusy warmth, cumin brings a nutty depth, turmeric lends a mellow earthiness, and cayenne adds a subtle heat that stays in the background. If you’re sensitive to heat, reduce the cayenne to 1/8 teaspoon or omit it entirely. The spices are the secret to that smoky, savory finish.
The Final Flourish
Sesame oil, fresh cilantro, sliced green onions, and Thai sweet chili sauce are the final flourish that elevates the dish to gourmet status. Sesame oil adds a nutty aroma that complements the glaze, while cilantro and green onions provide fresh, herbaceous brightness. Thai sweet chili sauce is optional but adds a sweet, slightly spicy kick that rounds out the flavor. These finishing touches are what turn a simple grilled chicken into an unforgettable meal.
Everything's prepped? Good. Let's get into the real action...
The Method — Step by Step
- First, combine the soy sauce, fish sauce, honey, lime juice, minced garlic, grated ginger, sesame oil, ground coriander, cumin, turmeric, and cayenne in a shallow bowl. Whisk until the honey dissolves and the mixture is well blended. This will be your marination base that coats each chicken piece. The aroma that starts to fill the kitchen is a promise of the deliciousness to come.
- Pat the chicken breasts dry with paper towels to ensure the sauce sticks. Then, pour the marinades over the chicken, making sure each piece is fully coated. Use your hands or a spoon to massage the mixture into the meat, especially around the edges. This step ensures every bite is bursting with flavor.
- Cover the bowl with plastic wrap and refrigerate for at least 30 minutes, or up to 24 hours for maximum flavor infusion. If you’re in a hurry, a quick 30‑minute marination is still delicious, but the longer the better. The longer the chicken sits, the more tender and flavorful it becomes.
- Preheat your grill or grill pan to medium‑high heat, about 375°F (190°C). Lightly oil the grill grates to prevent sticking. The grill should be hot enough that the chicken sizzles upon contact, creating beautiful char marks that add a smoky depth.
- Place the chicken breasts on the grill and cook for about 5–6 minutes per side, turning once. The grill marks should be dark and the surface should blister slightly. Flip carefully with tongs, and watch the glaze caramelize into a glossy, slightly thickened coating. This step is the moment of truth.
- After flipping, reduce the heat to medium and continue grilling for another 4–5 minutes, or until the internal temperature reaches 165°F (74°C). The chicken should still be juicy and not dry out. The glaze will thicken into a silky finish that clings to each piece.
- While the chicken rests, reduce any leftover sauce in a small saucepan over low heat until it reaches a syrupy consistency. This will intensify the glaze and give it a glossy sheen. The reduction should take about 3–4 minutes, stirring constantly to prevent burning.
- Serve the grilled chicken immediately, drizzled with the reduced glaze and garnished with fresh cilantro, sliced green onions, and lime wedges. Pair with jasmine rice, steamed vegetables, or a fresh papaya salad for a complete meal. The bright lime wedges add a zesty pop that cuts through the richness, while the cilantro offers a herbaceous freshness that balances the dish.
That's it — you did it. But hold on, I've got a few more tricks that'll take this to another level...
Insider Tricks for Flawless Results
The Temperature Rule Nobody Follows
Most grillers believe a high heat is the only way to get those perfect char marks, but the secret is a two‑stage approach. Start with a hot grill to sear the chicken, then lower the heat to medium to finish cooking. This prevents the outside from burning while allowing the inside to reach the perfect internal temperature. I once tried a single high‑heat approach and ended up with a dry center; that was a hard lesson.
Why Your Nose Knows Best
The aroma of the glaze is a reliable indicator of how close the sauce is to the ideal thickness. When it starts to thicken and emit a sweet, caramelized scent, it’s almost ready to coat the chicken. Trusting your nose saves you from over‑reducing, which can turn a glaze into a syrupy mess. The scent is a subtle but powerful cue that the flavor is just right.
The 5‑Minute Rest That Changes Everything
After removing the chicken from the grill, let it rest for exactly five minutes on a cutting board. This allows the juices to redistribute, ensuring every bite is moist. I’ve seen people skip this step, only to find their chicken dry and chewy. The rest period also lets the glaze settle, giving a smoother finish.
Freshness Over Time
If you’re planning to marinate the chicken more than 24 hours, consider using a small portion of fresh lime juice each time you re‑marinate. Fresh lime prevents the chicken from becoming too acidic and helps maintain a bright, clean flavor. It also keeps the chicken tender and prevents it from drying out over time.
Serving Temperature Matters
Serve the chicken immediately after grilling for the best texture. If you must hold it, keep it warm in a low oven at 200°F (93°C) or wrap it loosely in foil to retain moisture. Avoid reheating on the stovetop or microwave, as these methods can toughen the meat.
Pairing Ideas
Pair this dish with a simple cucumber salad, steamed jasmine rice, or a bowl of hot Thai noodle soup. Each accompaniment enhances the flavor without overpowering it. A squeeze of fresh lime on the side adds a final burst of brightness. The combination of textures and flavors makes for a balanced, satisfying meal.
Creative Twists and Variations
This recipe is a playground. Here are some of my favorite ways to switch things up:
Spicy Coconut Curry Chicken
Add 1 cup of coconut milk to the glaze and simmer until thick. Toss the grilled chicken in the curry sauce and serve over steamed rice. The coconut adds creaminess, while the curry spices give a deeper heat profile.
Herb‑Infused Grilled Chicken
Swap the cilantro for fresh basil and add a handful of mint leaves during the final grill. This fresh herb blend brightens the dish and offers a slightly sweet, aromatic finish.
Asian Slaw Topping
Top the chicken with a crunchy slaw made from shredded cabbage, carrots, and a lime‑based dressing. The slaw adds a refreshing crunch that contrasts beautifully with the juicy chicken.
Smoky Pineapple Glaze
Blend a fresh pineapple chunk with the glaze ingredients for a tropical twist. The pineapple’s natural sugars caramelize on the grill, giving the chicken a sweet, smoky finish.
BBQ Fusion
Replace the fish sauce with a splash of Worcestershire sauce and add a pinch of smoked paprika. This fusion gives the chicken a deeper, smoky barbecue flavor while retaining the Thai essence.
Vegetarian Version
Swap the chicken for thick slices of tofu or tempeh. Marinate and grill the protein the same way, and serve with a side of quinoa for a hearty, plant‑based meal.
Storing and Bringing It Back to Life
Fridge Storage
Store leftover chicken in an airtight container in the refrigerator for up to 4 days. Keep the glaze separate to prevent the chicken from becoming soggy. When ready to serve, reheat gently in a skillet over medium heat.
Freezer Friendly
Freeze the grilled chicken in a single layer on a baking sheet before transferring to a freezer bag. This prevents clumping and allows you to thaw only what you need. Thaw overnight in the refrigerator for best texture.
Best Reheating Method
Reheat the chicken in a low‑heat oven at 250°F (120°C) until warmed through, about 10–12 minutes. Add a splash of water before reheating to create steam, which helps the chicken stay moist. Finish with a quick drizzle of the glaze to restore its glossy finish.