Picture this: I’m standing in a kitchen that feels more like a crime scene than a sanctuary. The sink is a pool of melted frosting, the countertop is a battlefield of crumbs, and my phone’s notification pops up with the words “Birthday chaos.” My friend dared me to bake a cake that would make her guests gasp louder than the cake‑cutting knife. I stared at the empty fridge and realized that the only thing that could salvage the evening was a dessert that screamed celebration from the first bite.
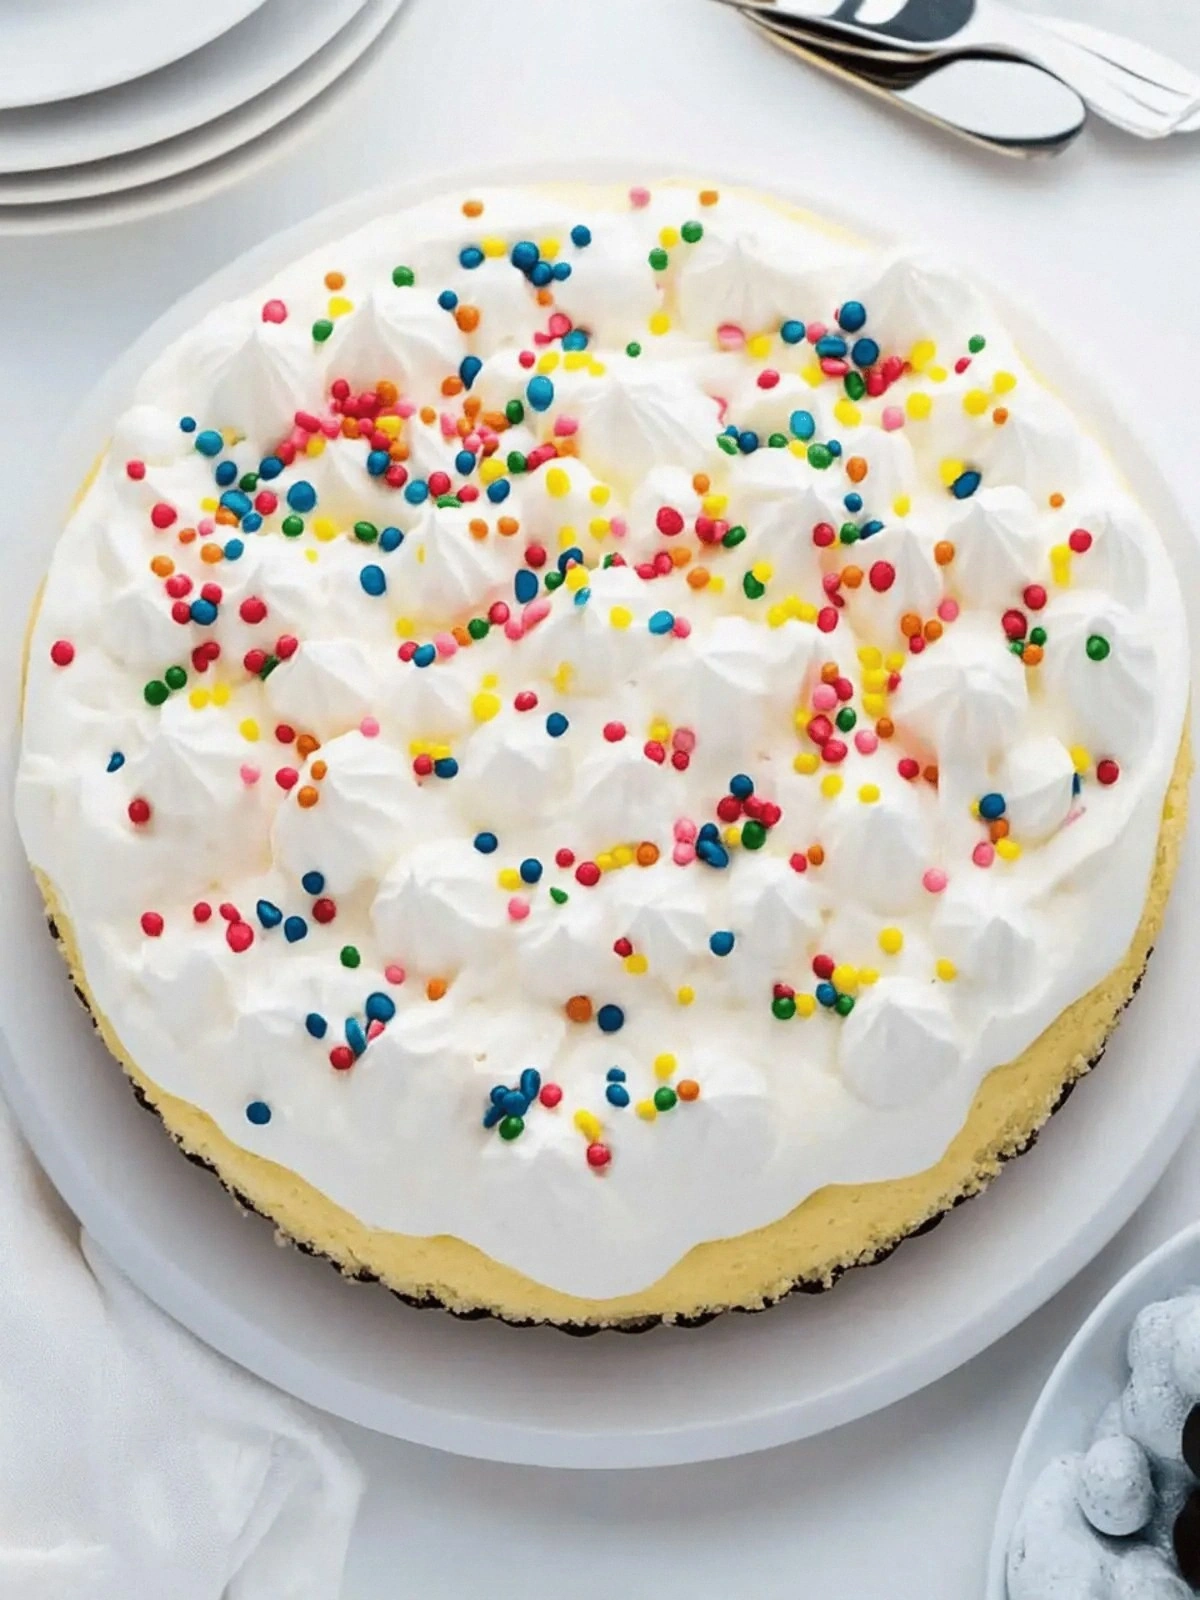
I’ve spent months hunting for that one cheesecake that feels like a hug and a confetti party in one. The aroma that unfurls when you crack open a tub of cream cheese is like a sweet promise of comfort. The texture—soft, dense, with a slight spring—makes each forkful feel like a secret handshake between you and the universe. The visual appeal of rainbow jimmies cascading over a glossy, ivory base is a festival that invites you to dive in. And the finish? A silky whipped cream cloud that whispers “you made it” to your taste buds.
This isn’t just another birthday treat; it’s the ultimate cheesecake that turns ordinary birthdays into legendary memories. I dare you to taste this and not go back for seconds, because once you try it, the rest of the cake feels like a distant memory. It’s hands down the best version you’ll ever make at home, and it’s engineered to be the centerpiece of any birthday celebration. The secret sauce? A playful twist of rainbow sprinkles that add crunch, color, and a pop of childhood nostalgia. Every bite is a reminder that life is sweeter when you sprinkle a little joy on top.
If you’ve ever struggled with the classic cheesecake’s dry texture or uneven rise, you’re not alone—and I’ve got the fix. The trick is to balance the creaminess with the right amount of sour cream and to let the batter rest before baking. Picture yourself pulling this out of the oven, the whole kitchen smelling incredible, and the cake’s surface shimmering like a polished marble. That moment is pure magic, and it’s exactly what we’re about to create together. Let me walk you through every single step—by the end, you’ll wonder how you ever made it any other way.
The first thing that separates this cheesecake from the rest is the crust. It’s buttery, buttery, and has a subtle crunch that contrasts perfectly with the velvety filling. The second is the ratio of cream cheese to sour cream, which keeps the texture moist without making it too heavy. Third, the inclusion of rainbow jimmies isn’t just for looks; they add a satisfying snap and a burst of color that makes the cake feel festive. Fourth, the whisking technique we’ll use ensures a silky batter that eliminates lumps. Fifth, the baking method—an overbaked water bath—keeps the center from cracking and ensures an even rise. And finally, the topping of whipped cream provides a light, airy finish that balances the richness. These are the five pillars that make this cake unforgettable.
What Makes This Version Stand Out
- Texture: The batter is whisked to a silky smooth consistency, eliminating lumps and creating a dense yet airy mouthfeel. A proper blend of cream cheese and sour cream locks in moisture, preventing the dreaded dry crumb. The result is a cake that melts in your mouth like a cloud.
- Flavor: Vanilla extract is used in full measure to accentuate the natural tang of cream cheese, while the sour cream adds a subtle tang that balances richness. The rainbow sprinkles provide a sweet crunch that cuts through the dense filling. This harmony of flavors is why guests keep coming back for more.
- Visual Appeal: A glossy ivory base topped with a rainbow of sprinkles turns the cheesecake into a centerpiece. The contrast between the white filling and the bright jimmies makes it Instagram‑ready. Even the whipped cream topping has a fluffy cloud effect that invites photos.
- Ease of Execution: The recipe requires no fancy equipment—just a mixing bowl, a whisk, and a 9‑inch springform pan. The baking process is straightforward, with a single water bath that guarantees even cooking. Even novice bakers can follow along without fear.
- Make‑ahead Potential: This cheesecake can be assembled up to 24 hours in advance. The batter can be refrigerated, and the cake can be baked on the day of the event. This flexibility means you can focus on other party details.
- Crowd Reaction: The combination of a rich filling, crunchy sprinkles, and airy whipped cream creates a sensory experience that delights all ages. Guests rave about the contrast between the soft interior and the bright exterior. The cake becomes the highlight of any birthday party.
- Ingredient Quality: Using premium cream cheese and fresh sour cream elevates the flavor profile. The choice of unsalted butter allows you to control the saltiness. Quality ingredients make a noticeable difference in taste.
- Uniqueness: Few cheesecakes incorporate rainbow sprinkles in the batter, giving this version a playful twist. The combination of classic cheesecake and a pop‑of‑color element is rarely seen. It’s a cake that stands out in both taste and appearance.
Inside the Ingredient List
The Flavor Base
Cream cheese is the heart of any cheesecake, providing a rich, tangy foundation that carries the entire flavor profile. Using 24 ounces of softened cream cheese ensures a creamy texture that doesn’t separate during baking. If you skip this step and use a lower quality cheese, the cake will taste bland and watery. A good rule of thumb is to let the cream cheese sit at room temperature for at least 30 minutes before mixing.
The Texture Crew
Sour cream adds a subtle tang and keeps the batter moist, preventing the cake from drying out. The 1 cup of sour cream is crucial; if you reduce it, the batter will become too thick and may crack during baking. For a lighter version, you can swap sour cream with Greek yogurt, but be sure to whisk it thoroughly to avoid lumps. The eggs are the glue that binds everything together; using room temperature eggs ensures a smooth, lump‑free batter.
The Unexpected Star
Rainbow jimmies bring a playful crunch and a burst of color that transforms the cheesecake into a party centerpiece. The 1/2 cup of sprinkles is mixed into the batter just before pouring, so they’re evenly distributed throughout. If you’re a sprinkles skeptic, you can reserve a portion for topping the whipped cream instead. This small tweak keeps the interior smooth while still offering a decorative finish.
The Final Flourish
Whipped cream is the airy finale that balances the richness of the cheesecake. The 1 cup of whipped cream should be lightly sweetened with a teaspoon of powdered sugar for a subtle finish. If you’re a fan of extra flavor, fold in a splash of vanilla or a dusting of cocoa powder. The whipped cream also serves as a visual contrast, making the cake look more luxurious.
Everything's prepped? Good. Let's get into the real action...
The Method — Step by Step
- Preheat your oven to 325°F (160°C). Line a 9‑inch springform pan with parchment paper, ensuring it extends slightly above the edges. This step guarantees a smooth release once the cake cools. If you forget, you’ll end up with a stubborn cake that sticks to the pan.
- In a medium bowl, combine the Graham cracker crumbs, granulated sugar, and melted butter. Mix until the crumbs are evenly coated and resemble wet sand. This mixture forms the crust’s foundation, and a good crumb structure will give the cake a sturdy base. Press the mixture firmly into the bottom of the pan, using the back of a spoon to create an even layer.
- Allow the crust to set in the refrigerator for 10 minutes while you prepare the batter. The chilled crust will hold its shape during baking, preventing cracks. This is a perfect moment to grab a cup of coffee and enjoy the aroma of butter and sugar. The smell alone can lift your spirits.
- In a stand mixer, beat the softened cream cheese on medium speed until smooth and creamy. Add the sour cream, vanilla extract, and 2 tablespoons of sugar, continuing to mix until fully incorporated. The goal is a lump‑free batter; if you see any lumps, keep mixing until they disappear. A smooth batter ensures a silky texture in the finished cake.
- Add the eggs one at a time, beating on low speed after each addition. This technique prevents curdling and helps the batter emulsify. If you add too many eggs too quickly, the mixture can separate, leading to a grainy texture. Each egg should be fully incorporated before adding the next.
- Fold in the rainbow jimmies gently with a spatula. This ensures an even distribution of sprinkles without crushing them. The jimmies will be embedded throughout the cake, giving each slice a colorful surprise. Be careful not to overmix; you want the batter to remain light.
- Pour the batter over the chilled crust, smoothing the top with a spatula. The batter should be poured in a single layer to avoid unevenness. If you notice any gaps, fill them in with a small spoon. This step is crucial for a uniform rise.
- Place the springform pan into a larger baking dish. Fill the dish with hot water until it reaches halfway up the sides of the pan. This water bath keeps the batter from drying out and prevents the top from cracking. If the water level is too low, the cake may dry; too high, and it may overflow.
- Bake for 50 minutes, or until the center is set but still slightly jiggly. The edges should be just starting to pull away from the pan. If you’re unsure, insert a toothpick; it should come out with a few moist crumbs. This timing is essential to avoid overbaking, which leads to a dry texture.
- Turn off the oven, crack the door open slightly, and let the cheesecake cool in the oven for 1 hour. This gradual cooling prevents cracking caused by sudden temperature changes. After the hour, remove the cheesecake from the oven and let it cool completely on a wire rack. Cooling at room temperature preserves the smoothness of the filling.
- Refrigerate the cheesecake for at least 4 hours, preferably overnight, to set the flavors fully. The chilling step allows the cream cheese to firm up, creating a dense yet creamy texture. If you’re short on time, a 2‑hour chill can suffice, but the flavor will be less pronounced.
- Before serving, top the cheesecake with a generous swirl of whipped cream. Use a spatula to create a decorative swirl that resembles a cloud. The whipped cream adds a light, airy contrast to the dense cake. If you prefer, sprinkle a few extra rainbow jimmies on top for a festive finish.
That's it — you did it. But hold on, I've got a few more tricks that'll take this to another level. These insider tips will ensure your cheesecake not only looks amazing but also tastes like a masterpiece.
Insider Tricks for Flawless Results
The Temperature Rule Nobody Follows
Many bakers bake at 350°F, but this recipe calls for 325°F to prevent the top from over‑browning while the center remains creamy. Lower heat also reduces the risk of cracks. Keep the oven door closed as much as possible to maintain a steady temperature. A stable environment is the secret to a flawless rise.
Why Your Nose Knows Best
If the cheesecake starts to smell like burnt sugar, it’s a sign the water bath is too hot. Let the water cool to just below boiling before adding the pan. A gentle simmer keeps the batter from overcooking. Trust your nose; it’s a reliable indicator of oven performance.
The 5‑Minute Rest That Changes Everything
After removing the cake from the oven, let it rest for exactly 5 minutes before turning the oven off. This brief pause allows the steam to settle, preventing the cake from cracking. Think of it as a moment of calm before the grand finale. A quick rest makes a world of difference.
The Perfect Whipped Cream Swirl
To create a flawless swirl, chill your mixing bowl and beaters for 15 minutes before whipping. Cold equipment ensures the cream stays fluffy. Add a pinch of sea salt to balance the sweetness. A well‑whipped topping elevates the overall experience.
The Crumb‑Free Crust Trick
Press the crust mixture into the pan with a flat glass, not a spoon. The glass compacts the crumbs evenly, preventing holes. If you’re impatient, let the crust sit in the fridge for 20 minutes to firm up. A tight crust keeps the filling in place.
The Final Touch of Sprinkles
Reserve a handful of jimmies for the top. Sprinkle them over the whipped cream for an extra pop of color. The contrast between the creamy topping and the bright sprinkles adds visual excitement. It also makes the cake feel like a celebration.
Creative Twists and Variations
This recipe is a playground. Here are some of my favorite ways to switch things up:
Chocolate‑Infused Delight
Swirl in 1/4 cup of melted dark chocolate into the batter before baking. The chocolate adds depth and a hint of bitterness that balances the sweetness. It also gives the cake a rich, chocolatey aroma that’s hard to resist. Chocolate lovers will applaud this subtle twist.
Berry‑Burst Surprise
Fold in 1 cup of fresh blueberries or raspberries after whisking the eggs. The berries burst with juice, creating pockets of flavor in each bite. They also add a pop of color that makes the cake even more inviting. This version is perfect for spring birthdays.
Citrus Zest Twist
Add the zest of one lemon or orange to the batter for a bright, citrusy note. The zest complements the cream cheese’s tang, giving the cake a refreshing lift. It’s a great way to bring a seasonal flavor to a year‑round favorite. The citrus aroma is instantly uplifting.
Almond Crunch Variation
Replace half of the graham cracker crumbs with almond flour for a nutty undertone. The almond flour adds a subtle crunch that pairs well with the creamy filling. It also gives the crust a slightly firmer bite. This version is ideal for those who love a nutty flavor profile.
Minty Fresh Edition
Add 1 teaspoon of peppermint extract to the batter for a cool, minty finish. The mint pairs wonderfully with the chocolate swirl if you decide to add chocolate. It also gives the cake a refreshing aftertaste. Mint lovers will find this variation irresistible.
Caramel Swirl Surprise
Drizzle 1/4 cup of caramel sauce into the batter before pouring. The caramel creates a sweet, buttery swirl that looks stunning. It also adds a caramelized flavor that pairs well with the cream cheese. This version is perfect for those who adore caramel.
Storing and Bringing It Back to Life
Fridge Storage
Wrap the cheesecake tightly in plastic wrap and store in the refrigerator for up to 5 days. The cold environment keeps the filling firm and prevents bacterial growth. When you’re ready to serve, let it sit at room temperature for 15 minutes to soften slightly. A quick chill will preserve the texture.
Freezer Friendly
For longer storage, wrap the cheesecake in two layers of foil and freeze for up to 2 months. Thaw overnight in the refrigerator before serving. The freezing process may slightly alter the texture, but the flavor remains intact. This option is perfect for planning ahead.
Best Reheating Method
If you need to warm the cheesecake, place it in a preheated oven at 300°F for 10 minutes. The gentle heat restores the softness without drying it out. Add a tiny splash of water before reheating; it steams back to perfection. This trick keeps the cake moist and delicious.