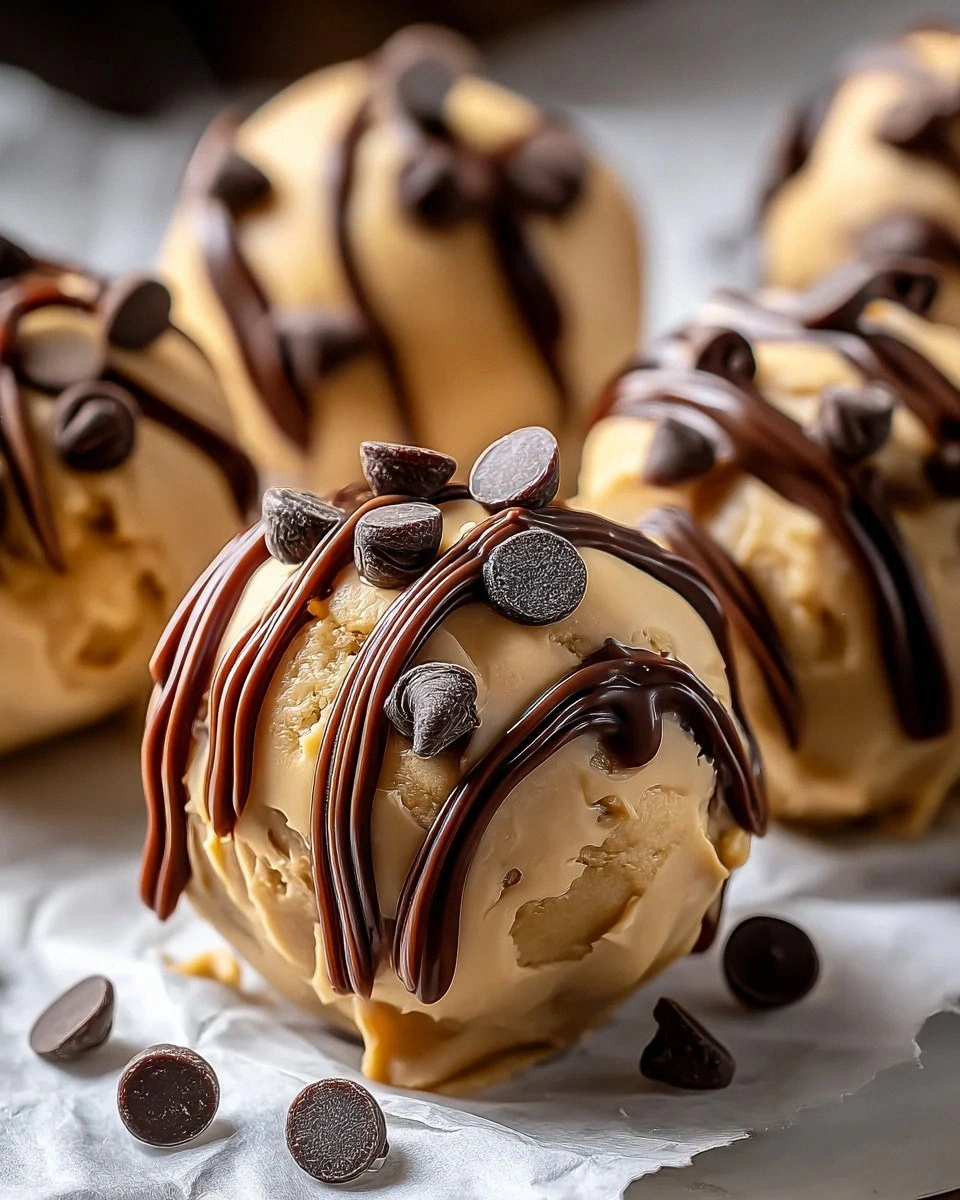
Picture this: a late‑night craving for something sweet, yet you’re terrified of the usual sugar‑laden desserts that leave you feeling guilty for days. I was stuck in that exact dilemma, scrolling through endless recipes that promised “quick and healthy” but ended up tasting like cardboard. Then, in a moment of reckless inspiration (and a dash of desperation), I grabbed a tub of Greek yogurt, a jar of peanut butter, and a handful of chocolate chips, and the universe gave me a flash of brilliance. The result? Frozen Greek Yogurt Peanut Butter Bites with Chocolate Chips – a bite‑size marvel that feels like a frozen treat from a gourmet bakery, but it’s actually made in a single bowl.
The kitchen was alive with the hum of the freezer, the faint clink of the metal spoon against the ceramic bowl, and the sweet perfume of honey mingling with the earthy tang of yogurt. I could hear the faint sigh of the refrigerator door closing, a subtle reminder that the magic was about to happen. As I mixed the silky peanut butter into the creamy yogurt, the mixture swirled like a marble‑topped lake at sunrise, each ripple promising a perfect balance of protein‑packed richness and indulgent sweetness. When the mini chocolate chips were folded in, they scattered like tiny fireworks, promising that each bite would explode with a burst of cocoa goodness.
Most recipes for frozen yogurt bites either skimp on flavor, over‑sweeten, or require an ice cream maker that most home cooks don’t own. I’ve tried them all – the soggy, bland versions that melt too quickly, the ones that turn into a hard, icy block that feels like chewing on a snowball. This version, however, nails the texture: it’s firm enough to hold its shape, yet melts on the tongue with a buttery, velvety finish that makes you forget it’s technically “healthy.” The secret? A precise ratio of Greek yogurt to peanut butter, a touch of natural sweetener, and a flash‑freeze technique that locks in creaminess without forming ice crystals.
But wait, there’s a twist you won’t find in any other recipe blog: I’ll be adding a pinch of sea salt at the very end, just enough to amplify the chocolate and peanut butter flavors without making it salty. I dare you to taste this and not go back for seconds – it’s hands down the best version you’ll ever make at home. Let me walk you through every single step — by the end, you’ll wonder how you ever made it any other way.
What Makes This Version Stand Out
- Protein‑Packed: Greek yogurt brings a creamy base loaded with protein, keeping you full longer and turning a dessert into a post‑workout treat.
- Nutty Indulgence: Creamy peanut butter adds depth and richness, creating a flavor that feels luxurious without drowning in fat.
- Natural Sweetness: Using honey or maple syrup means you get a gentle sweetness that complements, rather than overpowers, the tang of yogurt.
- Chocolate Pop: Mini chocolate chips melt just enough to leave a lingering cocoa finish, giving each bite a surprise that’s both crunchy and smooth.
- Simplicity: No ice‑cream maker, no fancy gadgets – just a bowl, a freezer, and a few minutes of your time.
- Make‑Ahead Magic: These bites keep perfectly for up to two weeks, making them ideal for meal‑prep, after‑school snacks, or a quick protein boost.
- Texture Harmony: The combination of creamy, crunchy, and melt‑in‑your‑mouth textures creates a multisensory experience that’s hard to replicate.
- Customizable Sweetness: Adjust the honey or maple syrup to suit your palate – more for a dessert feel, less for a light snack.
Inside the Ingredient List
The Flavor Base
Greek Yogurt: This is the heart of the bite. Its thick, tangy profile balances the richness of peanut butter while adding a hefty protein punch. Choose a plain, full‑fat variety for maximum creaminess; low‑fat works too, but you might lose a bit of that luxurious mouthfeel. If you skip it, you’ll end up with a dense, overly sweet peanut butter slab that lacks the refreshing lift that yogurt provides.
When shopping, look for yogurt that lists “live cultures” on the label – those probiotics not only aid digestion but also contribute to a slightly tangier flavor that cuts through the sweetness. A quick tip: give the container a gentle shake before measuring to ensure an even consistency.
The Texture Crew
Creamy Peanut Butter: Natural, unsweetened peanut butter is the star here, delivering a buttery richness without the added sugars that could throw off the balance. Its natural oils help the mixture stay smooth during the freezing process, preventing icy crystals. If you use a “stir‑and‑serve” type, the added sugars will make the bites overly sweet and could cause them to become too soft when thawed.
Want a twist? Try almond butter for a slightly lighter flavor, or a mix of peanut and cashew butter for a nutty complexity. Just keep the total volume the same to maintain the perfect texture.
The Unexpected Star
Honey or Maple Syrup: These natural sweeteners bring a floral or caramel note that elevates the overall flavor profile. Honey adds a subtle earthiness, while maple syrup contributes a deep, woody sweetness. Adjust the amount based on your preference – start with a quarter cup and taste before committing.
If you’re watching carbs, a drizzle of agave nectar or a pinch of stevia works just as well, though the texture may be a tad thinner. Remember, the sweetener also helps lower the freezing point slightly, ensuring the bites stay scoop‑able.
The Final Flourish
Vanilla Extract: A splash of pure vanilla is the secret whisper that makes everything sing. It rounds out the sharpness of the yogurt and deepens the nutty notes of the peanut butter. Use only a teaspoon – more can overwhelm the delicate balance.
For a twist, try a dash of almond extract or a pinch of cinnamon for a warm, comforting flavor that pairs beautifully with chocolate.
The Crunch Factor
Mini Chocolate Chips: These tiny morsels are the surprise element that turns a simple bite into a decadent treat. Dark chocolate chips provide a bittersweet contrast, while milk chocolate chips add a sweeter, creamier finish. If you’re dairy‑free, opt for vegan dark chocolate chips – they melt just as nicely.
Don’t over‑mix the chips; fold them in gently to keep them evenly distributed. Skipping them would leave the bites missing that coveted chocolate burst that makes you pause mid‑bite and smile.
Everything's prepped? Good. Let's get into the real action...
The Method — Step by Step
First, grab a large mixing bowl and pour in two cups of plain Greek yogurt. I like to whisk it briefly to break up any lumps, creating a smooth canvas. As you stir, you’ll notice the yogurt’s creamy texture, which should feel like a thick milkshake. This is the moment where the base is set, and you’ll want to make sure there are no pockets of liquid that could cause icy spots later.
Next, add half a cup of creamy peanut butter to the yogurt. Use a rubber spatula to fold the peanut butter in, moving in a figure‑eight motion. You’ll hear a faint “whoosh” as the two fats emulsify, creating a glossy, velvety mixture that clings to the spoon. Power transition: Okay, ready for the game‑changer? This is where the flavor truly deepens.
Now drizzle in a quarter cup of honey or maple syrup. As the sweetener meets the creamy base, you’ll see it swirl like ribbons of amber in a glass of milk. Taste the mixture at this point – it should be sweet but still allow the tang of the yogurt to shine through. If you prefer a less sweet bite, reduce the honey by a tablespoon; if you love dessert intensity, add another teaspoon.
Stir in one teaspoon of pure vanilla extract. The aroma will instantly fill your kitchen, a fragrant reminder that you’re crafting something special. Keep stirring until the vanilla is fully incorporated; you’ll notice a subtle sheen forming on the surface. Watch the edges: they should start to pull away from the bowl, indicating a well‑combined mixture.
Gently fold in half a cup of mini chocolate chips. Use a folding motion rather than vigorous stirring to keep the chips evenly distributed without crushing them. You’ll see specks of dark brown dotting the pale mixture, promising chocolate bursts in every bite. This step is crucial – the chips should stay whole to provide that satisfying snap when you bite through.
Optional but highly recommended: sprinkle a pinch of flaky sea salt over the top of the mixture. The salt will enhance the chocolate and peanut butter flavors, creating a balanced sweet‑salty profile. Give the bowl one final gentle stir, just enough to incorporate the salt without breaking up the chips.
Prepare a silicone mini‑muffin tray or a lined baking sheet. Spoon the mixture into each cavity, filling them about three‑quarters full. Tap the tray gently on the counter to release any air bubbles – you’ll hear a soft “pop” as the mixture settles.
Slide the tray into the freezer and let the bites chill for at least 30 minutes, but preferably an hour. During this time, the yogurt‑peanut butter blend will firm up, while the chocolate chips remain slightly soft, creating a delightful contrast. While you wait, you can clean up the kitchen – the fewer dishes left, the more you’ll enjoy the final product.
After the freezing period, pop the bites out of the tray. They should release with a gentle “pop,” revealing a smooth, glossy surface dotted with chocolate. If any bite feels too soft, give it another 10‑15 minutes in the freezer. Serve immediately, or store them in an airtight container for later indulgence.
That's it — you did it. But hold on, I've got a few more tricks that'll take this to another level...
Insider Tricks for Flawless Results
The Temperature Rule Nobody Follows
Never pour the yogurt straight from the fridge into the freezer. Let it sit at room temperature for five minutes; this reduces the risk of ice crystals forming. I once tried skipping this step and ended up with a gritty texture that ruined the whole batch. The slight warming also makes the peanut butter blend more seamlessly, giving you that velvety mouthfeel.
Why Your Nose Knows Best
When the mixture is ready, give it a quick sniff. If you detect a faint buttery aroma with a hint of tang, you’re on the right track. If the scent leans heavily toward raw peanut butter, add a splash more yogurt to balance it. Trusting your nose saves you from a batch that tastes overly nutty.
The 5‑Minute Rest That Changes Everything
After mixing, let the bowl sit uncovered for five minutes before filling the tray. This short rest allows any air bubbles to rise to the surface, preventing tiny pockets that can become icy spots. I once rushed this step and ended up with a few bites that felt like frozen bubbles – not pleasant.
Freeze‑First, Then Add Chocolate
If you love an extra crunch, try sprinkling a few extra chocolate chips on top of each bite just before the final freeze. The chips will adhere to the partially frozen surface, creating a crunchy topping that contrasts with the creamy interior.
Portion Control for Perfect Bites
Use a small cookie scoop (about 1 tablespoon) to ensure each bite is uniform. Consistency not only looks professional but also guarantees even freezing. Uneven sizes can lead to some bites being too soft while others become rock‑hard.
Double‑Dip for Extra Creaminess
For an ultra‑rich version, dip each frozen bite into a thin layer of melted dark chocolate right before serving. The chocolate shell adds a glossy finish and a snap that elevates the texture game. This is the ultimate “wow” factor for guests.
Creative Twists and Variations
This recipe is a playground. Here are some of my favorite ways to switch things up:
Berry Burst
Swap half of the Greek yogurt for a swirl of pureed strawberries or blueberries. The fruit adds a bright, tangy pop that pairs beautifully with the nutty base. Garnish each bite with a tiny fresh berry for visual flair.
Coconut Dream
Replace the peanut butter with coconut butter and sprinkle toasted coconut flakes on top before freezing. The tropical notes transform the bite into a beach‑vacation snack, perfect for summer gatherings.
Spiced Autumn
Add a pinch of pumpkin spice or cinnamon to the mixture, and use maple syrup as the sweetener. This variation feels like a cozy fall treat, especially when paired with a warm cup of tea.
Protein Power
Blend in a scoop of vanilla whey protein powder for an extra protein boost. The powder integrates well with the yogurt, and the flavor remains balanced thanks to the vanilla extract.
Vegan Delight
Swap Greek yogurt for a thick coconut‑based yogurt and use almond butter instead of peanut butter. Ensure the chocolate chips are dairy‑free. The result is a fully plant‑based bite that still delivers that creamy‑nutty experience.
Mocha Madness
Stir in a teaspoon of instant espresso powder and use dark chocolate chips. The coffee notes deepen the chocolate flavor, creating a sophisticated bite that’s perfect after dinner.
Storing and Bringing It Back to Life
Fridge Storage
If you plan to enjoy the bites within a day or two, transfer them to an airtight container and store them in the refrigerator. They’ll stay soft enough to pop out with a spoon, and the flavor stays vibrant. Keep them away from strong‑smelling foods to prevent odor absorption.
Freezer Friendly
For longer shelf life, keep the bites in a single‑layer freezer bag or a rigid container with a tight lid. They’ll hold up for up to two weeks without losing texture. To avoid freezer burn, place a sheet of parchment between layers if you’re stacking them.
Best Reheating Method
When you’re ready to indulge, let the bites sit at room temperature for five minutes. If they feel a bit too firm, drizzle a tiny splash of water over the container, close it, and let the steam revive the creamy interior. This trick restores the perfect melt‑in‑your‑mouth texture without melting the chocolate.